Boilers are solid and sturdy. Although they are complex, they are built in a way that doesn’t require them to undergo regular repairs and maintenance. That’s probably one of the best things about a new boiler. But what if you have an old boiler at your place that has stopped working as it used to? If such are your concerns, here are some solutions for common boiler problems. Don’t forget to consult your home warranty provider to enlist and pay for a certified technician if the problems seem a bit too serious for you to DIY.
An issue called kettling
If you have had your boiler repaired a couple of times already, you will know about kettling. It is a major problem that is common to the most boilers. You can recognize it by the sound your boiler makes. If you hear loud banging or rumbling from your boiler, it’s kettling.
This problem is caused due to an excess of minerals in your water supply. They get deposited in your boiler and cause changes in pressure levels in your tank. If any such thing happens to your boiler, we recommend you seek professional help since it could be dangerous to try to solve it by yourself. You can always call the boiler repair technician before it becomes a bigger problem. Getting a new boiler could save you time and money in the long run.
Matters with dripping and leaking
Sometimes people freak out when they see their boiler dripping water. They think their boiler is cracked somehow and hurry to call the boiler repair technician. In some cases, this may be a reason for serious concern, but boilers often leak just because of condensation.
You can wipe the surface and see if it is just condensation on your boiler or if it is actually leaking. If it is just condensation, you can relax; however, if it is a major leak from your main tank, you need to call a boiler repair company before it is too late.
Pilot problems
The pilot light has evolved. Nowadays, it is not the same thing from the past when it used to be a tiny flame that ran all day, ensuring that heat was always available. These days it’s electronic ignition, a technologically advanced method of sensing temperature and igniting the boiler when necessary.
You need to check which kind of boiler you have. If it is an old one, you probably have the old flame pilot, and you need to light it on yourself when it goes out. If you have an advanced electronic ignition pilot that is malfunctioning, you will need to call the heating technicians to diagnose the pilot and fix the ignition system issues.
Issues with the heating
Sometimes our boilers stop heating properly. No heat calls from the boiler are found on the main control panel, and an alarm sound can accompany them. When you hear such alarms, it could be a minor problem with the pilot or a more complicated situation such as issues with the safety switch, a pump or a malfunctioning thermostat. In any case, you should fix these issues immediately. The best thing to do is to call a professional technician.
Final thoughts
You can always learn from the experts when they come to your place to solve boiler issues. Having the knowledge can help you save time and money by being able to fix the problem yourself.
But if you do not know what to do, never attempt to meddle with your boiler. You may put your life at risk. In such cases, you must call a qualified heating technician or consider a boiler repair company.
You may already know that your HVAC system is probably one of the most expensive components you will buy for your home or business property, and it’s essential to get it right! Air conditioning and heating are essential, after all – according to Consumer Reports, over 75 percent of homes in the US use air conditioning, and a whopping 90 percent of newly-built properties feature centralized air conditioning systems! The system you choose must not just be efficient and enough to make your home or place of business a comfortable environment all year through – it has to be reliable and has a long lifespan. And choosing the proper one can be intimidating – what specs should you look for in the first place? We’ve made it easier for you, so here’s your essential guide to selecting the right HVAC system: the top factors to consider.
The types
HVAC systems refer to technology that lets you regulate the atmosphere of a home or building. HVAC stands for Heating, Ventilation, and Air Conditioning, and with a proper HVAC system, you can control the cooling and heating elements and have the ideal temperature in a room or space.
There are four kinds of HVAC systems; namely split, hybrid, ductless, and packaged. Your HVAC installer, such as experts in AC repair in Aurora IL, like McNally’s HVAC, recommends choosing the system suitable to your budget and needs. For instance, the split system is divided into a heating and a cooling system, which is the most common. The hybrid HVAC system is more advanced, and it has more efficiency with its hybrid heater. On the other hand, the ductless has an AC outdoors and a heat pump for both cooling and heating, while the packaged system offers both all in one unit and is commonly used in places without basements.
Top factors that should influence your choice
Efficiency
The systems used for HVAC have tremendously improved, and this is especially true today. The efficiency of such systems is shown by the rating they have, with the higher rating meaning the most efficient. There are several system ratings, the most prominent being the SEER (Seasonal Energy Efficiency Ratio), but there is also the AFUE, the EER, and the HSPF. For the rating on SEER, you should look for an efficiency rating of a minimum of 15.
Air quality and temperature
The comfort of your home or business property is of prime importance, so the various cooling and heating components should be assessed for how they will impact your energy consumption, the temperature indoors, and the air quality. Doing a bit of research goes a long way in determining these variables, and you can then decide which system works best at decreasing humidity.
The capacity
The system you choose should be able to effectively cool and heat the space, and in measuring the capacity, look at the British Thermal Unit (BTU). In general, the higher the British Thermal Unit, the bigger the capacity.
Your budget
Of course, you want to be able to get the least expensive option, provided it offers the most outstanding comfort. But while you consider this, think about other factors such as durability and energy efficiency.
Summer is right around the corner and in the weeks leading up to the season of outdoor fun, more homeowners are taking on outdoor home improvement projects in preparation. There are many things you could do to your home to make it ready for entertaining during the summer, but these are five of the most sought after improvements buyers are looking for in 2022. Even folks that are building a new house are including these projects with their construction plans.
Let’s take a look at the top five outdoor home improvements homeowners and buyers alike are championing in 2022.
1. Outdoor workspaces
Remote work is here to stay, at least in some capacity, and homeowners are embracing it 100%. Those who are lucky enough to work remotely are moving away from the makeshift office in their dining rooms and are building a workstation outside. These workstations come in the form of a converted garden shed, a covered patio, or a simple setup near an outlet and shade.
2. Structured outdoor living spaces
Homeowners are embracing patios, decks, and screened-in porches as an additional living space that people actually want to spend time in. These outdoor living spaces aren’t like your parent’s decks, complete with white plastic chairs and picnic tables. Folks are building spaces that feature built-in seating, an overhead covering, and so much more – all in the name of summer fun!
3. Patterns on surfaces
Patterns can brighten up any space, and that includes outdoor living spaces. We’re seeing bold area rugs on decks, brightly colored fabrics on patio furniture, and some homeowners are going so far as to use stencils to spruce up plain concrete slab patios.
4. Stylish seating arrangements
Homeowners are upgrading their outdoor furniture for sets that blur the line between indoor furniture and patio furniture. The name of the game here is to marry the comfort and style of indoor furniture with the weather-resistance and quality of outdoor furniture. People are going so far as to combine textures like rattan and wicker with the bold patterns we mentioned above for a look that is trendy and resilient.
5. Backyard oasis
The backyard is more than just an extra lawn that needs to be maintained. Homeowners see their backyards as a place to kick back, relax, and enjoy the moment. They’re turning the simple backyard into a backyard oasis that makes them feel like they’re away on vacation without ever purchasing a plane ticket. To achieve that, we’re seeing homeowners invest in water features, chaise lounge chairs, pools, and even spas – all in the name of creating the ultimate getaway at home.
Homeowners all over the country are embracing outdoor living spaces as an extension of their homes and they’re taking on upgrade projects now more than ever. They’re building decks, patios, and porches. They’re decorating these spaces with furniture and decor that is both weather-resilient and comfortable. They’re adding touches like pools and spas to create their perfect summer oasis.
And for buyers, these improvements are exactly what they’ve been looking for!
In the 21st century, people are devising ways to make their working/ resting space as comfortable as possible. And that involves keeping the environment cools regardless of the unpredictable environmental conditions. And that’s where Air conditioning units come in handy. Air conditioning is the process of removing heat or thermal energy from a physical space to make it more comfortable for the people in that space.
Read below to learn how an AC unit works, its origin, and the future of these systems.
How Do Air Conditioners Work?
The compressor is the system’s engine, drawing in warm air and pressurizing it to raise its temperature. Then, the compressed gas makes its way through a series of tubes called an evaporator coil. As this coil extracts heat from the surrounding air, the fluid inside it changes from liquid to gas, simultaneously absorbing heat and cooling off. The cooled gas then travels through the second set of tubes that decompress and cool it back into liquid form, making it ready to begin again. The result is that your home or office is cooled by air conditioning when two things happen. The air temperature is lowered, and the humidity of the air is lowered via a process called dehumidification.
What’s the Origin of Air Conditioners?
It was invented in 1902 by Willis Carrier to solve a problem at a printing plant in Brooklyn, New York. In 1902, a young engineer named Willis Carrier had a problem to solve. He was employed by a printing plant in Brooklyn, New York, specializing in high gloss paper and magazines. The heat and humidity of the city’s summers were causing the glossy pages of these publications to stick together, ruining expensive batches of magazines. Carrier set out to invent something that could control humidity levels throughout his employers’ publishing houses, and this invention became what we now know as air conditioning or AC.
You may be wondering why controlling humidity is crucial to us today. It’s mostly used to cool us off. Our bodies cool down when sweat evaporates from our skin. When the air around us is humid or full of moisture, it takes longer for our sweat particles to evaporate into the air. That’s because many water particles are present in the air, making it harder for them to move from our skin into the space around us.
It’s a powerful technology that has saved millions of lives around the world
With the recent boom in remote working, a lot of people around the world live comfortably indoors thanks to AC. And its impact goes far beyond comfort. The use of air conditioning has made it possible for many people to survive a number of different medical procedures and hospital stays that would otherwise have been too dangerous.
The truth is, the future for A/C units is bright, especially because humans continue finding ways to adapt and improve their environment using technology. The future will certainly include advanced AC units.
Indoor air conditioning units aren’t going anywhere
While we will likely see changes in the air conditioner industry with the advent of new technologies, we will not wave goodbye completely to the indoor air conditioner anytime soon. People rely on their home and office AC units to keep them comfortable in environments that would otherwise be hot and stuffy.
A similar reliance exists when it comes to transportation. Cars, trains, and other forms of mass transit are used by billions of people worldwide every day, so it’s reasonable to assume that many of these vehicles will have AC units installed in them for the foreseeable future.
It is also integral to many industrial processes like pharmaceutical manufacturing.
Besides, AC systems are at home in computer servers as well as other power systems, including transmission lines for electric power grids and battery storage systems for renewable energy sources like wind turbines or solar panels.
Artificial intelligence will make air conditioning even better
In the future, artificial intelligence could create an easier experience for homeowners to optimize their cooling systems. For example, if you’re a parent who works full-time and doesn’t get home until 6 PM, your AI assistant can program your AC unit to begin cooling the house around 4 PM, when you usually leave work. Your AC will also know that it should be cooler at 5:45 PM on a specific day because your child probably has dance practice and normally arrives home sweaty.
On hot days in the summer or cold days in the winter, your AC could monitor the weather forecast and adjust accordingly. It might also know that this week is spring break and reduce energy usage or turn off entirely during hours when no one is likely to be home.
With AI technology embedded directly into our homes, we can control our living environment.
Right now, the experts are working on systems that can save even more energy by making more precise decisions about when AC should be used
The application of artificial intelligence and machine learning approaches to construct controls for buildings and HVAC systems is a particularly fascinating area of development, Pope says. We’re currently developing systems that can learn from prior performance and make smarter decisions about whether to run the air conditioner or switch off the lights. This technology will make our air conditioning even smarter and more efficient, and it will most likely happen in the background for you.
We’re just getting started with smart home technology
Innovative home technology has been on an upward trajectory for years, and it will continue to advance as we start to see the benefits of tech integration. We’re only just starting to understand the potential of the internet of things, which allows us to connect devices in our homes and control them remotely. This kind of infrastructure enables us to make continuous improvements that will make a huge difference in our day-to-day lives.
Based on what is happening on the ground, within a few years, building intelligent home technology will be commonplace worldwide. In fact, we’ll see some pretty big advancements in the near future as companies continue building better products. With recent product launches like Amazon’s Alexa and Google Home, it looks like smarter homes are headed towards becoming the new normal.
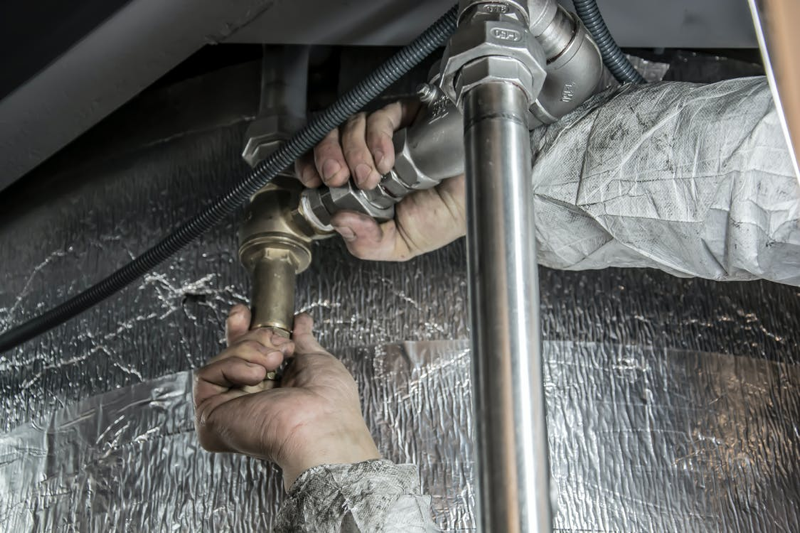
Have you ever been away from home for a few days to return to a plumbing nightmare such as a flooded basement? Many homeowners have experienced the terror of a plumbing emergency, and it’s no fun.
The good news is that most plumbing emergencies are avoidable if you take precautions. Know your plumbing basics, such as the location of the main water shut-off valve and the water meter. Regularly check the entire unit for leaks or worn-out parts. Here’s how to avoid plumbing emergencies.
Always Carry Out Regular Inspections
Have an expert plumbing & HVAC services provider conduct regular system inspections to avoid nasty surprises. Schedule the exercise at least once a year. The effort detects potential issues and nips them before developing into full-blown emergencies. The expert may recommend replacing certain plumbing system parts, such as corroded pipes and worn-out washers.
Check for Leaks
Household leaks waste an estimated 180 gallons of water per week. Don’t ignore the faucet dripping for weeks or the mold growth near the water heater. Regularly check for leaks and repair them as soon as possible to avoid further damage.
Don’t Flush Non-biodegradable Items
Flushing objects such as diapers, sanitary napkins, and paper towels down the toilet can cause plumbing issues. They clog pipes and drain systems causing extensive damage. Only flush biodegradable items such as human waste and toilet paper to avoid problems. Additionally, refrain from pouring grease or cooking oil down the sink as it hardens and blocks the pipes.
Keep Your Drains Clean
Clogged drains are one of the most common plumbing issues. They often occur in the kitchen sink due to grease and food particles building up over time. To unclog a drain, use a plunger or an auger. You can also try a natural drain cleaner with enzymes to break down the clog. Pour hot water, vinegar, and baking soda down the drain regularly to keep it clear.
Never pour coffee down the drain. Coffee grounds build up over time and clog your drains. If you must pour coffee down the drain, mix it with hot water first to break it down. Better yet, compost the coffee grounds.
Check Appliances Regularly
Regularly check water-using appliances such as the washing machine, dishwasher, and water heater for leaks. Look out for signs such as pooled water around the device, musty smells, and mold growth. Regular maintenance prevents serious issues such as a burst washing machine hose which can cause extensive flooding.
Other than this, keep an eye on the water pressure. If it’s too high, it could damage your pipes. A decreased water pressure indicates a leak, clogs, or corrosion in the system.
Keep The Gutters Clear
Gutters full of leaves and debris can cause water to overflow and seep into your home’s foundation. This could lead to severe issues such as flooding and water damage. Clean the gutters at least twice a year, in the fall and spring. If you live in an area with many trees, do it more often. The effort protects the roof as well. Poor drainage causes water to seep under the shingles leading to rot.
Be Careful With Chemicals
Household cleaning chemicals can damage your plumbing system. They contain harsh ingredients that eat away at the pipes and cause corrosion. When using these products, always follow the manufacturer’s instructions. Additionally, store them properly to avoid any accidents. Keep them out of reach of children and pets.
Besides this, check whether you have hard water. The water contains high levels of minerals such as magnesium and calcium. Over time, these minerals build up and clog the pipes. They can also cause corrosion. Install a water softener to protect your plumbing system if you have hard water.
Liaise With Professionals
Plumbing emergencies can be stressful as they happen when least expected. Always have a professional’s contacts. The expert will have the necessary tools and experience to fix any plumbing issue correctly. Most importantly, they’ll offer speedy solutions.
Experts spot potential problems and offer preventative measures. They’re also insured, assuring you of maximum protection to your property. Although the service costs money, it’s worth it.
Glazing materials make or break greenhouses. Generally, they enable greenhouses to protect plants from fluctuating temperatures, shifting light levels, and changing precipitation. They also protect the structure from harsh weather. So, when choosing a glazing material, you may have to consider your location, needs, and budget. You may also need to think about the prevailing weather patterns in your place.
Suppose you’re planning to build your first-ever greenhouse. In that case, you may need to know the best greenhouse glazing materials. Doing so will help you identify the different options suitable for your needs, budget, and location. For that purpose, here’s an article to guide you. So, read on!
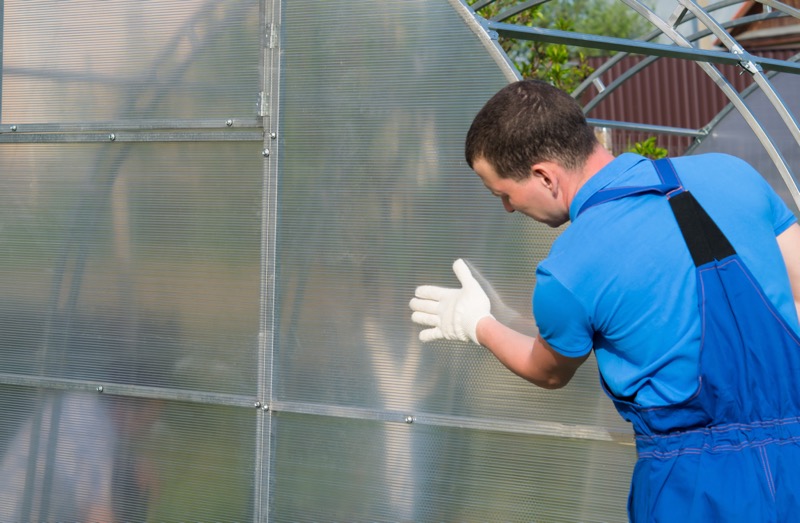
1. Polycarbonate Greenhouses
Growing vegetables in greenhouses made of transparent polycarbonate
Polycarbonate greenhouses use polycarbonate glazing. This is the safest type of glazing, as it’s made from plastic, so there’s no risk of smashed glass causing harm to anyone by accident. Swgreenhouses.co.uk sell polycarbonate greenhouses in the UK, including a range of both aluminium framed and wooden framed greenhouses.
The type of greenhouse frame you choose depends on your garden and personal needs; wooden is more traditional but heavier and expensive, whereas aluminium is more modern and cheaper. You should consider the type of plants you wish to grow as well as polycarbonate is slightly translucent compared to greenhouse glass, which is transparent.
Polycarbonate glazing is also known for its better light diffusion and UV protection. Many polycarbonate greenhouses are quicker to install compared to the traditional structures. Furthermore, they come in various shapes and sizes. You may find a lot of inexpensive polycarbonate greenhouse materials, making your greenhouse construction manageable. In addition, polycarbonate is more sustainable than other standard options.
To keep the polycarbonate greenhouse in good condition, you may need to clean it regularly. You may use a broom, dish soap, and squeegee window cleaner for this. These tools can help remove the debris and leaves on the floor and shelving. After cleaning, you may use a microfiber towel to ensure that the glass is free from blemishes.
2. Glass Greenhouses
Glass greenhouses, on the other hand, have a luxurious appeal, ideal for residential and commercial greenhouses and better garden ideas. They’re also a durable structural framing and highly resistant to UV radiation, making them ideal for greenhouse plants. Glass greenhouses are also less dependent on lighting as they could allow 80% or more light transmission.
If you prefer glass glazing materials, you may need to know more of the following types:
Floated
This type of glazing material is scratch-free and is characterized by even surfaces.
Insulated
If you’re looking for a glass with insulating properties, you may consider this option. It’s energy-efficient and reductive against heat loss and gains.
Low-Iron
If you prefer optimal light transmission, you may choose low-iron glass.
Safety
Shatter-proof safety glasses are known for their heat and impact resistance and UV protection.
The biggest drawback of glass greenhouses is their fragility. Although glass glazing products have different brittleness, most of them can’t withstand extreme weather elements, such as winds and hails. Because of this, many consider glass greenhouses expensive and challenging to maintain.
3. Plastic Film Greenhouses
Blossom of strawberry plants growing in outdoor greenhouse covered with plastic film
Plastic film greenhouses use polyethylene products as the structure’s covering. Typically, it’s less expensive than other glazing materials. They also allow controlled diffusion and top-notch light transmission. Most plastic films contain photo-selective qualities that could absorb or reflect particular light wavelengths, adjusting the light that passes through them.
However, plastic films are also known to degrade after being exposed to extreme heat for an extended time. They’re more prone to tear and wear, abrasion, and scratches, leading to early replacement and extra expenses.
In cleaning plastic films, you may use an oxygen bleach solution. Place a small amount of the solution on a spotless rag and use it to wipe the film in a circular motion to prevent them from blurring. You may need to use 6-millimeter-thick types for the best plastic film installation as they’re more durable.
4. Fiberglass Greenhouses
workers in blue uniforms, checking the correct installation of the greenhouse and polycarbonate on it.
Fiberglass types are durable and highly insulating. They’re also lighter than glass and are not as costly as the other alternatives. These glazing materials are also customizable since they’re easy to cut and install. Furthermore, they allow ample light transmission for plant growth.
However, fiberglass can turn yellow after a particular time, making it less transparent. Also, it tends to blur and become unattractive. Fiberglass greenhouses are also combustible, so a fire extinguisher is necessary if you choose this material.
You may use cleaning solutions for synthetic materials, such as plastics, in cleaning fiberglass. Apart from this, you may utilize warm water and white vinegar. Use a microfiber cloth in applying the solution to the fiberglass surfaces. Alternatively, you may use a gentle liquid soap to buff the fiberglass. Wax them to maximize their aesthetic appeal.
5. Acrylic Greenhouses
Most acrylic greenhouses can transmit more than 90% of light. They can withstand impact better than glasses but less than polycarbonate. They’re highly affordable and recyclable. The downside of acrylic materials is their low customizability and installation difficulty because they don’t work well with drilling and cutting.
To enhance the acrylic covering, you may treat it with a glazing liquid to make it more resistant to UV. This process also reduces the effects of condensation. If you want a more durable option, you may think about double-paneled acrylic.
To maintain acrylic sheets, you may use a blow dryer to remove their dust at least once a month. Then, use a microfiber cloth with a soap solution to make the sheets clear. Lastly, dry the solution using a moist cloth to avoid water spot formation. When properly maintained, acrylic greenhouses can reach 20 to 25 years.
Wrapping Up
Glazing materials play the most significant role in enabling greenhouses to achieve their purpose. While they have different strengths and weaknesses, most of them ideally fit a particular setup and plant needs. Because of this, you may need to delve deeper into what they can offer to know which suits your needs.
Suppose you’re planning to build a greenhouse anytime soon. In that case, you may consider reading this article to know which best suits the plants you want to grow, such as tomatoes or lettuce. For more ideas, you may ask seasoned gardeners about their ideal greenhouse build and the appropriate glazing materials for your location.
If you’re experiencing trouble with your electrical sockets, you can take several simple steps. First, you can check to see if there’s a tripped circuit breaker, blown fuse, or loose connection to the switch. If you can’t find the issue, you can try to reset the socket by pushing the “reset” button on your appliance. Secondly, check if the plug is firmly inserted into the electrical socket.
Tripped circuit breaker
If you notice that several electrical sockets in a room are not working, the problem could be caused by a tripped circuit holder. To reset a tripped breaker:
Flip the appropriate switch.
Push the breaker handle fully to the off or on position.
If the sockets still don’t work, check the fuse box to see if there is a short circuit or ground fault.
The circuit holder in the main power panel contains the circuit breakers for all electrical outlets. These circuit breakers are labeled by the electrical contractor who installed them. Normally, the circuit breaker will trip if the current is too high. But if it trips with no plugged-in device plugged in, it can cause several problems. To fix the problem, consult a professional for electrical maintenance.
Faulty receptacle
Listed below are some tips for troubleshooting faulty electrical sockets in your home. If you suspect that the outlet is faulty, you may need to replace it. It is simple to replace a receptacle and can give you peace of mind. If the outlet is not staying in place, it is likely that the receptacle is worn out and needs replacement. Buying new outlets is the best solution for this problem, and will prevent you from having to deal with this issue again.
If you suspect a faulty socket, you must first unplug all appliances in the room where you are trying to test it. Then, reset the circuit breaker or replace the fuse. If the outlet still fails to function, the problem could be due to a short circuit within the switch or receptacle. In addition, if it’s working, you may have charred wire insulation.
Blown fuse
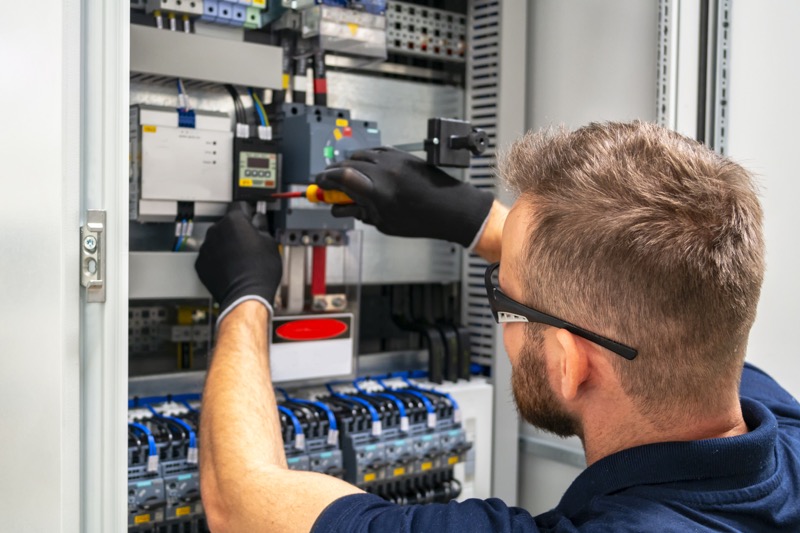
When troubleshooting a blown fuse and broken electrical sockets, there are many things to consider. A blown fuse is usually an indication of an electrical overload. While it can be frustrating to open a fuse box and discover a blown fuse, the task is not impossible. You can try unplugging appliances and re-examining the circuits. Otherwise, contact a licensed electrician for assistance.
If you suspect a blown or broken fuse, turn off all lights and appliances in the affected area. Unplug any appliances that are connected to the circuit. After that, turn off the main power to the fuse box. Before doing anything else, make sure not to overload the circuit. It’s important to be cautious and avoid touching the metal threads of a blown fuse. If you accidentally touch one of them, you could get an electric shock or burn.
Photo of an electrician working at distribuition board.
Loose connection to switch
When diagnosing a broken electrical socket, you should always check for a loose connection. The wiring in these sockets can be twisted over the years and may no longer be connected properly. In this case, you should call a professional electrician to come and check the socket. If you cannot reach the electrical socket, you can also try the following tips. First, disconnect all electrical devices connected to the socket, turn off the circuit breaker, reset the GFCI and call a licensed electrician.
Check for a loose connection. If the connection is loose, check the light for flickering or a dead outlet. If it is connected loosely, check other outlets nearby for similar problems. If the wires are bent, they may be damaged and corroded. In case the connection is loose, check the switch. It may be the cause of the dead outlet. Loose connections are usually very easy to identify.
Discolored outlet
If you are noticing discoloration in your outlets, there are several possible causes. Some outlets may be overheating due to heat, while others may have broken wiring. Either way, it’s essential to contact a licensed electrical contractor for further inspection. Discolored outlets should be inspected immediately to avoid further damage to your property. Also, if you notice smoke, sparks, or a burning smell while you’re plugging them in, you should contact a professional electrician.
A discolored outlet is a sign that it’s time to have it replaced. Discolored outlets can signify that the outlet is faulty or isn’t installed properly. Also, a hot outlet could indicate a fire hazard or bad wiring. When an outlet is discolored, it’s good to cut power to it at the panel and contact an electrician immediately.
Life is full of frustrations – and having your blinds stuck at the very top of your window is one of them. No matter how much tug, it just never gives—each time you’re restrategizing on what to do to make it eventually go down.
Mounting frustration can have you angrily tugging at the rope incessantly. Yet, that scenario can usually make things worse – the more tugging, the higher the possibility that you will damage your blinds.
In which case, what can you do when your blinds are so stubbornly stuck at the top? To avoid this in the future, or you’re currently dealing with it and searching for an article that can help, don’t look any further and read on to see what you can do!
How Does This Happen?
Many can attest to having their blinds stuck at some point – it’s inevitable. That’s why it’s a fairly familiar problem when you have horizontal slatted blinds in particular. Yet, other blinds like vertical ones and even shutters come with their own malfunctions. Like anything else, blinds are also susceptible to wear and tear after a couple of years. It’s natural that things eventually don’t work as they used to when you had first bought them. After a while, quality dips and certain parts of your blinds become prone to such issues. The common culprit behind your blinds getting stuck at the top generally comes from the cord getting trapped in its lock mechanism.
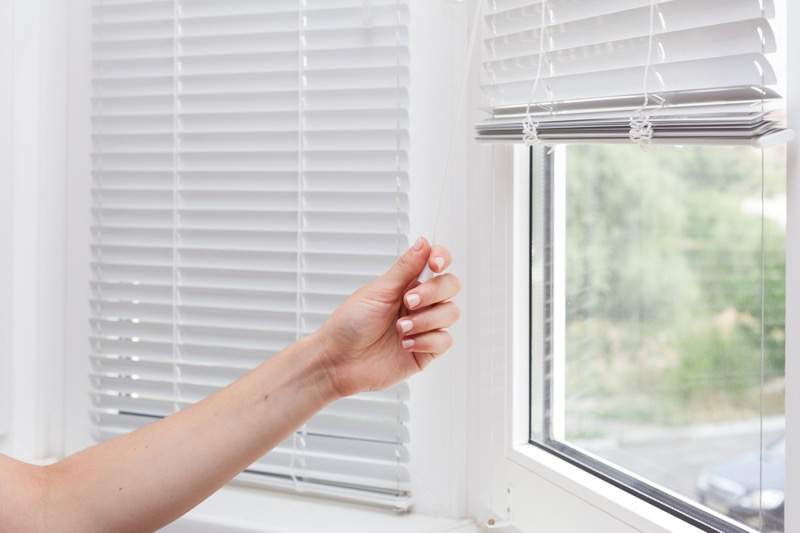
Adjusting the white blinds in height use a cord
What to Do About it?
As we have established, the issue lies within your cord getting trapped in the lock mechanism, and its condition can dictate what method will effectively fix your blinds.
Gently Tug Cord
If your first approach to fixing your blinds were to tug harshly on the cord, this method would be a good exercise in patience. Plus, you might find you can effectively release your blinds from the top. But how can you do this? It is not as simple as gently tugging the cord – there is a technique you need to implement for it to work properly. Gently pulling on the ropes can help loosen them enough to lower down. You will want to hold the cords and pull them towards the center of the blinds so that they are parallel to the headrail.
In doing so, tension will be applied as you tug the cords, which will allow the pawl to fall. If you’re unsure what a pawl is, it’s located in the headrail in the lock mechanism since it’s designed to grab the cord from your blinds. After allowing the pawl to fall, create a space between the pawl and the pin, releasing and lowering the blinds. It’s good to check the pawl since it moves along this track up and down, which helps lock or release the cord. The pawl’s purpose is to allow blinds to be lowered, so when the pawl is locked, this is where your blinds can end up getting stuck on top.
Take Blinds Off
If the first method didn’t work, then the next best thing you can do is remove the blinds from the brackets and windows. To do this approach, you will need to have a flat-bladed screwdriver. Look for the cords threaded through the lock mechanism and use the screwdriver by pressing the pawl down to keep the blade perpendicular to the roller. What exactly does this accomplish? In doing this, it’s in the hopes of moving the pawl to its lowest position on the track.
Pawls can get stuck at the top due to excessive pressure when tugging the cords, resulting in bunched or knotted cords. Once you have checked for these issues, return your blinds to your windows and test if the method worked by raising and lowering them a few times.
Getting Professional Help
Normally, you won’t need a professional to step in when it comes to stuck blinds since they’re a fairly minor issue that you can fix. Yet, if you exhausted all your options by trying everything above, then it’s safe to say that there is nothing you can do about it. The final thing you can do is reach out to an expert who can help when all else fails. By calling a professional, you can consult with them on the matter, and they can run you through what to do and how they can help fix it. Depending on the lock mechanism, you might need to get it replaced if the damage is irreversible.
Stuck blinds are a hassle. Yet, hopefully, one of these methods has provided you with the solution needed to fix them effectively!
There are a variety of benefits of roof insulation. Roof insulation cannot be understated as it can do so much for your home and save you money on the bills. Some of the most prominent benefits of roof insulation are to keep excess heat and moisture from entering the home to protect its structural integrity. During the winter months, this will help keep the temperature moderate and reduce the need for air conditioning or heating systems. This can save the homeowner a great deal of money on heating and cooling bills, a significant benefit to this invaluable roof feature.
Find out more about roof insulation and why installing it is crucial for any home as it serves several purposes.
Saving energy
Acquiring roof insulation for your home is an excellent investment that will reduce your energy bill. Roof insulation will keep your home at a comfortable temperature, which will reduce the number of times you use your heater during the winter and air conditioning during the hot summer months. Because the insulation will maintain your home within a consistent temperature, the heater and air conditioning won’t have to be so relied on. Therefore, you will begin to notice quite a reduced cost when your heating bill comes.
Preventing roof damage
Roof insulation can help prevent significant damage as it prolongs heat from travelling upward and melting snow at a rapid pace, which can inevitably lead to ice dams forming, moisture, and other significant amounts of condensation on the roof. Such moisture can cause damage to the roof over time as well as damage the overall structure of your home. Installing insulation can prevent heat from rising so quickly in your home, preventing major damage to your roof and the reduce the structural integrity of the home that could eventually cost you money to repair.
Retains heat
In colder climates, it’s essential to keep your home warm during the winter. Roof insulation will retain the heat within the home without letting it escape, ensuring that your household can remain comfortable as the temperatures begin to drop steadily.
Reduces chances of overheating
When you reside in an area that gets increasingly and uncomfortably warm, particularly during the summer, it is ideal to live in a home that remains at a comfortable temperature to avoid overheating. Insulation installed onto a roof can keep your home at a much cooler temperature to reduce the chances of excessive heat lingering in the house during the hottest days of the year.
Sustainability
Now more than ever, it is crucial to make your home as eco-friendly as possible, particularly if you have the means and resources to do so. Installing insulation onto your roof will enable more sustainability within your home and can be easily accomplished while being an extremely affordable feature to add to your roof. Roofing insulation can help reduce pollution while also reducing the energy that is used in your home by keeping a house within a comfortable temperature during weather extremities.
Protecting your roof
Roof insulation will work for several years, working as a protective measure against weather conditions and will help keep your roof and the structure of your home intact. When utilizing quality insulation to install onto your roof, it will immediately add an extra layer of protection to your roof and home. This feature will prove beneficial to homeowners who reside in areas that endure vast amounts of storms and various weather extremities. More so, roofing insulation will actually save you vast amounts of money that would otherwise be spent on roof repairs without the addition of protection that insulation enables.
Saving time
Replacing a damaged roof will take laborious time, effort, and money. When you install insulation on your roof, it can prolong the lifespan of the roof and maintenance, and repairs can be strictly avoided. By adding insulation, you don’t have to fret about the state of your roof for several years, and money can be saved for other means as continuous maintenance is no longer necessary when insulation provides a protective layer to the home.
Your bathroom is one of the most important rooms in your house. Not only is it a place where you get ready for your day, but it’s also a place where you can relax and unwind after a long day. That’s why it’s important to make sure that your bathroom is comfortable and stylish. If you’re planning on renovating your bathroom, you might be wondering what order you should do the bathroom renovations in.
Doing renovations in order can help you avoid a lot of stress and headache – and gives you a chance to break up the work over a period of time and into installments if needed. After all, you’ve probably got more than 1 bathroom to work with, so putting one out of commission while you use the other one is a practical move. It’s definitely worth doing some research and some critical thinking before you start your project. Here is a guide to help you figure out the order of your bathroom renovations:
Assess the State of Your Bathroom
The first step is to take a good look at your bathroom and assess its condition. This will help you determine what needs to be done and in what order. For example, if your bathroom needs a new coat of paint, that would be something that you would want to do first. But if you want to move the shower because the location is poor or the shower unit needs updating, that’s going to take planning and a by-stages approach.
Decide on Your Budget
The next step is to decide on your budget. The budget will play a big role in deciding what order you do the renovations in. For example, if you have a limited budget, you might want to do the cosmetic changes first and save the more expensive, invasive remodelling changes for later. When making the budget, be sure to factor in the cost of materials, labour, new utility lines, and any permit requirements.
Make a List of Your Priorities
After you’ve decided on your budget, it’s time to make a list of your priorities. This will help you figure out what order to do the renovations in. The most important thing is to make sure that you focus on the areas that need the most attention first.
In most cases, these will be the areas that are in the worst condition. For example, if your bathroom needs a new bathtub before you get a stylish update on the sink, that priority can help you decide which tasks can be done in the same renovation effort and which should be broken into stages while you take the process more cautiously for budgetary reasons.
Hire a Professional
If you’re not comfortable doing the renovations yourself, it’s important to hire a professional. Most renovations require some type of permit, so it’s important to make sure that you hire a complete home renovations company familiar with the process from top to bottom and from start to finish. A professional can also help you figure out the order of the renovations and make sure that everything is done properly. When hiring a professional, be sure to get references and read reviews to make sure that you’re hiring someone who is reputable. When you’re looking to transform your bathroom into the lap of luxury, look for companies who dream and do as big as your personal vision for the space.
Doing Research. Unrecognizable black businessman working on laptop, browsing information and writing report, free space
Start with the Basic Foundations
Once you’ve hired a professional, you might want to start with the basics. This includes things like new plumbing and electrical outlets, re-tiling, and making any necessary repairs to walls or ceilings.
These are all things that begin the transformation and define the visionary outcome. It’s important to make sure that these things are done properly so that they last.
Move on to the Main Features
After you’ve taken care of the basics, you can move on to the more difficult tasks, like tying thematic and aesthetic desires into an ensemble that works.
The order in which you do these will depend on your own personal preferences as well as your budget. However, some of the more essential changes might include things like installing new bathroom fixtures or cabinetry. These tasks take critical style and practical decisions, but they’ll make a big difference in the overall look of your bathroom.
Finish Up with the Details
After you’ve taken care of the major renovations, you can finish up with the details. This part might include things like adding new accessories, new mirrors, taps and handles, wall shelving, painting, baseboards, and otherwise adding flair. These details can really make your bathroom pop and highlight your chosen aesthetic.
Enjoy Your New Bathroom!
Once you’ve finished all of the renovations, it’s time to enjoy your new bathroom! You can now sit back and relax in your newly renovated space. From here, you can note the changes and gather your thoughts on future changes you’d like to see once the space loses its trendy style or allure. Bathrooms are hugely underrated parts of your home, and their functionality, as well as their aesthetic, can impact your mood. Whether you do your renovation in 1 shot or stage it out to spread costs, that’s fine. As long as its form and function uplift and relax you each day – once it’s all done.