Many people want their homes to feel unique, but the challenge is figuring out how to get there without completely renovating or spending thousands. You might think you’re stuck with the same old options: repainting, buying new curtains, maybe even swapping out light fixtures. But sometimes what you’re really craving is something more dynamic, more playful, something that changes with the light and feels alive. Probably what you need is dichroic film.
This special window film shifts colors depending on how the light hits it. It can look purple in one moment and gold the next, or shift from green to blue as the sun moves. It’s mesmerizing, and the best part is that it doesn’t require construction or heavy tools.
So, how do you use it in your home without it feeling over the top? This article discusses three creative ways to use it in your space.
1. Turn Ordinary Windows into Ever-Changing Art
Windows are probably the most obvious place to start. Your windows already let in natural light, which makes your home more vibrant. Adding dichroic film turns every shaft of sunlight into a mini light show.
The cool part is how it changes throughout the day. In the morning, you might catch softer hues—maybe pinks or golds—spilling across your living room walls. By afternoon, the same window could be bouncing deep blues or emerald greens into your space. It keeps things fresh without you lifting a finger.
Privacy is a huge deal, especially if you’re in an apartment or a house where neighbors can see straight in. Dichroic film can make your windows look stylish while also diffusing the view. You’ll still get plenty of natural light, but won’t feel like you’re exposed.
2. Upgrade Your Glass Doors and Partitions
Glass doors are sleek, but sometimes they can be to plain or a little sterile. If you’ve got sliding patio doors, French doors, or even those glass partitions that are becoming super trendy in open-plan homes, a dichroic film can take them to a whole new level.
Imagine walking from your kitchen into your dining space and catching a shimmer of gold that shifts into blue as you move. Or picture how your sliding patio doors could throw rainbow reflections onto your floor during golden hour.
This trick works especially well if you have interior glass partitions—like the kind that separate a home office from the rest of the house. Instead of a clear panel that feels a little cold, the film adds warmth, energy, and personality. Plus, it can create a sense of division without making the room feel boxed in.
3. Transform Furniture and Decor Accents
Dichroic films don’t have to be limited to windows and doors. If you’re willing to get a little creative, you can use them on smaller surfaces to completely change the vibe of your furniture and décor.
For example, try applying it to the glass top of a coffee table. Instead of just reflecting light like any old piece of furniture, it will throw bursts of shifting color into your living room. Or think about cabinet doors in the kitchen with glass inserts. Throw some film on there and you’ll instantly elevate your storage into something that looks custom-designed.
You could even play with smaller decorative items. A plain vase wrapped in film can become a centerpiece that catches every flicker of light. A wall mirror framed with dichroic edging will make it appear it belongs in a gallery. These little tweaks can make everyday items be more personal and intentional.
Final Thoughts
Your home should reflect your personality and style. Dichroic films are one of those little design hacks that pack way more punch than you’d expect. They’re versatile, affordable, and endlessly customizable. Whether you use them on windows, doors, furniture, or lighting, they’ll add a sense of movement and personality that will be hard to replicate with paint or décor alone.
A swimming pool is more than a backyard amenity it’s a place for recreation, relaxation, connection, and even fitness. Yet, choosing the right pool isn’t as simple as picking a style you like; it’s about matching your unique space, family needs, and priorities with the ideal design and features. Whether you’re dreaming of lively summer parties, peaceful evening swims, or a fun spot for the kids, learning how to assess and select the perfect pool can transform your home while maximizing your investment.
In this guide, discover how to weigh the most important factors when choosing a backyard swimming pool, explore the range of available options, and find tips for planning a pool that fits your lifestyle.
Assess Your Backyard Space and Budget
Before anything else, examine your available space. Measuring your yard’s dimensions helps identify possible shapes and sizes for the pool. Consider layout, sun exposure, slopes, nearby trees, and existing landscaping. Pools require both room to install and space for patios, decking, fencing, and pathways.
Budget also plays a significant role. Factor in not only the initial construction or purchase price, but ongoing costs—maintenance, water, chemicals, liners, and unexpected repairs. Setting a realistic financial plan up front lets you explore choices confidently and helps prevent surprises.
Explore Pool Types: In-Ground vs. Above Ground
Swimming pools come in several major forms:
In-Ground Pools
These pools are built directly into the landscape, typically from concrete (gunite), fiberglass, or vinyl-lined steel. They offer a luxury look, custom shapes, and long-term durability—ideal for homeowners who want a permanent feature. In-ground pools accommodate custom features like waterfalls, slides, and built-in spas, but come with a higher price tag and longer installation timelines.
Consider Family Lifestyle and Pool Usage
Think about how you’ll use your pool:
Children and Families: For safety, consider pools with shallow zones, secure fencing, slip-resistant steps, and clear sightlines from the house. Above-ground pools, especially with locking ladders, provide added peace of mind for young kids.
Fitness and Lap Swimming: Active swimmers should look for pools with long, unobstructed lengths, such as rectangular or oblong designs. Pools with swim jets or built-in resistance features are great for regular workouts.
Entertaining: Large decks, integrated seating, and lighting add to the party atmosphere. If you love to host, build in features for grilling, lounging, and even poolside dining.
Relaxation: Waterfalls, tanning ledges, and attached spas create a soothing oasis right at home.
Review your typical week, seasonal needs, and plans to determine which features and layouts will get the most use.
Weigh Design Features and Accessories
Pool design isn’t just about shape—focus on the details that support your lifestyle:
Materials: Concrete offers flexibility and durability, fiberglass saves maintenance time, and vinyl liners can be cost-effective.
Finishes: Mosaic tiles, natural stone, and textured liners lend a custom touch.
Technology: Smart lighting, automated cleaning systems, and programmable heaters increase convenience and utility.
Accessories: Consider covers, ladders, handrails, and safety alarms based on your family’s needs.
Understand Local Codes and Climate
Pool construction and installation are subject to local regulations, including property setbacks, fence codes, and safety equipment requirements. Check these before you buy. Climate also matters: cold regions may require deeper frost protection, while sun-drenched areas call for UV-resistant materials and robust filtration systems.
Above-Ground Pools: A Growing Trend
For flexible installations or spaces with challenging dimensions, above-ground pool options continue to expand. Oblong above-ground pools from Vita Pool Supply are particularly popular for those with narrow yards or who want a distinct look. Their elongated shape supports lap swimming, playful family time, and efficient use of space. Easy-to-maintain materials, quick setup, and contemporary designs make these pools a smart fit for many homes.
Plan for Maintenance and Upkeep
Pool maintenance is an ongoing commitment. Factor in your bandwidth for cleaning, water testing, and repairs. Above-ground models often feature streamlined systems, while in-ground options vary in complexity. Investing in efficient pumps, energy-saving heaters, and covers can minimize chores and expenses.
Choosing the right swimming pool means balancing practical considerations—space, budget, safety, and maintenance—with dreams of how you’ll enjoy it year after year. Whether you settle on a classic in-ground design or innovative options, aligning your decision with your unique needs ensures this investment becomes your favorite feature at home, promising endless summers of fun, relaxation, and connection.
When it comes to affordable, stylish, and functional furniture, IKEA has become a household name around the world. One of their most popular offerings is their range of sofas—sleek, modern, and budget-friendly. However, like any piece of furniture, sofas endure wear and tear over time. That’s where IKEA sofa covers come into play, providing a simple yet effective way to protect, update, or completely transform your sofa without breaking the bank.
Why Choose IKEA Sofa Covers?
1. Easy to Maintain: IKEA sofa covers are designed to be removable and washable, making them incredibly practical for households with kids, pets, or frequent guests. Spills, stains, and dirt don’t have to mean a new sofa; just pop off the cover and toss it in the wash.
2. Affordable Makeover: If you’re tired of your sofa’s color or fabric, IKEA sofa covers offer a budget-friendly way to change the look. Instead of buying a whole new sofa, you can pick a new cover that matches your current decor, giving your living room a fresh vibe.
3. Protection and Longevity: Using a cover protects the original upholstery from damage, extending the life of your sofa. This is especially important for high-use furniture, helping you keep it looking good for years.
4. Variety and Custom Fit: IKEA offers a wide variety of sofa covers designed specifically for their sofa models like EKTORP, KLIPPAN, and more. This means you get a snug fit that looks tailored rather than loose or sloppy. Plus, the selection includes multiple colors and materials, so you can find the perfect style.
Popular IKEA Sofa Covers
EKTORP Covers: One of IKEA’s most iconic sofa lines, the EKTORP sofa covers are especially popular because they’re thick, durable, and available in classic colors such as beige, gray, and blue. They’re also machine washable, making them practical for everyday use.
KLIPPAN Covers: Known for their compact and simple design, KLIPPAN sofa covers come in fun, vibrant colors and patterns. They are a great option if you want to add a pop of color or texture to your living room.
VIMLE and FÄRLÖV Covers: For newer IKEA sofa models like VIMLE and FÄRLÖV, covers are designed with modern fabrics and easy-to-remove zippers. These covers combine style and convenience with durable, stain-resistant materials.
How to Choose the Right Cover for Your IKEA Sofa
Know Your Sofa Model: Make sure you know exactly which IKEA sofa model you have, as covers are tailored to fit specific designs and sizes.
Consider Fabric and Color: Choose a fabric that suits your lifestyle—cotton blends are soft but may stain easily, while synthetic fabrics like polyester tend to be more durable. Pick colors that complement your room or go bold for a statement.
Check Care Instructions: If you have pets or kids, consider covers that are machine washable or easy to clean.
Installation Tips
Most IKEA sofa covers come with instructions and are designed for easy fitting. Typically, you will need to remove cushions, slide on the cover, and secure it with the provided fasteners or zippers. Taking your time during installation helps avoid wrinkles and ensures a smooth finish.
Final Thoughts
IKEA sofa covers are a versatile, affordable way to maintain, protect, and style your sofa. Whether you’re looking to freshen up your living space, protect your investment, or simply experiment with new colors and textures, these covers provide an easy, practical solution. With the wide range of designs and fabrics available, there’s something to fit every taste and lifestyle.
Between the tight deadlines, tedious chores, and that never-ending ping of notifications, life can feel like a whirlwind of stress and responsibility. But what if your garden became your personal reset button?
Aromatherapy isn’t just some fancy wellness trend. It’s nature’s way of calming frazzled nerves and lifting low spirits.
Imagine stepping outside and being instantly wrapped in a cloud of soothing, therapeutic scents. That’s the beauty of planting the right herbs and blooms. Here are six aromatic favourites that can turn any outdoor space from ordinary to utterly relaxing.
Lavender
Few scents are as iconic as lavender. Its soft, floral aroma has been easing worries for centuries, making it a staple for both gardeners and meditation lovers.
Plant it along pathways or near a bench, and you’ll be greeted with a gentle wave of fragrance every time you pass by.
Lavender thrives in direct sunlight and well-drained soil, so give it a sunny corner and keep those roots out of soggy ground. You’ll also need to prune it now and then to keep it neat and encourage fresh blooms.
While it tolerates dry spells, it still needs regular watering to flourish. In their first year, give young plants a drink once or twice a week to help the roots settle. Once established, they’ll only need a good soak every couple of weeks in hot, dry spells.
But if you’re growing lavender in pots, you’ll need to keep a closer eye on them, as containers tend to dry out more quickly. In that case, water when the top couple of inches of soil feel dry.
Peppermint
If lavender is soothing, peppermint is downright refreshing. One brush of its leaves, and you’re hit with a zingy burst that clears the mind in seconds, especially after rain.
It’s rather easy to maintain, too, which is why local garden care experts often recommend it for beginners. All it needs is consistent moisture, a sunny spot, and a quick trim now and then to promote lush foliage.
There’s one catch, though. Peppermint has a tendency to roam, so it’s best to grow it in pots or raised planters. That way, you’ll enjoy its vibrant scent without it creeping into every corner.
While it prefers partial shade in hot climates, peppermint thrives in full sun in cooler regions. This adaptability makes it suitable for just about any garden style, from neat, modern landscapes to laid-back, cottage-inspired plots.
Lemon Balm
Easy to grow and even easier to love, lemon balm is a cheerful addition to any outdoor retreat.
It’s basically like sunshine in leaf form. Crush it between your fingers, and you’ll be greeted with a citrussy scent that instantly lifts your mood. It’s perfect for brightening a dull day or winding down after a busy one.
The best part is, lemon balm isn’t picky. It’ll be happy almost anywhere, whether that’s a sun-drenched nook or a shady corner, as long as the soil drains well. Just trim it back occasionally to keep it tidy and to encourage fresh, fragrant growth.
It also makes a lovely ground cover, filling gaps with lush greenery and adding a zesty punch to your garden.
You can even use it to add a touch of whimsy to your space by placing a few cuttings between stepping stones. That way, you’ll be greeted by a trail of uplifting scent every time you walk past.
Rosemary
Rosemary may be best known for Sunday roasts, but its woody fragrance does far more than enrich flavour. It also helps sharpen focus. Place a pot near your outdoor seating area, and you’ll quickly notice the clarity it brings.
Caring for rosemary is a breeze. Give it full sun, well-drained soil, and the occasional trim, and it will reward you with sturdy growth.
When the heat kicks in, a little watering during hot spells will keep it lush and aromatic.
In addition to its divine smell, rosemary is a powerhouse of flavour. Its fresh sprigs can instantly add another dimension to bread, stews, or grilled vegetables. It’s one of those plants that nourishes both the body and the soul.
Jasmine
If your garden had a soundtrack, jasmine would be the soft, romantic ballad. Its starry white blooms release a delicate fragrance that’s both dreamy and grounding, turning your evenings outdoors into something truly magical.
Jasmine thrives in sunshine and good airflow, so pop it in a bright spot and give it something sturdy to climb. A trellis or pergola will do just fine.
A little pruning now and then is also necessary to keep it in check while encouraging more of those dainty flowers to sprout.
To create a fairytale-inspired atmosphere, place it by a terrace or seating area for an enchanting display that pleases the eyes as much as the nose. At dusk, when the air is still, its perfume will linger quietly, making late-night chats or quiet moments even more special.
Eucalyptus
For a garden that smells like a spa, eucalyptus is hard to beat. Its cool, invigorating scent clears the head and instantly lifts the mood, while its oils are famous for easing bodily aches and stuffy noses.
Eucalyptus trees grow rather quickly, so they’ll need plenty of space to stretch as well as well-draining soil.
Their fast growth makes them excellent natural screens, giving you privacy with the added bonus of their signature fragrance. Just make sure to prune them regularly to keep them from overwhelming the space.
If your garden is on the smaller side, dwarf or shrub varieties, like cider gum, are better suited for compact spaces.
Whether you use it as a focal point or to frame a seating area, it will bring a refreshing energy that makes your outdoor gatherings feel more lively.
Conclusion
With a handful of carefully chosen plants, your garden can double as a personal retreat, where your everyday worries can finally slip away.
Even the smallest balcony can become a serene haven with a couple of potted mints or a few strands of trailing jasmine.
So, why not welcome these fragrant companions into your outdoor space? Before long, your home will smell and feel like absolute bliss.
As families grow and lifestyles change, many homeowners in Southern Utah face the same question: Should I add on to my existing home, or should I commit to a full remodel? Both options have their benefits — and choosing the right path depends on your budget, goals, and the condition of your current property.
When Room Additions Make Sense
Adding a room is often the go-to solution for homeowners who love their current location but simply need more space. Common examples include:
Extra bedrooms for a growing family
Home offices for remote work
Sunrooms or outdoor living extensions to take advantage of Utah’s climate
Garage conversions into livable spaces
The main advantage? You gain functional square footage without completely disrupting your home. For example, if you’re planning to expand with a new living area or master suite, the foundation is critical. Working with experiencedconcrete slab contractors like A to Z Construction ensures your addition has a strong, durable base that can handle Utah’s shifting soils and weather extremes.
When a Full Remodel Is the Better Choice
Sometimes adding space isn’t enough — the entire home needs an update. A full remodel is ideal when:
Your layout feels outdated (closed-off kitchens, small bathrooms, low ceilings)
Major systems (plumbing, electrical, HVAC) are nearing replacement
You want your home to match today’s energy efficiency standards
Multiple rooms need upgrades for resale value
A full remodel allows you to reimagine your home from top to bottom. Kitchens, bathrooms, flooring, and even room layouts can be transformed. Partnering with acustom home builder in Utah like Prestigious Home Builders ensures the project blends structural integrity with modern design, giving your property a new life.
Cost and Value Considerations
Room additions tend to be less expensive upfront, often ranging from $25,000–$80,000 depending on size and finishes.
Full remodels carry a higher cost, but they frequently deliver a better ROI since multiple upgrades improve resale value simultaneously.
For families considering long-term investments, Prestigious Home Builders’ expertise inbuilding a house in Utah also comes into play. Sometimes, the cost difference between a complete remodel and building new is closer than people realize — and starting fresh may provide better returns in the long run.
Which Option Is Right for You?
If you love your home but need a little more space, a room addition anchored by the right foundation may be perfect.
If your home feels outdated or inefficient, a full remodel offers a complete transformation.
If you’re already looking at major upgrades, compare the cost of remodeling with building a house in Utah — sometimes new construction makes more sense.
Southern Utah’s housing market is competitive, and whether you choose an addition, remodel, or brand-new build, working with local experts ensures your investment lasts for decades.
Public spaces are designed for community enjoyment, but they also face constant wear from foot traffic, weather, and general use. For councils, developers, and contractors, the true challenge of building these spaces lies not just in their initial construction, but in ensuring they remain functional and attractive over the long term. Maintenance-ready construction is an approach that considers the lifecycle of a space from the outset, incorporating design features, materials, and systems that reduce the ongoing burden of upkeep.
The Principles of Maintenance-Ready Design
At the heart of maintenance-ready construction is the concept of whole-of-life planning. Instead of focusing solely on immediate delivery, project teams evaluate how design and material decisions will impact upkeep requirements over decades. A forward-thinking landscape construction company considers not just how a space looks on completion, but also how it will perform and endure under daily use.
Three guiding principles shape this approach:
Durability – Selecting robust materials and finishes that can withstand weather and heavy use.
Accessibility – Ensuring spaces are easy to clean, repair, and maintain without excessive disruption.
Sustainability – Incorporating systems that reduce water, energy, and chemical usage over the life of the asset.
Choosing Materials that Last
Selecting materials for durability is key to reducing future maintenance. Durability should be a consideration in all choices related to pavement, furniture, and retaining structures. Choices include:
Anti-graffiti coatings – Protective clear coatings applied to walls, seats, and shelters allow paint or marker removal without damage to the substrate. This can reduce cleaning costs and lost time.
Concrete and stone finishes – Natural stone or exposed aggregate concrete should be selected where appropriate, rather than surfaces that require periodic repainting.
Metalwork with powder-coated finishes – Powder coating has better resistance to chipping and corrosion than conventional paint finishes. It can be used on railings, fencing, and shelters to help extend life.
Each of these material choices may have higher initial costs, but in most cases, the reduced repainting, resurfacing, and replacement can provide savings.
Green Spaces Designed for Efficiency
Vegetation is one of the most valued features of public spaces, but it can also represent a major maintenance expense if not carefully designed. Plant selection, soil preparation, and irrigation planning must all be considered early in the construction phase.
Low-growth planting zones – Using species that naturally maintain a compact form reduces the frequency of trimming and pruning. Selecting drought-resistant plants further decreases irrigation requirements.
Mulching and groundcovers – Applying mulch or using hardy groundcovers suppresses weeds, retains soil moisture, and enhances soil health.
Irrigation-integrated retaining systems – Retaining walls that incorporate drip irrigation channels or water reservoirs make it easier to maintain healthy plants while reducing water waste.
By integrating these strategies, project teams ensure that green spaces remain vibrant without placing excessive demands on landscape maintenance services.
Smart Water and Drainage Systems
Water management is another critical factor in maintenance-ready construction. Poorly designed drainage can lead to erosion, flooding, or the premature deterioration of pavements and structures.
Permeable pavements allow rainwater to filter through, reducing surface runoff and easing the load on stormwater infrastructure.
Automated irrigation systems with smart controllers adjust watering schedules based on rainfall and evaporation rates, cutting down on manual oversight.
Rain gardens and bioswales not only improve stormwater quality but also reduce the need for extensive underground drainage works.
These systems combine environmental sustainability with reduced long-term maintenance needs.
Designing for Easy Access and Cleaning
Public spaces are only as maintainable as their accessibility allows. A good design ensures maintenance crews can clean, repair, or service infrastructure without excessive disruption.
Modular construction elements – Seating, shade structures, and bins built in modules allow for easy replacement of damaged components rather than full reconstruction.
Accessible service zones – Designing hidden access points for irrigation controls, electrical systems, and lighting reduces the time required for routine checks.
Surface gradients and layouts – Thoughtful grading prevents pooling water, which can damage pavements and increase cleaning requirements.
These approaches reduce labour demands and extend the usable life of facilities.
Integrating Technology into Maintenance-Ready Spaces
Emerging technologies are reshaping the way public spaces are maintained, with opportunities to embed smart systems directly into construction. Examples include:
Sensor-driven lighting that adjusts based on usage patterns, reducing energy costs and bulb replacements.
Automated monitoring systems for irrigation networks, detecting leaks before they cause damage.
Digital asset management tools that track maintenance schedules and flag when components are approaching end-of-life.
By embedding these systems at the construction stage, public assets can be monitored and managed with greater efficiency.
The Role of Collaboration
Maintenance-ready construction requires collaboration between designers, engineers, contractors, and facility managers. Too often, decisions about materials and systems are made without consulting those who will be responsible for long-term upkeep. Successful projects foster collaboration from day one, ensuring that practical knowledge of maintenance realities informs design and construction.
Public sector clients are increasingly demanding landscape construction solutions that reflect not just initial cost but lifecycle performance. Contractors who deliver on this expectation not only enhance the durability of public spaces but also build stronger reputations for innovation and responsibility.
Public spaces are community assets that must withstand constant use and environmental stress. Building them to be maintenance-ready ensures they remain safe, attractive, and functional without placing an excessive financial or operational burden on councils and service providers.
Through careful material selection, efficient planting strategies, smart water systems, and accessible design, contractors can greatly reduce long-term upkeep needs. When combined with emerging technology and strong collaboration, these principles set the stage for public spaces that deliver lasting value.
For contractors and clients alike, investing in maintenance-ready construction is not just a cost-saving strategy—it is a commitment to sustainable, resilient spaces that support communities for decades to come.
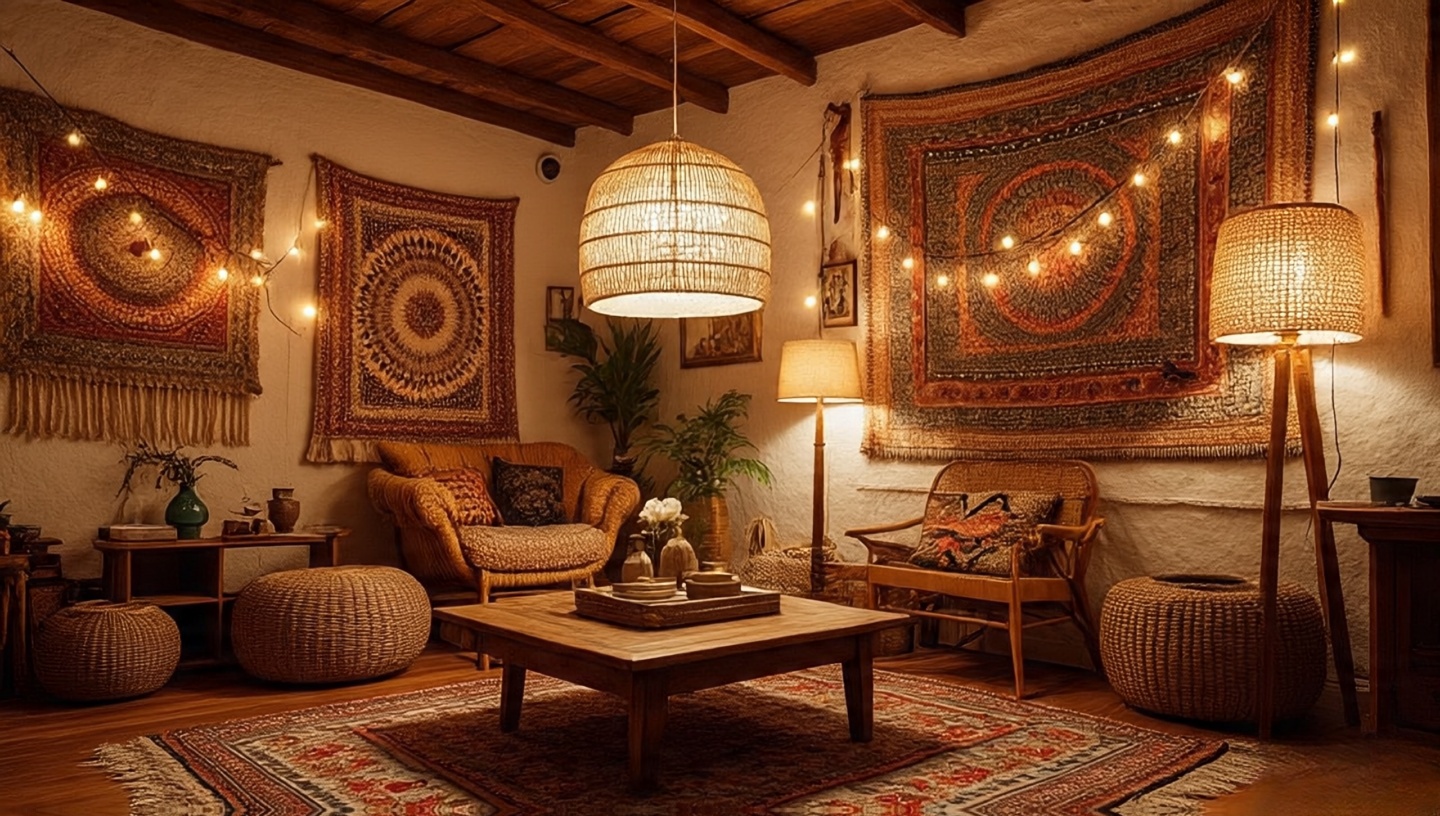
Roohome.com – When I first strung mismatched lanterns across my own narrow balcony, I wasn’t thinking about design theory. I just wanted a place to read after sunset. Yet when dusk fell and the lights flickered against terracotta pots, it felt like a quiet festival. That simple moment still shapes how I approach residential lighting today. Boho lighting, when done thoughtfully, turns plain walls and modest budgets into an intimate retreat.
This guide distills 30+ years of architectural practice and a lifetime of small experiments. Whether you’re styling a city apartment, a rental patio, or a weekend cabin, you’ll find professional tips, clear measurements, and real-world fixes to bring the magic of Bohemian glow into your home safely and affordably.
The Boho Philosophy of Light
Bohemian interiors are “collected, not decorated.” Lighting must follow that ethos. Forget a single overhead fixture; think layers of brightness and shadow that change as you move through the space.
Designer’s Notes
Use at least three layers: ambient, task, and accent. This detailed guide explains how each layer supports the others.
Aim for a lighting ratio of 3:1 between highlights and background for soft drama.
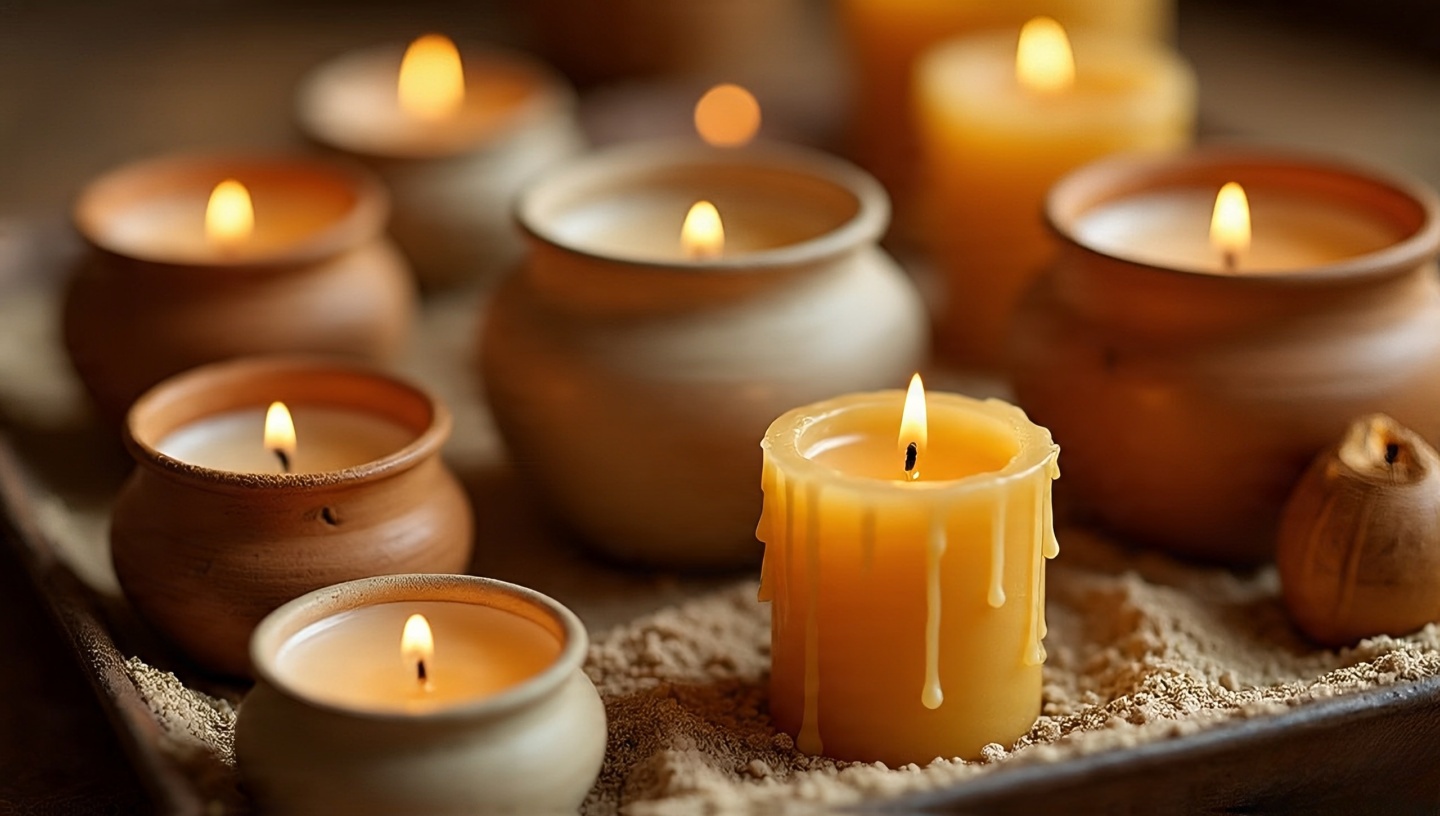
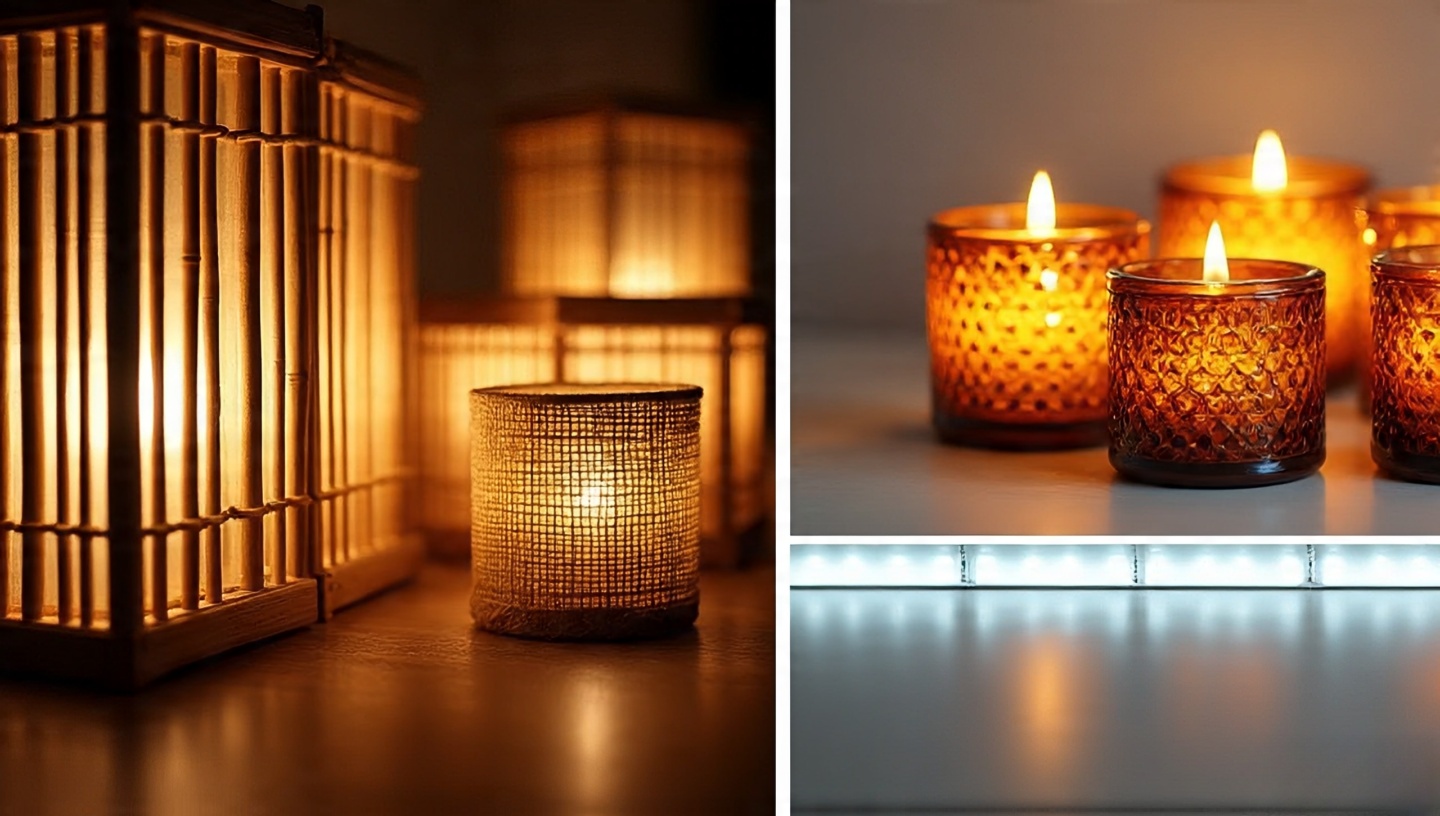
Candles: The Soul of Boho Warmth
Candles remain the quickest way to add soul. I’ve used beeswax pillars tucked into hand-thrown clay pots and watched wax drip like golden honey an aroma that instantly slows a room’s heartbeat.
Dimensions & Clearances
Leave at least 300 mm (12 in) clearance above any open flame.
Cluster groups no larger than a 450 mm (18 in) circle for visual balance and easier airflow.
Common Mistake & Fix
Mistake: Candles too close to lightweight drapes. Fix: Position at least 600 mm (24 in) from fabric or use glass hurricanes with a vented top.
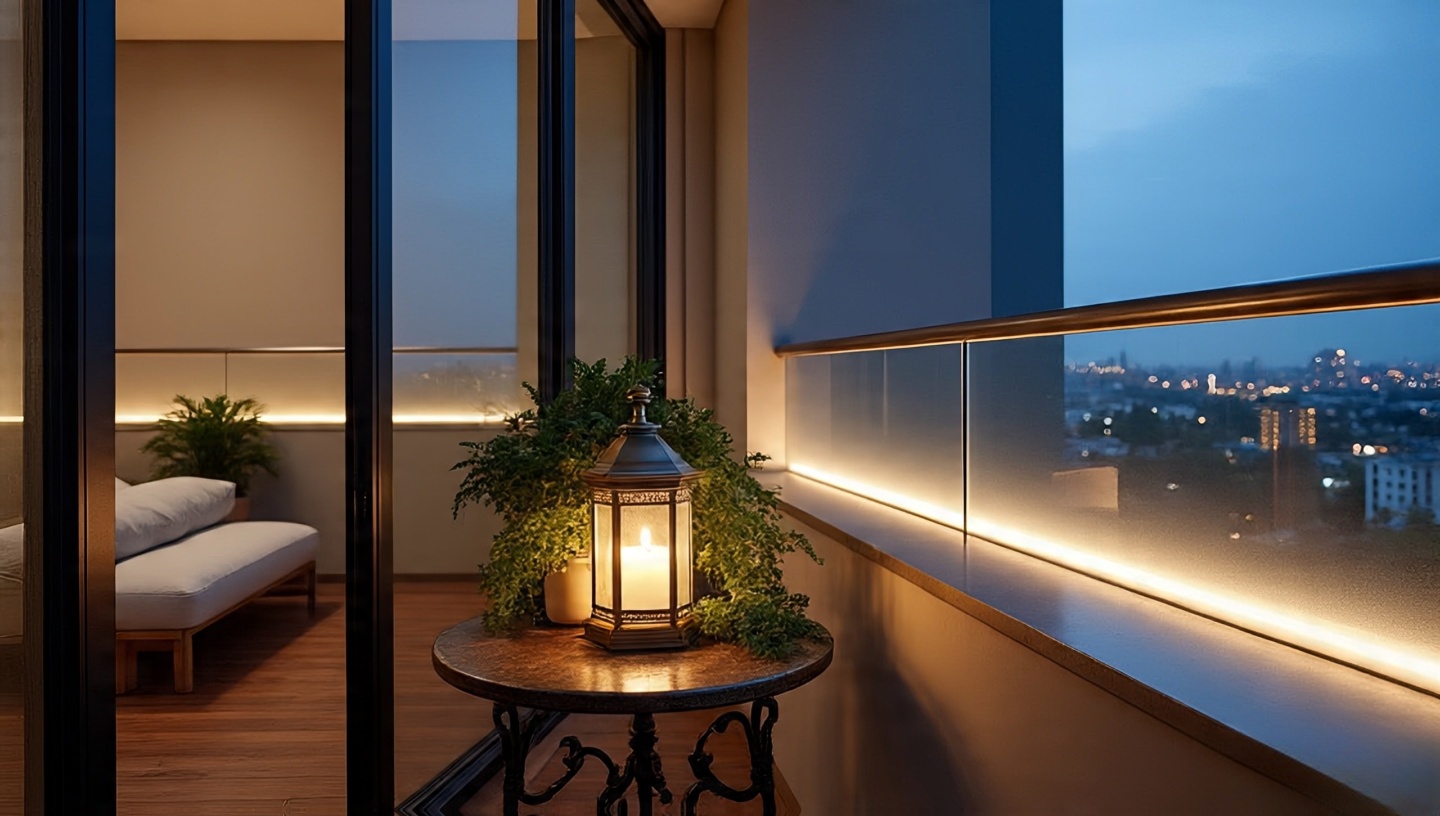
Lanterns: Traveling Light Stories
I once rescued a dented Moroccan lantern at a flea market; a gentle polish left just enough patina to catch candlelight. Hanging it from a tree branch transformed a plain backyard into a secret garden party.
Materials & Finishes
Metal: Brass or copper throws a warm, amber hue and ages gracefully.
Bamboo or Rattan: Lightweight and ideal for humid climates, but seal with a water-based polyurethane to resist mildew.
Installation & Sequencing
Outdoor hooks should be stainless steel grade 304 or better to prevent rust.
Space lanterns 900 mm (36 in) apart for balanced illumination along a path or pergola.
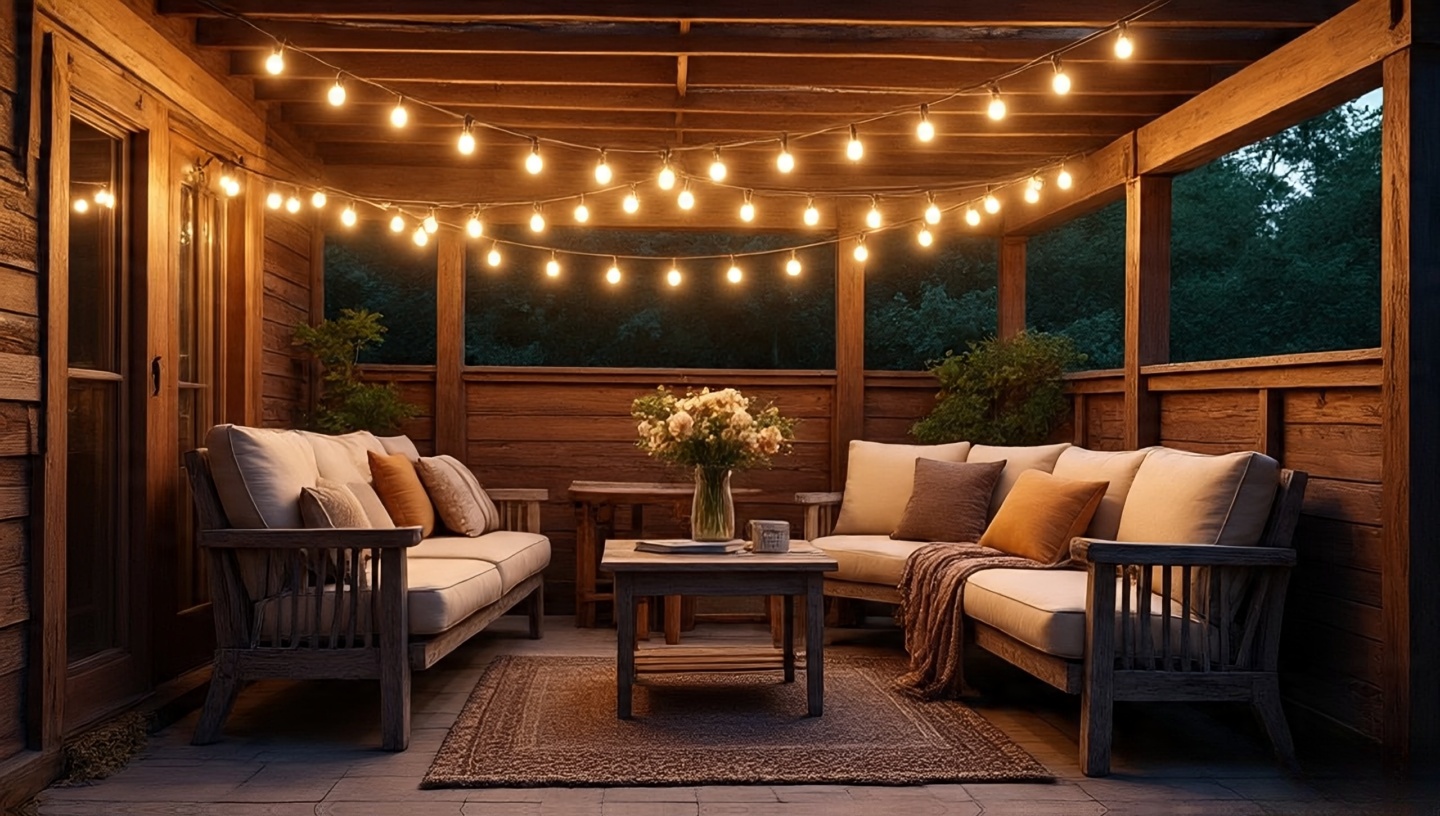
String Lights: Instant Magic
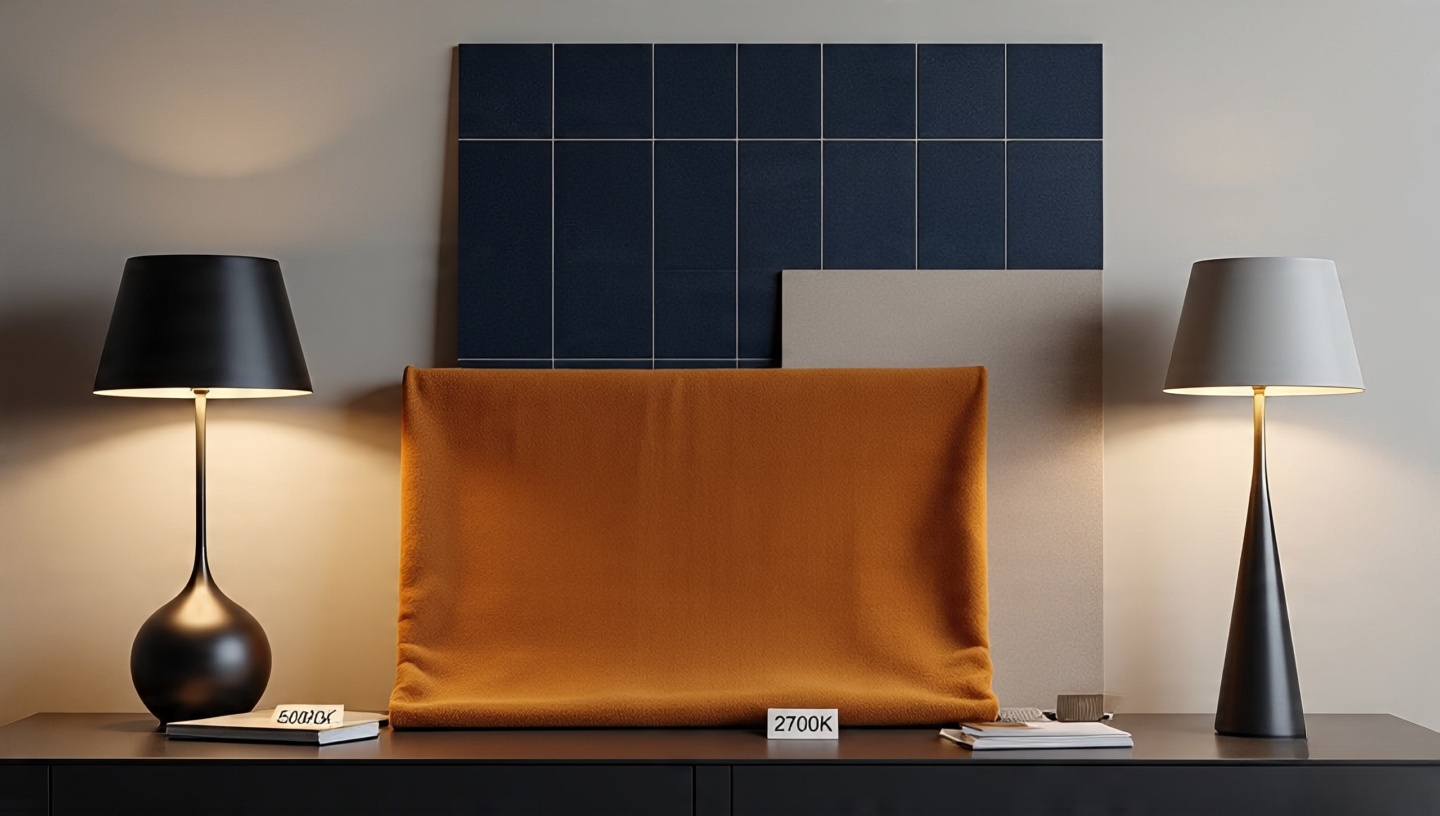
Few elements deliver atmosphere per dollar like string lights. In a stark studio apartment, one strand of warm Edison bulbs (2700 K) can transform the mood overnight it feels like camping, but fancier.
Cost & Value
Commercial-grade LED strands: around $2–3 per linear foot, lasting 25,000+ hours.
Battery micro-LEDs: cheaper upfront, but plan for frequent battery swaps if used nightly.
Common Mistake & Fix
Mistake: Sagging cables under their own weight. Fix: Use stainless steel guide wire every 1.8 m (6 ft) to prevent droop and protect electrical connections.
Textures That Amplify the Glow
Light adores texture. Rough plaster, woven rugs, and macramé wall hangings catch shadows that smooth drywall never will. When I added a jute rug and chunky knit throws, the light suddenly felt thicker, almost tangible. For deeper design context, explore this article on atmosphere and patina.
Designer’s Notes
Pair matte walls (flat or eggshell finish) with high-gloss accents to bounce light selectively an old theatrical trick for depth.
Budget Lessons Learned the Hard Way
Shop Off-Season: Post-holiday sales can cut string-light prices by 50 % or more.
Repurpose Glass Bottles: Drop micro-LEDs into empty wine bottles for instant table lamps.
DIY Lanterns: Punch patterns into old tin cans; a single tea light will cast starry shadows.
Cost Matrix
Item
DIY Cost
Retail Cost
Tin-can lantern
$2–3
$20+
Wine-bottle lamp
$5
$25
Safety and Practicality
Atmosphere matters, but so does code compliance. Check local fire ordinances for balcony candles and confirm outdoor string lights carry a UL Wet Location rating. Indoors, combine real candles with LED flameless ones for late-night ambience without risk.
Dimensions & Clearances
Maintain a minimum 1 m (39 in) pathway clearance around any open flame for egress safety especially important in multifamily housing.
When Light Becomes a Story
During a storm that cut power across my neighborhood, I lit every lantern I owned. Neighbors drifted in, drawn by the flicker through my windows. We shared tea and quiet laughter while rain drummed the roof. Lighting isn’t just décor; it’s a gathering force.
Mixing Modern and Rustic
Boho doesn’t require abandoning technology. Smart plugs and timers can automate your evening glow. Pair these conveniences with reclaimed wood furniture or clay pots to balance new with old.
Climate & Code Considerations
In humid tropics, choose marine-grade wiring and corrosion-resistant fittings.
For cold climates, select cables rated to -40 °C to avoid brittleness.
Little Touches With Big Impact
Lava Rocks Around Fire Pits: They store and radiate heat longer than plain gravel.
Mirrors Behind Candles: Double the glow without extra flames.
Dimmer Switches: Low-cost upgrade (under $30) for perfect evening mood.
Decision Checklist: Your First Boho Glow Plan
Identify three lighting layers: ambient, task, accent.
Measure clearances: 300 mm above candles, 1 m egress paths.
Choose materials rated for your climate (marine-grade, UL Wet, etc.).
Blend at least two textures jute, brick, macramé for shadow play.
Set a budget and shop off-season for best value.
Seasonal Lighting Strategies
Lighting that feels perfect in July can look flat in December. Over the years I’ve learned to design for the seasons, so the Boho glow never feels stale.
Summer Breeze
Use citronella or lemongrass candles to keep mosquitoes at bay while adding a citrusy scent.
Opt for airy bamboo lanterns and lighter fabrics that sway with warm winds.
Autumn Warmth
Layer amber glass hurricanes to echo falling leaves.
Increase candle clusters as evenings grow longer, but keep clearances generous to account for more indoor gatherings.
Winter Glow
In cold climates, integrate dimmable LED strips along window frames to fight long dark nights.
Add heavy woven textiles think wool throws to catch and amplify candlelight.
Integrating Plants and Light
Plants and lighting share a quiet relationship. A trailing pothos catching a soft glow feels like living art. But there are rules to keep greenery healthy.
Designer’s Tips
Keep live plants at least 150 mm (6 in) from open flames to avoid singeing leaves.
Choose species that enjoy low light snake plant, ZZ plant, or philodendron so they thrive even with gentle evening illumination.
Acoustic Considerations
Light sets mood, but sound completes it. In many Boho spaces I design, I combine soft lighting with materials that enrich acoustics.
Rugs and macramé absorb echo, making conversation warmer.
Lantern glass can gently resonate when breezes pass; a subtle, pleasing chime effect if positioned carefully.
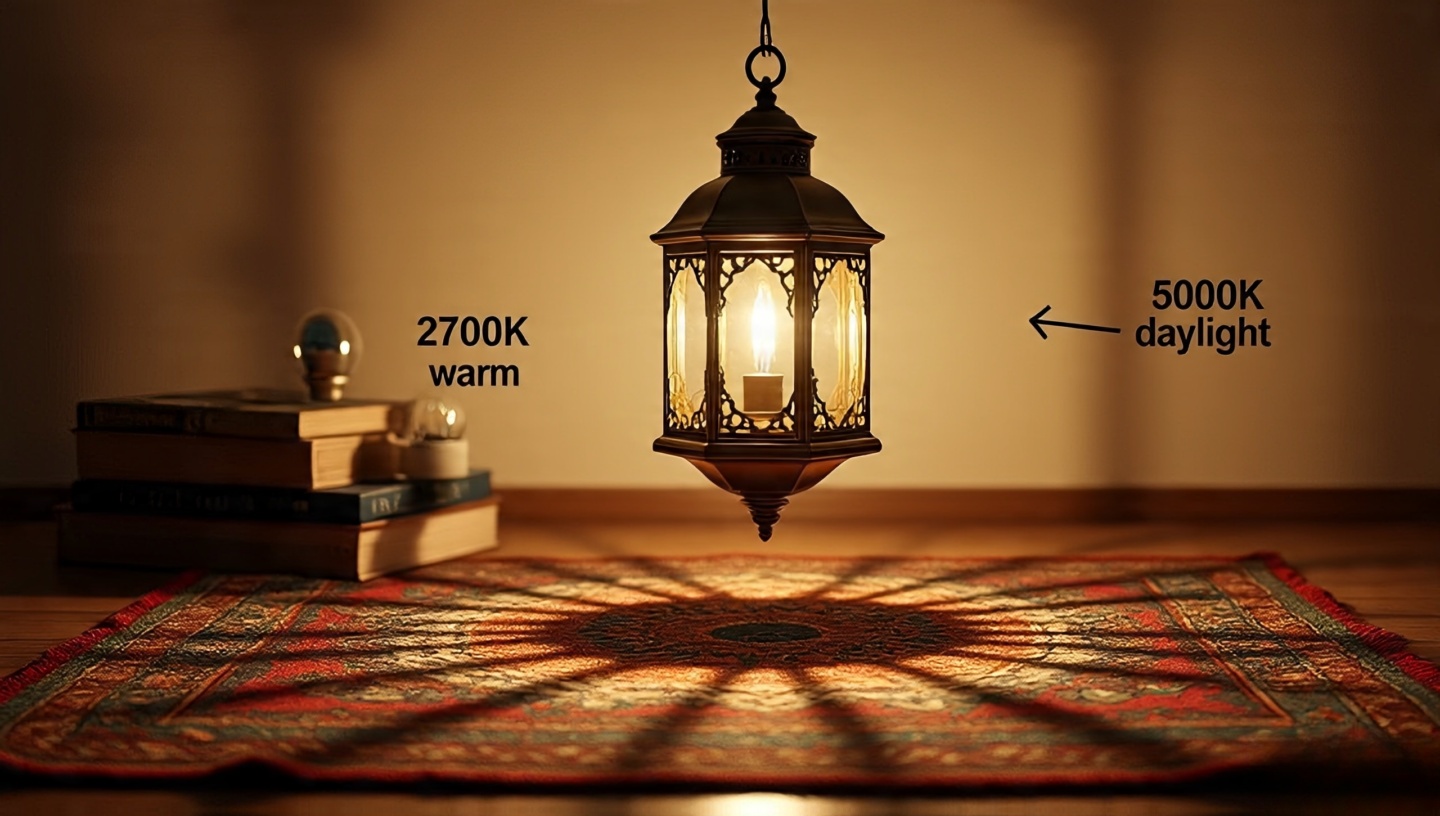
Color Temperature Science
Understanding Kelvin ratings helps you stay consistent. A candle glows around 1,800 K, while most “warm” LED bulbs sit near 2,700 K.
Decision Matrix: Choosing Bulb Temperature
Kelvin
Effect
Best Use
1800–2200 K
True candlelight
Bedrooms, patios
2700–3000 K
Classic warm white
Living rooms, dining
4000 K+
Cool/neutral
Avoid for Boho too clinical
Outdoor Weatherproofing
Not every light is meant to brave the elements. I’ve seen many clients disappointed when bargain lights corroded after a single rainy season.
Look for IP65 or higher for direct rain exposure.
Use heat-shrink tubing on all exterior connections to block moisture.
Anchor cables to withstand 40 km/h gusts; stainless eye-hooks every 1.5 m (5 ft) are a reliable standard.
Creating Zones for Conversation
Great Boho lighting guides people naturally. I divide patios or living rooms into three light “zones” so guests drift without crowding.
Welcome Zone: Lanterns at eye level to draw people in.
Gather Zone: String lights overhead for dining or music.
Quiet Zone: Soft candle clusters for one-on-one chats.
Case Study: Tiny Urban Balcony
A recent client had a 1.2 × 3 m apartment balcony. We layered micro-LED strings along the railing, added two wall-mounted copper sconces at 1.6 m height, and suspended a single 300 mm brass lantern from a ceiling hook. The entire project cost under $150 and turned a once-ignored space into their favorite “room.”
Lighting for Small Gatherings
For dinners of six to eight, aim for about 15 lumens per square foot of ambient light. Supplement with candles to avoid harsh overhead glare. This balance lets food and faces shine without feeling like a stage set.
Maintaining Your Boho Glow
Atmospheric lighting requires upkeep. Dust builds on bulbs, wicks need trimming, and outdoor fixtures need seasonal checks.
Trim candle wicks to 6 mm (¼ in) before each burn to reduce soot.
Wipe LED bulbs with a soft microfiber cloth every month to maintain brightness.
Inspect extension cords quarterly for nicks or frays especially outdoors.
Mini-FAQ
Q: Can I use indoor string lights outside? A: Only if the packaging lists “UL Wet” or “IP65” or higher; otherwise moisture can short the wiring.
Q: How many candles are safe on a small balcony? A: Limit to what maintains a 1 m egress path and always use weighted, wind-proof holders.
Q: Do LED candles look realistic? A: High-quality models with flicker chips and warm 2200–2400 K color can fool most guests.
Closing Thoughts
Lighting is never just about visibility. It’s about feeling the shimmer of lanterns on a quiet night, the soft hum of string lights when friends gather, the faint scent of melted wax. Start with one idea tonight: maybe the DIY tin-can lantern or a single strand of Edison bulbs. Notice how your space changes when the lights go low and the stories begin.
Roohome.com – When I first moved into my tiny city apartment, I thought a single overhead lamp would be enough. It wasn’t. The room felt flat and cold, like a waiting room instead of a nest. One evening, after balancing on a wobbly chair to replace a flickering bulb, I realized lighting isn’t just about brightness. It’s mood, rhythm, even a quiet form of storytelling. Boho style free-spirited yet grounded thrives on that kind of layered light.
Over three decades as an architect, I’ve seen clients underestimate lighting more than any other element. The right plan doesn’t just illuminate; it shapes how you cook, read, gather, and rest. This guide is for homeowners, renters, and design enthusiasts who want a Boho space that feels alive after sunset.
Below, I break down the essentials ambient, task, and accent lighting plus the nitty-gritty details designers obsess over: dimensions, materials, sequencing, and the small mistakes that can ruin a beautiful plan.
1. Why Boho Homes Deserve More Than One Light Source
Bohemian interiors celebrate texture, color, and a sense of travel. A single harsh bulb kills that vibe. Imagine the shimmer of woven wall hangings or the deep grain of reclaimed wood under a soft glow. Ambient, task, and accent lighting work like instruments in a band: each with a distinct role, but magic happens when they play together.
Designer’s Note
Think of light as a flexible wall. It defines zones, softens corners, and adds movement. Without layers, even the richest textiles look two-dimensional.
2. Ambient Lighting: The Soulful Base Layer
Ambient lighting is your background glow broad, embracing, a little mysterious. In my own living room, I swapped a bright ceiling fixture for a cluster of rattan pendant lamps. When dimmed, the light filters through the weave, creating dappled patterns that dance across plaster walls. It feels like camping, but fancier.
Dimensions & Clearances
Ceiling pendants: hang 30–36 inches above a dining table, 7 feet minimum above walkways.
Wall sconces: center at 60–66 inches from the floor for even eye-level glow.
Materials & Finishes
Rattan or wicker shades scatter playful shadows.
Frosted glass diffuses light for gentle coverage.
Tip: Use dimmers so you can shift from morning brightness to evening coziness with a flick of the wrist.
3. Task Lighting: Functional but Never Boring
Picture yourself slicing herbs at a reclaimed wood counter or reading a novel on a tufted daybed. You need focused light, but Boho doesn’t mean sterile. I once rescued a bent brass pharmacy lamp from a flea market; now it angles perfectly over my reading chair, the patina catching the glow like an old coin.
Common Mistake
Too Narrow a Beam: A spotlight narrower than 30° creates harsh circles. Choose adjustable heads for a wider, softer cone.
Fix
Swap to a 60° flood bulb or add a secondary diffuser to soften edges.
Kitchen counters: Adjustable sconces instead of standard under-cabinet strips add character and flexibility.
Creative corners: Art studios deserve articulated lamps aged copper or hand-painted ceramic bases add story.
Small-space hack: Clip-on lights can travel from desk to bedside when square footage is tight.
4. Accent Lighting: Little Sparks of Magic
If ambient is the background and task is the workhorse, accent lighting is the flirt. It highlights art, plants, or architectural quirks. One rainy weekend, I tucked a string of amber fairy lights into a shelf of pottery. Suddenly the dull nook became a glowing shrine to my travels.
Wall washers graze a textured wall, making macramé pop.
Glass-door cabinets with subtle lighting turn everyday mugs into sculpture.
Uplights at the base of a fiddle leaf fig create dramatic silhouettes at night.
5. Layering Without Clutter
The trick is layering, not competing. I start with ambient fixtures, add task lamps where I naturally sit or cook, then sprinkle accents like a chef finishing a dish with salt. Step back after each addition. Does the room feel balanced or chaotic? Boho embraces abundance, but light should flow like music, not shout over itself.
Decision Matrix: When to Add or Edit
Sign
Action
Dark corners
Add a focused accent light
Flat textures
Introduce patterned shades or wall grazers
Glare on screens
Lower ambient output or reposition task lamps
6. Materials That Age Gracefully
Texture isn’t just for cushions. Beaten metal lanterns add a moody shimmer, rattan softens edges, and hand-blown glass pendants scatter starlike reflections. I once found a Moroccan shade whose bubbles painted constellations across my ceiling. Patina isn’t damage; it’s history.
7. Color Temperature & Bulb Choices
While you could get technical with lumens and CRI, I go by feel. Warm white (around 2700K) flatters skin and textiles. For a dreamy vibe, Edison-style filament bulbs add a soft amber hue. Smart bulbs let you shift tones for different moods, but I still love the romance of a simple dimmer and a well-crafted bulb.
8. Creating Vignettes and Zones
Lighting can carve out zones in an open-plan space. In my loft, a pair of paper lanterns signals the dining area, while a cluster of candles defines the meditation corner. It’s subtle but powerful like drawing invisible walls with light. Guests instinctively gather where the glow feels most inviting.
9. Outdoor Boho Lighting
Don’t forget balconies or patios. I love draping solar-powered fairy lights across a bamboo pergola. Add a few lanterns with citronella candles and you’ve got a setup that’s equal parts cozy and mosquito-proof. Use lava rocks around your fire pit they hold heat longer on chilly nights and look like dark chocolate pebbles under moonlight.
Climate Considerations
Check IP ratings: IP44 or higher for damp areas, IP65 for full exposure. Stainless steel or powder-coated fixtures resist rust in humid climates.
10. Budgeting & Lifecycle Planning
Good lighting isn’t cheap, but it pays for itself in comfort and resale value. Expect to allocate 10–15% of your interior budget to lighting. Choose LED for lower energy bills and longer life look for a minimum 25,000-hour rating. Vintage fixtures are worth rewiring; the charm outlasts trends.
11. Sequencing Your Lighting Installation
Whether you’re renovating a whole home or simply upgrading a single room, sequencing matters. Install ambient fixtures first think of them as the backbone. Next, position task lighting so electricians can wire junction boxes accurately. Accent lighting comes last, once you’ve placed furniture and art. This order avoids costly rework and keeps your contractor from chasing changes.
Installation Tip
Label each circuit at the panel to simplify future maintenance.
Leave at least 3 inches of extra wire at each junction box to accommodate adjustments.
12. Code and Safety Considerations
As an architect, I can’t stress this enough: beauty is nothing without safety. Follow local electrical codes for load limits and outlet placement. Use UL-listed or CE-certified fixtures. In damp areas like bathrooms or outdoor patios, insist on fixtures rated IP44 or higher.
Common Mistake
Ignoring Grounding: Vintage fixtures often lack modern grounding wires.
Fix
Have a licensed electrician retrofit a grounding conductor before installation. It’s a small cost for peace of mind.
13. Working with Natural Light
Daylight is free, so integrate it into your plan. Sheer curtains can diffuse morning glare, while reflective surfaces like brass or mirrored trays bounce light deeper into the room. I often position a reading chair near a south-facing window and add a task lamp only for evenings. Think of electric lighting as a partner to the sun, not a replacement.
14. Energy Efficiency Without Compromise
Modern LEDs offer a wide spectrum of warmth and color rendering. Choose bulbs with a Color Rendering Index (CRI) of 90 or above to honor the rich hues of Boho textiles. Motion sensors in hallways or closets reduce wasted power and extend bulb life.
Budget Note
LED filament bulbs cost more upfront but last 15–20 times longer than incandescents.
Smart dimmers can cut energy usage by up to 40% over time.
15. Integrating Technology Discreetly
Smart homes don’t have to feel sterile. Hide smart hubs in woven baskets or behind decorative screens. Use voice control or app-based dimmers for convenience, but keep switches accessible for guests. I often pair a vintage sconce with a modern smart bulb the charm stays, the control improves.
16. Seasonal Lighting Strategies
Your lighting plan can shift with the seasons. In winter, I favor warmer hues and extra candles to offset long nights. Summer calls for brighter task lighting near cooking and craft zones, balanced with sheer curtains to tame midday glare. Rotate shades and swap bulbs to match the mood of each season without a full redesign.
17. Highlighting Art and Collectibles
Boho homes often feature eclectic collections. Track lighting with adjustable heads works wonders for gallery walls. Use 30-degree beams for paintings and 60-degree for sculptures or textiles. Keep a 12–18 inch offset from the wall for ideal spread. I once illuminated a client’s vintage rug as if it were a painting, and it became the star of the room.
18. Multi-Room Cohesion
A cohesive lighting story ties the entire home together. Maintain a consistent color temperature across adjoining rooms to avoid visual whiplash. Repeating a material like rattan or aged brass creates subtle harmony. It’s like carrying a melody through different movements of a symphony.
19. Quick Fixes for Renters
If you rent, you can still build layers without rewiring. Use plug-in sconces, battery-powered puck lights, and removable adhesive hooks for string lights. When I lived in a small rental loft, a single plug-in pendant over the dining table made the entire space feel intentional and warm.
Renter’s Checklist
Check lease for restrictions on wall mounting.
Use cord covers to keep cables neat and safe.
Invest in dimmable smart bulbs for flexible mood control.
20. Final Designer’s Reflection
After decades of practice, I still find lighting the most poetic part of design. It’s where function meets feeling. The right combination of ambient, task, and accent light transforms not only a room but the way you experience time in it. Start small, experiment, and let the shadows guide you because the most memorable spaces are those that glow with stories as much as with light.
With these extra layers of expertise, you can confidently create a Boho lighting plan that evolves with you and your home, season after season.
Roohome.com – I still remember the quiet crunch of jute under my feet when I first experimented with layering rugs. I had a big, slightly faded wool rug and a small vintage kilim I picked up at a flea market. The moment I set them together, the living room felt like it had a heartbeat. The textures whispered stories earthy jute, warm wool, a hint of spice from the kilim’s dye. That simple act of overlap transformed a flat space into something that felt traveled and alive.
Why Layer Rugs At All?
Layering rugs isn’t just for design magazines. It’s practical and surprisingly forgiving. Maybe your favorite rug is too small for the room, or you want to protect a pricier piece with a cheaper base. Or maybe you just crave that collected, bohemian vibe. Mixing patterns and textures adds depth and warmth that a single rug can’t match.
Texture Play: Think soft wool over flat jute, or silky viscose atop sturdy sisal.
Budget Friendliness: Use a large, inexpensive rug as a canvas, then showcase a smaller statement piece.
Seasonal Flexibility: Swap the top layer when the mood or weather changes.
Getting Sizes Right: More Important Than You Think
Start with a base rug big enough to define the conversation area. A common mistake is going too small, making furniture float awkwardly. For a living room, aim for a base that lets the front legs of sofas and chairs rest comfortably on it. Over it, layer a smaller rug (often 2/3 the size of the base) for contrast. I once tried a top rug barely half the size of the bottom one looked like a coaster on a placemat. Lesson learned.
Overlaps That Feel Effortless
The magic is in the overlap. Don’t center everything like a grid. Slide the top rug slightly off-kilter. Let one corner peek out beneath an armchair or edge under a coffee table. The human eye loves a bit of asymmetry it feels casual, lived-in, like a campsite that’s been enjoyed for a while.
Diagonal Drama: Angle the smaller rug so one corner leads toward a doorway.
Offset Balance: Shift the top rug a few inches left or right for a relaxed vibe.
Edge Framing: Keep three to four inches of the base rug visible around the smaller one to showcase both.
Anchoring Furniture Without Killing the Flow
Furniture placement can make or break the layered look. A coffee table can straddle both rugs, unifying the setup. Sofas should at least have their front legs on the base rug, while side chairs can overlap slightly onto the top rug for a playful touch. When I anchored a leather club chair half on the kilim, half on the jute, it felt like the chair was inviting you in for a long read and a cup of cinnamon tea.
Materials & Textures: The Secret Sauce
Pair opposites for maximum impact: smooth on rough, shiny on matte. A shag or Moroccan rug over a natural jute base is a classic move. The base handles foot traffic; the top delivers that plush, sink-in comfort. For dining areas, flip it use a low-pile wool base and a flat woven runner layered across the center like a textile table runner for your floor.
Tip: If you live in a humid climate, add a thin rug pad between layers to let air circulate and avoid mildew.
Tip: For allergy-prone households, avoid deep shag as the top layer it traps more dust.
Patterns That Sing Together
Patterns are where personality explodes. If you love global motifs, consider pairing a muted kilim with a vibrant Moroccan print. Balance is key: if the base rug is busy, let the top be simpler. I once stacked two bold geometrics, thinking “more is more,” but it gave me a headache every time I entered the room. Editing is love.
Need inspiration? Dive into the guide to global patterns for Moroccan, Turkish, Indian, and Berber designs. It’s a passport to texture and history without leaving your living room.
Color Stories You’ll Want To Live In
Layering rugs is like mixing paint on a palette. Earthy neutrals on the bottom let you splash jewel tones on top. Or go monochrome with shades of gray and charcoal for a gallery-like calm. Think about the light in your room too a northern exposure might crave warm terracotta, while a sun-drenched space can handle cool blues and greens.
The Small-Space Hack
In a studio apartment, layering can define “zones.” I once lived in a 38-square-meter flat where a jute rug marked the living area and a striped runner layered diagonally separated my reading nook. It felt like two rooms in one, without a single wall erected.
Practical Tips to Keep It From Slipping
Use a quality rug pad beneath the bottom rug for grip and cushion.
For extra security, add thin double-sided carpet tape under the top rug corners.
Rotate layers every few months to even out wear and fading.
Challenges & How to Tackle Them
Shedding: New wool rugs shed. Vacuum lightly with a brushless attachment. Cleaning: Layered rugs mean double duty. Shake out the top one often; lift it to clean crumbs from the base. Sunlight Fade: If your room gets fierce afternoon rays, rotate rugs quarterly. A little discipline keeps the colors vibrant.
When to Break the “Rules”
Design rules exist to be bent. Want three layers? Go for it. Prefer a tiny accent rug over a giant base, like a postage stamp on an envelope? If it delights you, it works. I once threw a cowhide on top of a thick shag just because it reminded me of a mountain lodge and it became everyone’s favorite conversation piece.
Rugs Beyond the Living Room
Layering works in bedrooms, dining rooms, even hallways. A patterned runner over a neutral carpet can guide the eye like a trail through a forest. In bedrooms, place a narrow rug atop a wide sisal under the bed’s edge; you’ll love the first-morning step onto that soft surface.
The Emotional Payoff
There’s a quiet satisfaction in creating a room that tells your story. Rugs absorb memories: the echo of laughter, the soft patter of pets, the smell of morning coffee. When you layer them, you’re literally stacking experiences. Each fiber catches a piece of your life.
Final Thoughts Your Turn
Layering rugs is part art, part play. Don’t overthink it. Start with what you have, shift things around, listen to the textures underfoot. Maybe tonight, roll out that smaller rug from the closet, slide it at an angle, and see how the room changes. If it feels like camping but fancier, you’ve nailed it.
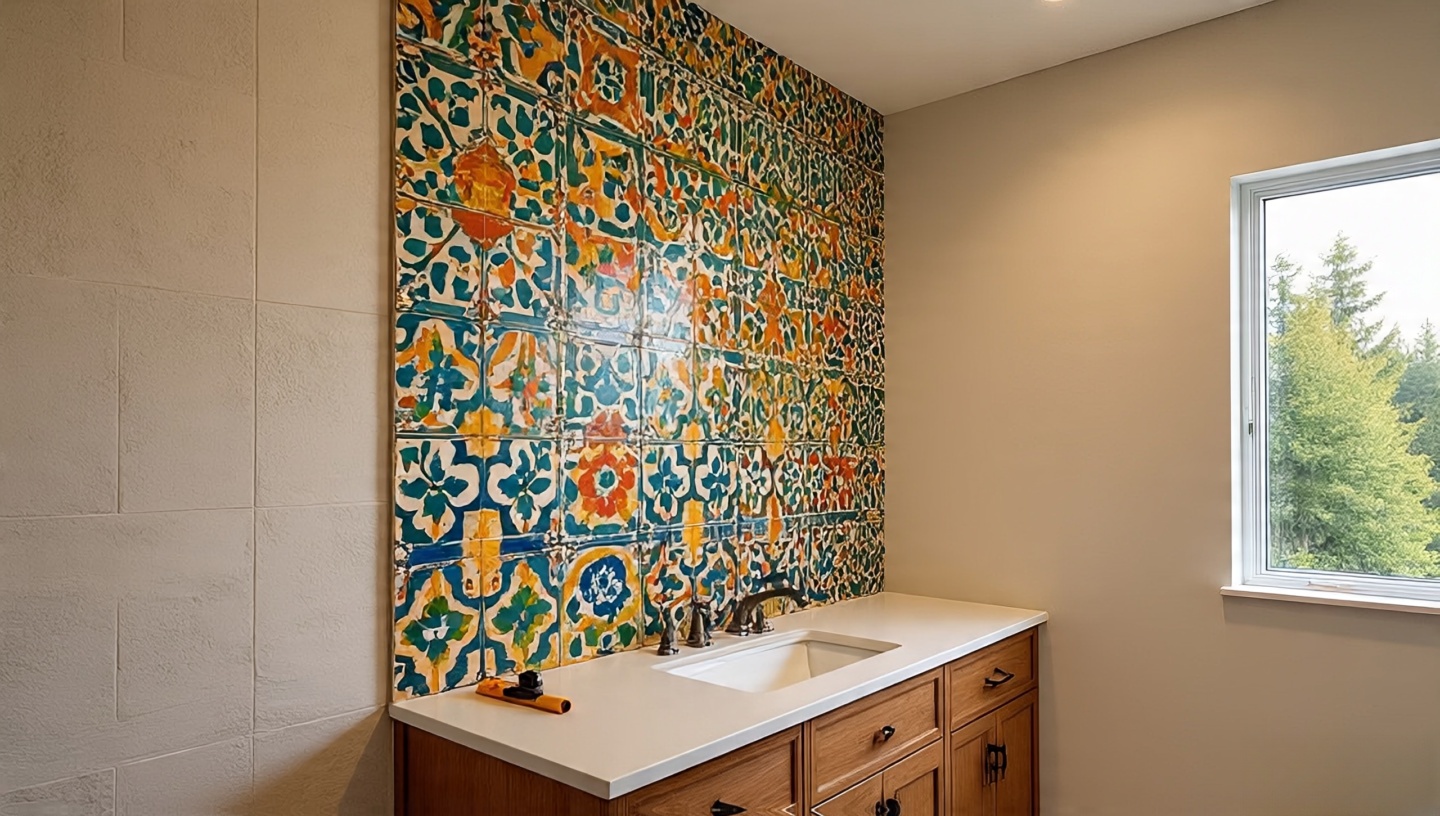
Roohome.com – I still remember the first time I unrolled a Moroccan rug in my own living room. The scent of lanolin rose up like a faint memory of a mountain market, and the jewel-toned diamonds instantly made the space feel alive. That single act sent me down a lifelong path of exploring global patterns from the geometric drama of Turkey’s kilims to the intricate paisleys of India and the earthy simplicity of Berber weaves.
If you’ve ever stood in a bazaar, fingers brushing against hand-woven fabrics, you know that patterns are more than decoration. They carry the hum of trade routes, the wisdom of artisans, and the quiet thrill of travel. This guide is both story and manual: a deep dive into the craft, measurements, and decisions that let you bring these traditions home without turning your living room into a souvenir shop.
Whether you’re a design professional or a curious homeowner, you’ll find here a mix of lived experience, technical data, and personal reflections. Let’s travel room by room and continent by continent.
1. Why Global Patterns Matter in a Modern Home
Patterns are visual fingerprints of culture. Moroccan zellige tiles echo centuries of Islamic geometry, Turkish kilims carry nomadic clan symbols, Indian block prints whisper of Mughal gardens, and Berber rugs chart tribal stories in simple lines.
Designer’s Note
I often tell clients: “A pattern is not just a surface, it’s a narrative.” When you layer these elements, you’re inviting history and craftsmanship into your daily routine.
Common Mistake & Fix
Mistake: Treating patterns as mere decoration. Fix: Learn the origin of each piece and let that story guide placement. This respect shows in the final atmosphere.
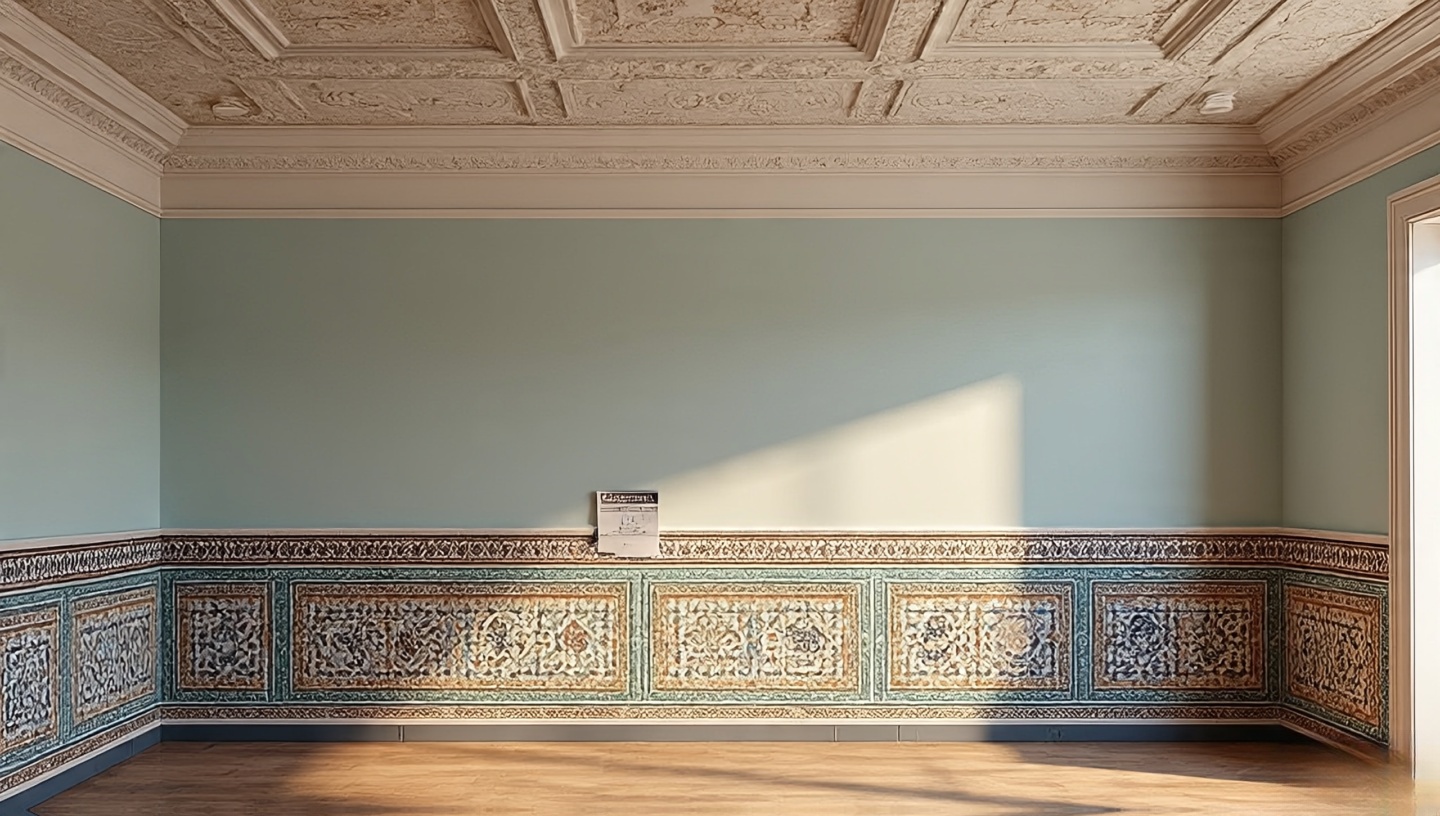
2. Moroccan Magic: Geometry and Desert Light
Moroccan design feels like a conversation between desert dunes and city mosaics. Bold quatrefoils, starbursts, and diamond grids define the style.
Dimensions & Clearances
Zellige tiles often come in 4×4 inch (10×10 cm) modules. Allow a 1/16 inch (1.5 mm) grout line for that signature uneven sparkle.
Materials & Finishes
Choose hand-cut tiles; the slight irregularity catches light in ways machine cuts never can. Seal them well zellige is porous and loves to drink up splashes of olive oil.
Color palette: indigo blues, saffron yellows, clay reds.
Layering idea: pair a Moroccan rug with a neutral linen sofa so the pattern leads the room.
Image idea: Close-up of hand-cut zellige tiles catching morning light, alt text “Moroccan zellige tiles in cobalt blue with natural imperfections.”
3. Turkish Textiles: Kilims, Coffee, and Warm Hospitality
Walk into a Turkish bazaar and you’ll hear the looms before you see them. Kilims flat-woven rugs with zigzags and medallions are like graphic novels in wool. I once dragged a 10-foot kilim through Istanbul’s Grand Bazaar after an afternoon of bargaining and apple tea. Worth every lira.
Installation & Sequencing
Lay a rug pad first to prevent sliding. Kilims are reversible, so rotate them every six months to even out wear.
Cost & Value
Authentic vegetable-dyed kilims range from $30 to $60 per square foot. Synthetic dyes cost less but fade unevenly.
Look for vegetable dyes; they develop a warm patina over time.
Flat weave makes them ideal under dining tables chairs glide smoothly.
Image idea: Grand Bazaar stall stacked with folded kilims in reds and oranges, alt text “Stacks of Turkish kilims in a market stall.”
4. Indian Elegance: Paisley, Block Prints, and Festival Energy
India’s patterns are like music complex but somehow inevitable. Paisleys swirl like monsoon clouds, while block prints stamp rhythmic flowers and vines. In Jaipur, I watched artisans hand-dip wooden stamps into indigo dye, their wrists flicking in a quiet dance.
Materials & Finishes
Use pure cotton or silk for breathability. Pre-wash block prints in cold water with a pinch of salt to set the dye.
Climate Consideration
Natural dyes react to sunlight; use UV-filtering window film to prevent fading in bright rooms.
Image idea: Artisan block-printing fabric in indigo dye, alt text “Jaipur craftsman printing paisley pattern on cotton.”
Berber rugs from the Atlas Mountains tell their stories in undyed wool and minimal symbols. The first time I rolled one out in a sunlit loft, the natural cream and charcoal lines felt like quiet poetry after the riot of Indian prints.
Dimensions & Clearances
Standard Beni Ourain rugs range from 5×8 ft to 9×12 ft, with a plush 1–1.5 inch pile allow for door clearances if used in entryways.
Common Mistake & Fix
Mistake: Vacuuming with a beater bar. Fix: Use suction only to avoid pulling natural fibers.
Image idea: Minimalist living room with cream Berber rug and matte black accents, alt text “Berber rug anchoring a modern loft space.”
6. Mixing Worlds Without Making a Mess
Blending Moroccan tiles with Turkish kilims and Indian cushions can feel like hosting a rowdy dinner party. My rule: pick one pattern to be the “lead singer” and let the others play backup.
Decision Matrix
Lead Element: Choose one dominant pattern (floor or wall).
Supporting Cast: Add 1–2 secondary patterns at 30% scale of the lead.
Neutral Base: Keep at least 40% of the room in solid tones (white walls, oak floors).
7. Lighting, Texture, and the Magic of Shadows
A single rattan pendant can cast lace-like shadows across a Turkish kilim, transforming the mood after sunset. Warm bulbs (around 2700K) highlight natural fibers better than cool ones.
Designer’s Note
I once swapped a basic ceiling light for a pierced brass lantern, and suddenly my living room felt like a café in Marrakesh.
8. Practical Tips from the Road
Measure before you fall in love. Bring room dimensions on a card when traveling.
Ask about care. Vegetable dyes can bleed if scrubbed; gentle vacuuming is often enough.
Ship smart. Roll rugs tight, wrap in plastic, and mark “textile sample” to simplify customs.
9. Budgeting and Value: What to Spend and When to Save
Authentic pieces cost more, but longevity offsets price. A hand-woven Moroccan rug can last 30 years with proper care, while a factory print may fade in five. Allocate 60% of your décor budget to the primary floor or wall pattern; accessories can be found at flea markets or estate sales for less.
Fix: In humid regions, choose breathable natural fibers and use a dehumidifier to prevent mold in thick Berber rugs.
11. Choosing the Right Scale for Patterns
Scale is often overlooked, yet it’s the silent partner of good design. A grand Moroccan quatrefoil can dominate a small powder room, while a delicate Indian block print might disappear in a large living area. Before buying, step back and picture how far away the eye will be when the pattern is viewed.
Designer’s Rule of Thumb
Patterns viewed from more than 10 feet can be bold and large.
Spaces under 6 feet of viewing distance benefit from smaller, tighter motifs.
Image idea: Side-by-side comparison of large-scale Moroccan tile and small-scale Indian print in different room sizes, alt text “Large and small pattern scales demonstrated in living spaces.”
12. Floors, Walls, and Ceilings: Where to Place the Drama
Not every pattern belongs on the floor. Some of the most striking designs I’ve created involved tiled ceilings and patterned plaster. If you have low ceilings, keep patterns vertical tiled wainscots or patterned drapery draw the eye up without crowding the headspace.
Installation Tip
Always confirm ceiling joist load before adding heavy patterned tiles overhead. A typical joist supports about 5–10 psf (pounds per square foot); calculate tile and adhesive weight accordingly.
13. Outdoor Applications
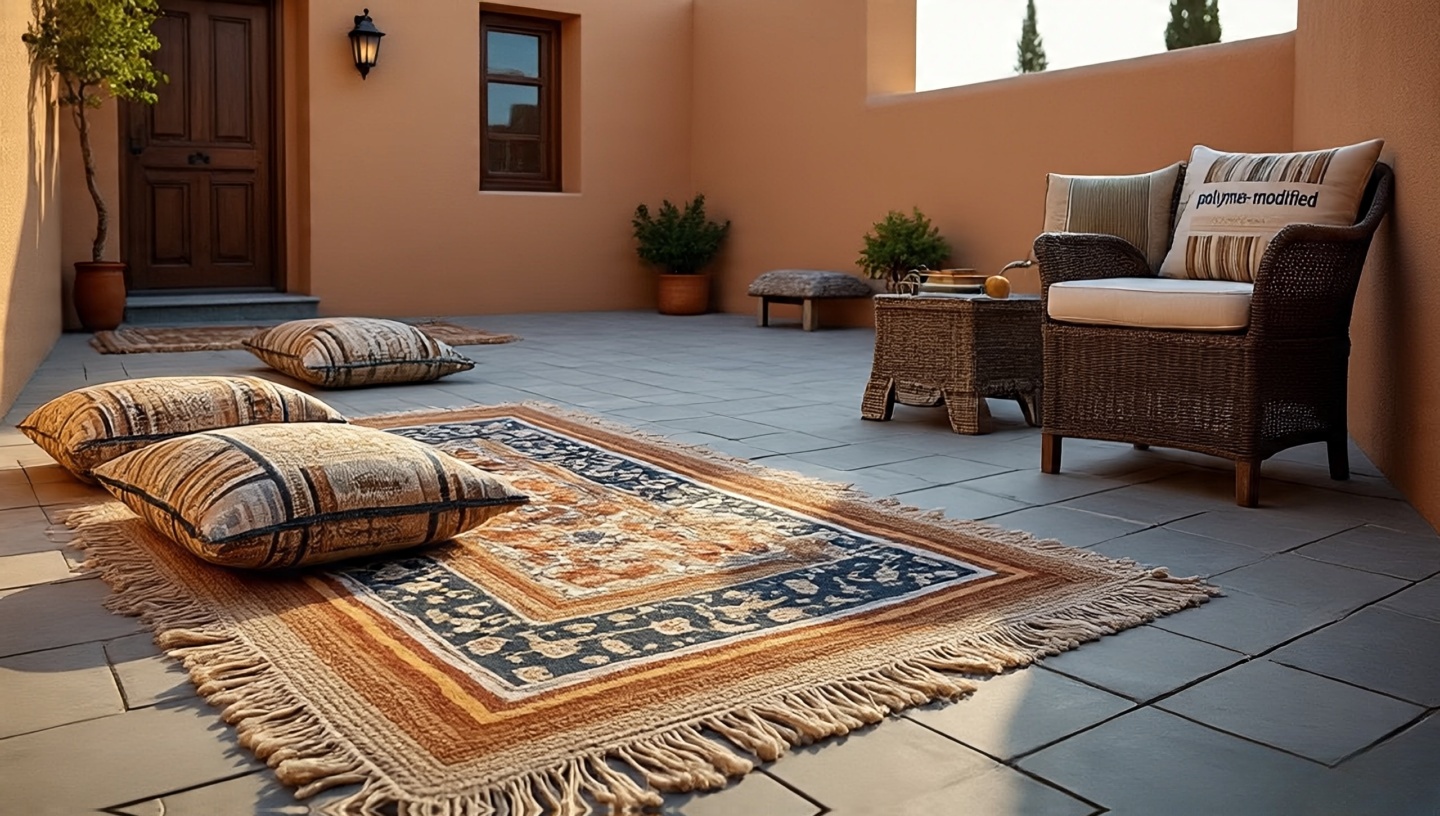
Global patterns don’t need to stay inside. Moroccan encaustic tiles create unforgettable patios, while Turkish kilims can be adapted as outdoor rugs if treated with UV-resistant sealant.
Climate/Code Considerations
In humid or freeze-thaw climates, choose frost-proof tiles and use polymer-modified thinset to avoid cracking.
Image idea: Courtyard with patterned Moroccan tiles and low Berber seating, alt text “Outdoor courtyard with Moroccan patterned tile and cushions.”
14. Pairing Patterns with Modern Minimalism
One of my favorite juxtapositions is a stark modern room softened by a single vintage rug. Concrete floors and white walls allow a Turkish kilim or Indian print to become functional art. The tension between clean lines and centuries-old craft creates a space that feels fresh yet rooted.
15. Color Psychology and Light
Color isn’t just visual; it affects mood and perceived space. Deep indigo can cool a sun-soaked room, while saffron warms a shaded corner. When installing Moroccan or Indian patterns, use daylight-temperature bulbs (5000K) if you want true color accuracy, or warm bulbs (2700K) for a softer evening glow.
Common Mistake & Fix
Mistake: Judging colors under store lighting. Fix: Always request a sample and test it in your actual room for at least 24 hours.
16. Sustainable Sourcing and Ethics
Authentic global patterns often come from small artisan workshops. Supporting them means respecting fair trade and responsible harvesting. I recommend asking vendors for cooperative certifications or direct artisan contacts. It’s not just ethical; it ensures quality.
Budget Insight
Fair-trade rugs may cost 15–20% more, but they typically last decades longer than mass-produced copies, balancing cost over time.
17. Maintenance and Longevity
Each pattern carries its own maintenance rhythm. Kilims benefit from a gentle beating outdoors once a year, while Berber rugs need occasional professional washing to refresh natural oils.
Tiles: Reseal every 2–3 years depending on traffic.
Textiles: Rotate seasonally to even out UV exposure.
18. Integrating Technology with Traditional Patterns
Smart lighting can highlight patterns at specific times of day. I’ve programmed systems to wash Moroccan tiles in warm light during dinner hours and shift to cooler tones for morning brightness. It’s a subtle way to blend ancient craft with modern convenience.
19. Regional Hybrids and Personalization
Don’t be afraid to create your own fusion. I once combined Indian paisley wallpaper with a minimalist Japanese tatami layout. The result felt like a quiet tea house that had traveled through Rajasthan. Use patterns as vocabulary, not dogma.
20. Bringing It All Together: Your Action Plan
Here’s a concise checklist to start your own global-pattern project:
Identify one cultural pattern that speaks to you Moroccan, Turkish, Indian, or Berber.
Decide the application: floor, wall, ceiling, or textiles.
Measure and test scale with painter’s tape outlines before buying.
Source ethically, asking vendors for artisan details.
Plan lighting to complement textures and colors.
Image idea: Mood board collage of Moroccan, Turkish, Indian, and Berber samples with measuring tape, alt text “Mood board of global patterns and tools for planning.”
21. Layering Patterns with Furniture Layout
The furniture plan is as important as the pattern itself. A Moroccan rug hidden beneath an oversized sectional loses its voice. I like to float furniture leave at least 12–18 inches of the rug exposed on all sides so the geometry reads clearly.
Dimensions & Clearances
Maintain a minimum 18-inch walkway around coffee tables.
For dining tables, allow 24 inches beyond chair backs so the kilim edge stays visible when chairs are pulled out.
Image idea: Living room layout diagram with rug borders visible around furniture, alt text “Optimal rug exposure with floating furniture arrangement.”
22. Combining Metals and Woods with Global Textiles
Patterns sing louder when paired with the right materials. Brass complements the warmth of Turkish reds; pale oak highlights the cool blues of Moroccan tile. In my own studio, a Berber rug against blackened steel shelving creates a balanced dialogue of warmth and edge.
Common Mistake & Fix
Mistake: Mixing too many metal finishes. Fix: Limit to two finishes per room one dominant, one accent.
23. Acoustic Benefits of Layered Textiles
Thick Berber rugs and layered kilims act as natural sound absorbers. In open-plan lofts, this can reduce echo by up to 30%. I once measured a 5 dB drop after adding a Moroccan runner and heavy linen drapes small changes, big comfort.
Designer’s Note
Patterns aren’t just visual; they shape how a space sounds, adding a softness that drywall alone can’t match.
24. Seasonal Pattern Rotation
Rotate textiles with the seasons. Lighter Indian block prints keep a room airy in summer, while dense Moroccan or Turkish rugs add warmth in winter.
Store off-season rugs rolled in breathable cotton covers, never plastic.
Refresh stored textiles with cedar blocks to deter moths.
25. Creating Focal Walls
A single patterned wall can anchor a room as effectively as a fireplace. Consider Moroccan tile behind a vanity or Indian paisley wallpaper in a reading nook. Keep adjacent walls quiet to avoid visual overload.
Installation Tip
For tile walls, use a laser level and start from the center to ensure symmetrical cut edges at corners.
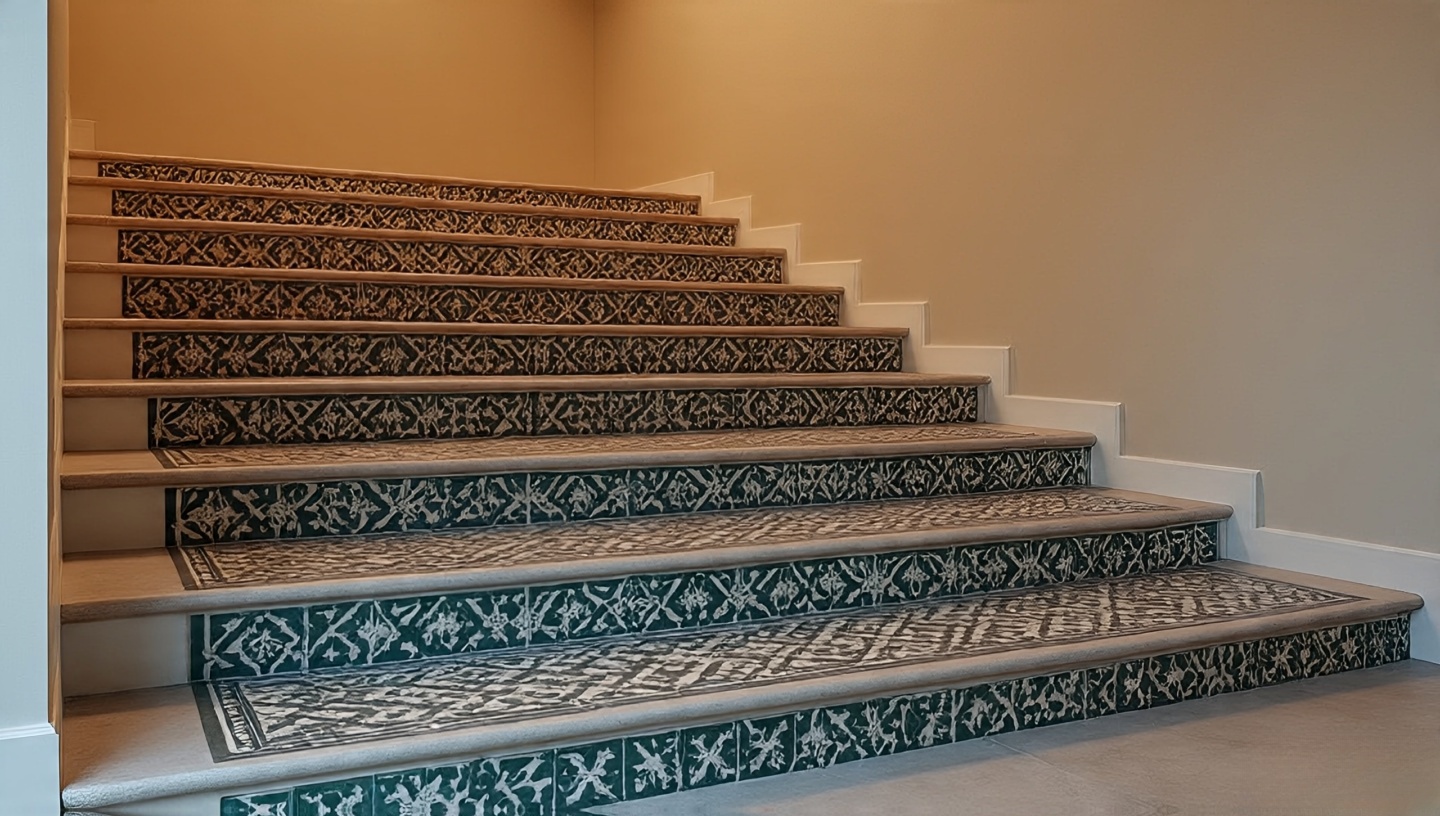
26. Patterned Stair Risers and Transitional Spaces
Stair risers are a secret canvas. Thin Moroccan tiles or stenciled Indian prints transform a mundane stairwell into a daily gallery. I recommend a durable sealant and anti-slip nosing for safety.
27. Pattern as Wayfinding
In large homes or boutique hotels, subtle pattern changes guide movement. A darker Turkish kilim can signal a transition to a private lounge, while brighter Indian prints invite guests toward social areas.
Designer’s Rule
Shift hue or scale by 20% between zones to create gentle visual cues without signage.
28. Integrating Global Patterns into Kitchens
Kitchens love pattern but hate fuss. I’ve installed Moroccan backsplash tiles with epoxy grout for easy cleaning and laid flat-weave kilims treated with Scotchgard near prep zones for a splash of texture without risk.
Climate/Code Consideration
Ensure tiles near stoves are rated for high-heat environments and meet local fire-safety codes.
29. The Role of Ceiling Height in Pattern Selection
Tall ceilings welcome bold Moroccan or Indian motifs; low ceilings benefit from horizontal Turkish stripes to elongate the space. When in doubt, tape a paper sample at full height to preview scale.
30. Personal Collections: Curating Over Time
A home rich with global patterns should feel collected, not staged. I encourage clients to buy slowly: one authentic piece per year can build a lifetime of texture and story. Each rug or textile becomes a chapter rather than a quick trend.
Image idea: Gallery wall of framed fabric swatches from travels, alt text “Framed textile swatches from global markets forming a personal collection.”
Final Reflection
After decades of design work, I’ve learned that the most resonant homes are those that evolve. Let your global patterns grow as you do each tile, rug, or print carrying a memory, a lesson, a conversation. That’s the real architecture of living.


 Bohemian interiors celebrate texture, color, and a sense of travel. A single harsh bulb kills that vibe. Imagine the shimmer of woven wall hangings or the deep grain of reclaimed wood under a soft glow. Ambient, task, and accent lighting work like instruments in a band: each with a distinct role, but magic happens when they play together.
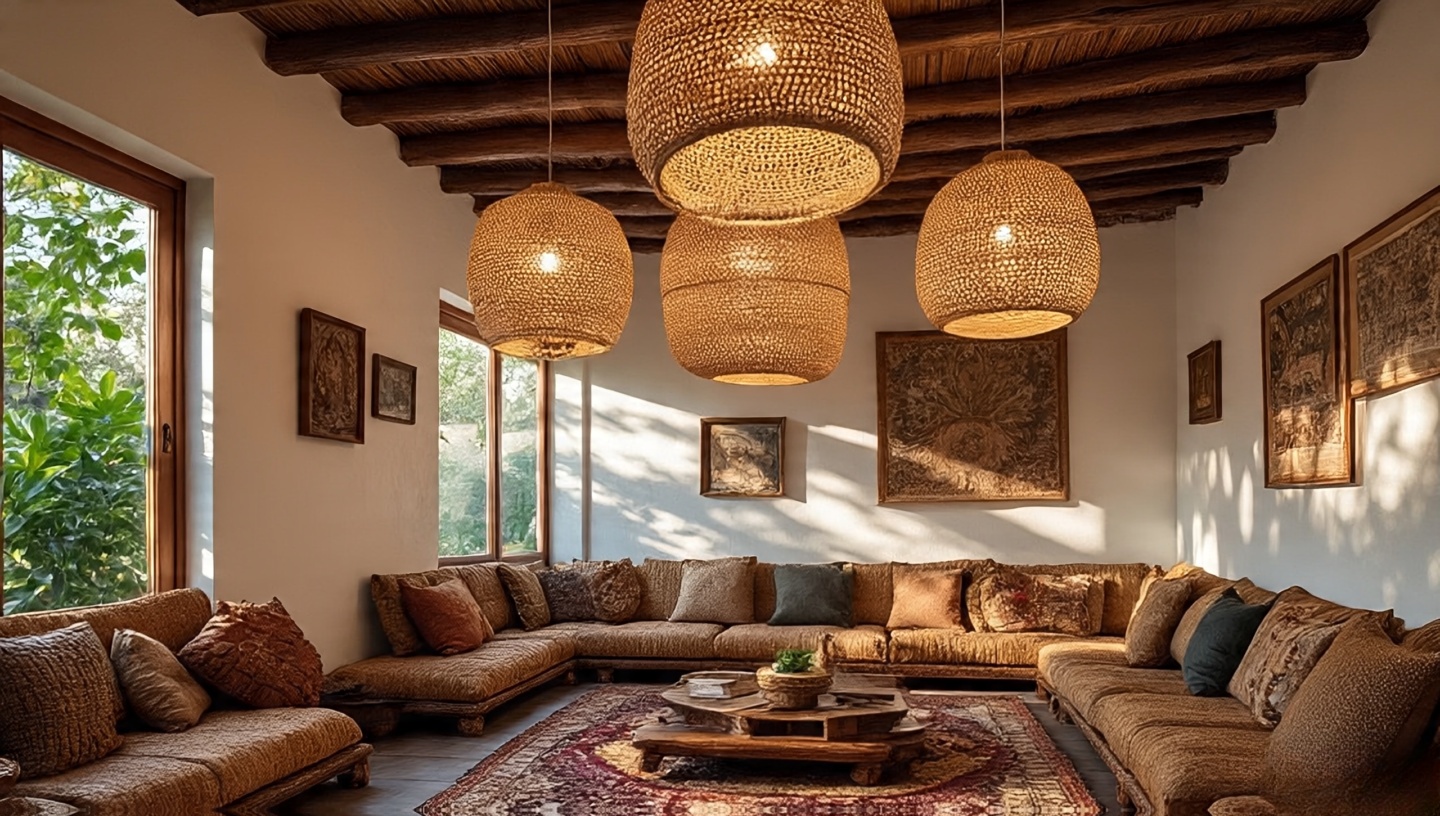 Ambient lighting is your background glow broad, embracing, a little mysterious. In my own living room, I swapped a bright ceiling fixture for a cluster of rattan pendant lamps. When dimmed, the light filters through the weave, creating dappled patterns that dance across plaster walls. It feels like camping, but fancier.
 Picture yourself slicing herbs at a reclaimed wood counter or reading a novel on a tufted daybed. You need focused light, but Boho doesn’t mean sterile. I once rescued a bent brass pharmacy lamp from a flea market; now it angles perfectly over my reading chair, the patina catching the glow like an old coin.
 If ambient is the background and task is the workhorse, accent lighting is the flirt. It highlights art, plants, or architectural quirks. One rainy weekend, I tucked a string of amber fairy lights into a shelf of pottery. Suddenly the dull nook became a glowing shrine to my travels.
 The trick is layering, not competing. I start with ambient fixtures, add task lamps where I naturally sit or cook, then sprinkle accents like a chef finishing a dish with salt. Step back after each addition. Does the room feel balanced or chaotic? Boho embraces abundance, but light should flow like music, not shout over itself.
 Texture isn’t just for cushions. Beaten metal lanterns add a moody shimmer, rattan softens edges, and hand-blown glass pendants scatter starlike reflections. I once found a Moroccan shade whose bubbles painted constellations across my ceiling. Patina isn’t damage; it’s history.
 While you could get technical with lumens and CRI, I go by feel. Warm white (around 2700K) flatters skin and textiles. For a dreamy vibe, Edison-style filament bulbs add a soft amber hue. Smart bulbs let you shift tones for different moods, but I still love the romance of a simple dimmer and a well-crafted bulb.
 Lighting can carve out zones in an open-plan space. In my loft, a pair of paper lanterns signals the dining area, while a cluster of candles defines the meditation corner. It’s subtle but powerful like drawing invisible walls with light. Guests instinctively gather where the glow feels most inviting.
 Don’t forget balconies or patios. I love draping solar-powered fairy lights across a bamboo pergola. Add a few lanterns with citronella candles and you’ve got a setup that’s equal parts cozy and mosquito-proof. Use lava rocks around your fire pit they hold heat longer on chilly nights and look like dark chocolate pebbles under moonlight.
 Good lighting isn’t cheap, but it pays for itself in comfort and resale value. Expect to allocate 10–15% of your interior budget to lighting. Choose LED for lower energy bills and longer life look for a minimum 25,000-hour rating. Vintage fixtures are worth rewiring; the charm outlasts trends.
 Whether you’re renovating a whole home or simply upgrading a single room, sequencing matters. Install ambient fixtures first think of them as the backbone. Next, position task lighting so electricians can wire junction boxes accurately. Accent lighting comes last, once you’ve placed furniture and art. This order avoids costly rework and keeps your contractor from chasing changes.
 As an architect, I can’t stress this enough: beauty is nothing without safety. Follow local electrical codes for load limits and outlet placement. Use UL-listed or CE-certified fixtures. In damp areas like bathrooms or outdoor patios, insist on fixtures rated IP44 or higher.
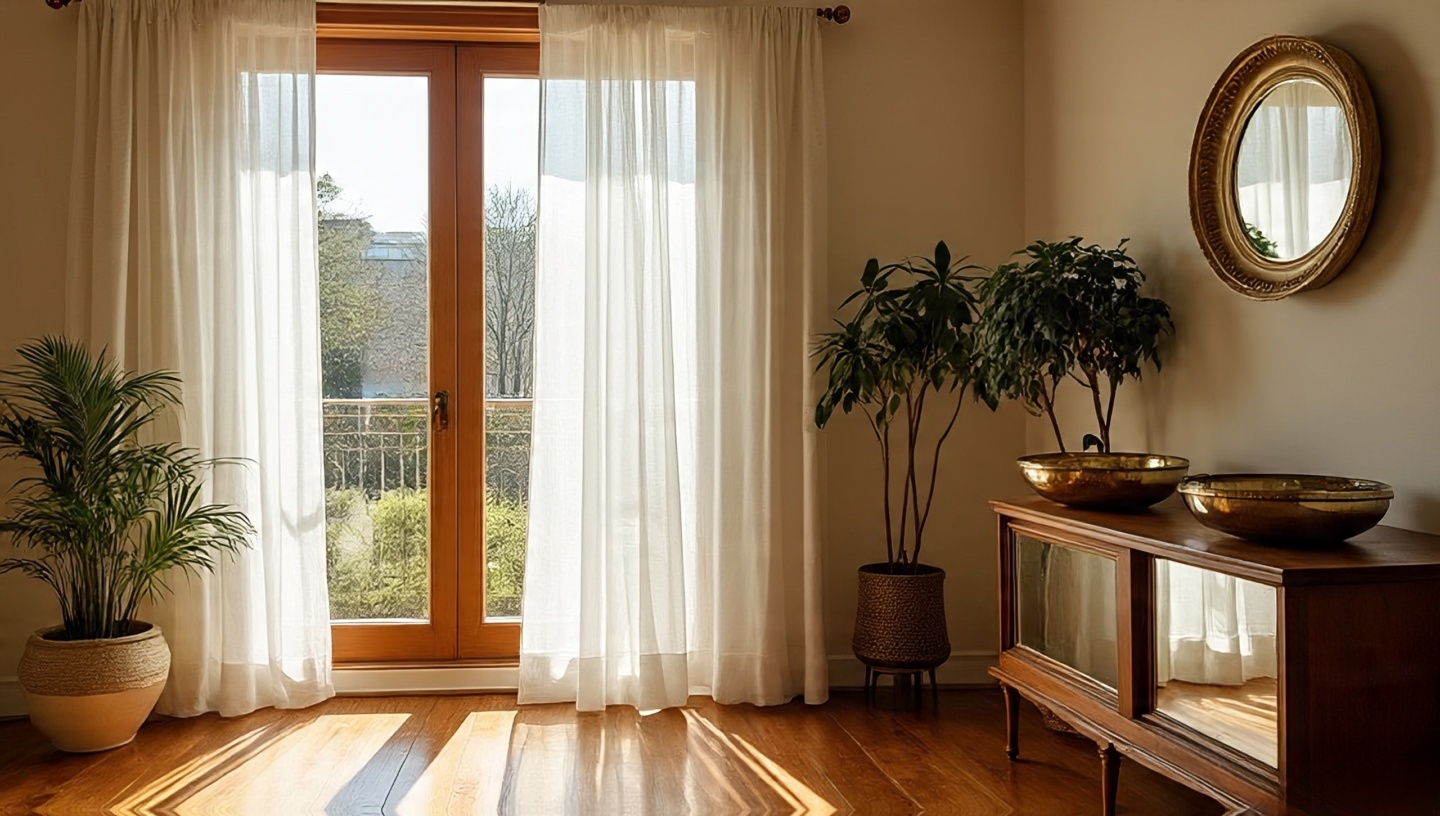 Daylight is free, so integrate it into your plan. Sheer curtains can diffuse morning glare, while reflective surfaces like brass or mirrored trays bounce light deeper into the room. I often position a reading chair near a south-facing window and add a task lamp only for evenings. Think of electric lighting as a partner to the sun, not a replacement.
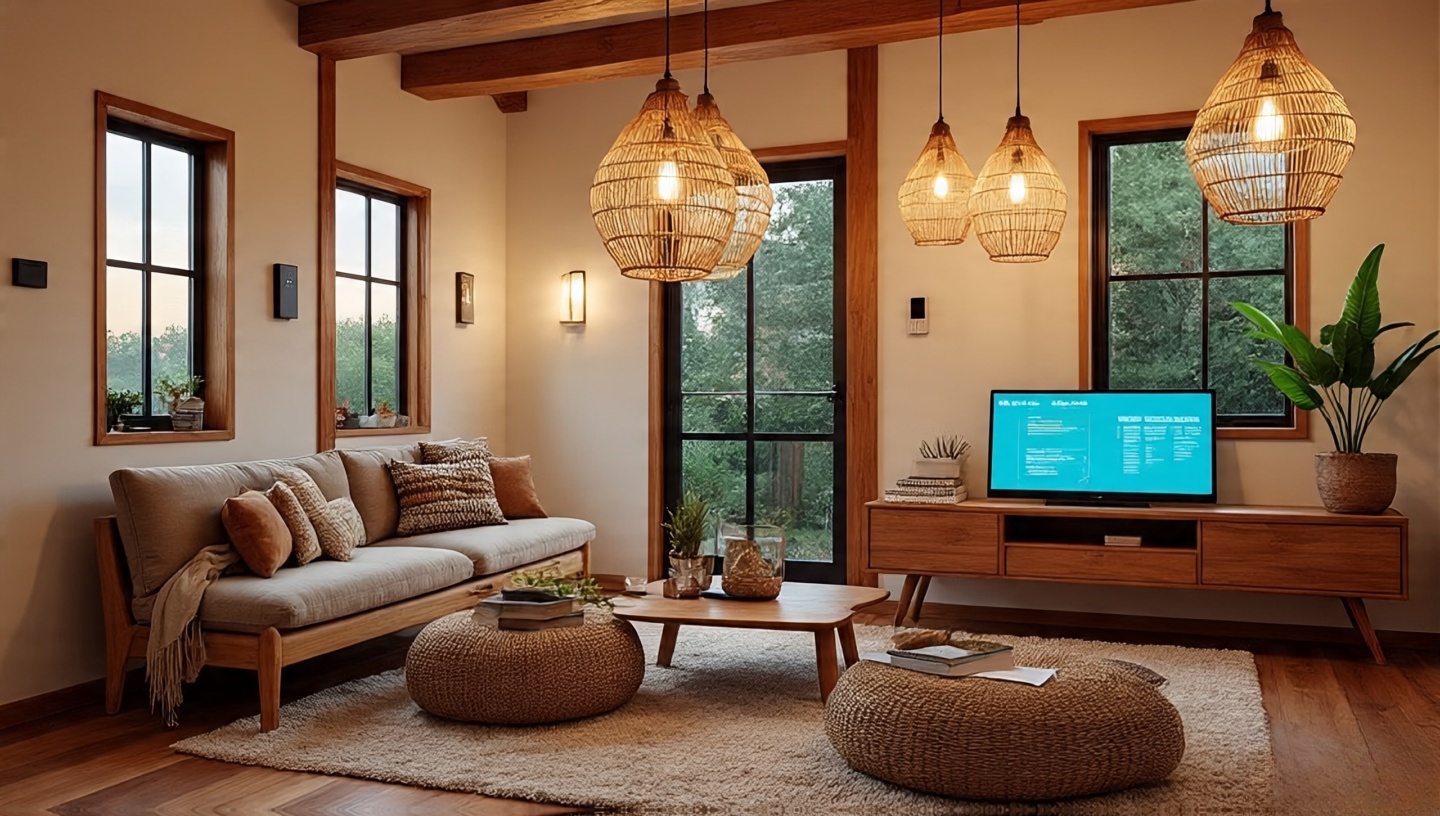 Modern LEDs offer a wide spectrum of warmth and color rendering. Choose bulbs with a Color Rendering Index (CRI) of 90 or above to honor the rich hues of Boho textiles. Motion sensors in hallways or closets reduce wasted power and extend bulb life.
 Smart homes don’t have to feel sterile. Hide smart hubs in woven baskets or behind decorative screens. Use voice control or app-based dimmers for convenience, but keep switches accessible for guests. I often pair a vintage sconce with a modern smart bulb the charm stays, the control improves.
 Your lighting plan can shift with the seasons. In winter, I favor warmer hues and extra candles to offset long nights. Summer calls for brighter task lighting near cooking and craft zones, balanced with sheer curtains to tame midday glare. Rotate shades and swap bulbs to match the mood of each season without a full redesign.
 Boho homes often feature eclectic collections. Track lighting with adjustable heads works wonders for gallery walls. Use 30-degree beams for paintings and 60-degree for sculptures or textiles. Keep a 12–18 inch offset from the wall for ideal spread. I once illuminated a client’s vintage rug as if it were a painting, and it became the star of the room.
 A cohesive lighting story ties the entire home together. Maintain a consistent color temperature across adjoining rooms to avoid visual whiplash. Repeating a material like rattan or aged brass creates subtle harmony. It’s like carrying a melody through different movements of a symphony.
 If you rent, you can still build layers without rewiring. Use plug-in sconces, battery-powered puck lights, and removable adhesive hooks for string lights. When I lived in a small rental loft, a single plug-in pendant over the dining table made the entire space feel intentional and warm.