If your power bills are skyrocketing and it’s tough to keep your residence in a comfortable setting, it’s time to switch to new insulation. Installing fresh insulation is among the finest house improvements you can undertake. New insulation gives a 100 percent or higher ROI. Insulation not only maintains your residence’s warmth and coziness, but it also retains it cool and comfortable during the summer season.
Expert insulation companies take the focus and effort necessary to correctly put insulation in your property, whether it be blown-in, spray foaming, radiating, solid, or batting insulation. Insulation contractors with experience examine your building as a whole and understand how insulation and ventilation work with each other to make your place comfortable and pleasant.
Insulation Types
Insulation is intended to keep the internal temperatures steady independent of the outside weather. Insulation is classified into four types.
Fiberglass Batts
The most frequent and least expensive approach to insulate your property is with fiberglass batts.
Blown in Insulation
White cellulose, leftover corrugated cardboard, papers, and other pulp materials, are used to make blown-in insulation.
Spray-Foam Insulation
Spray foam insulation is perfect for sealing narrow gaps and openings that allow draughts to enter a home. It starts with liquid polyurethane blasted into an aperture or hollow.
Reflective or Radiant Barrier
Reflective or radiant barriers function in the opposite direction of other insulating materials, although the results are identical.
The type you select is determined by the following factors:
The area’s square footage.
The kind of place.
The impact of your climatic changes.
Your financial circumstances.
The current R-value of your residence.
Insulation Company Costs
The average cost varies based on the type, with blown-in insulation costing around $880, fiberglass costing around $960, and spray foam costing around $1,100. The cost difference is attributable to the insulating medium used. Blown-in insulation and batting are less expensive solutions. Spray foam is the most expensive alternative, but it provides the highest ROI for your property.
Common Problems Insulation Contractors Can Help With
Insulation contractors’ expertise in installing insulation to keep a home’s climate stable. They can either work directly with one insulating medium or install a variety of them. Residential insulation contractors collaborate closely with clients to fix any concerns that arise. Common issues include:
High energy costs.
Uncomfortable spaces.
Drafts.
Pipes that have frozen, moisture, and fungus.
In every region and year, energy saving is a primary responsibility for residents. Choosing the finest insulation professional to provide experienced advice on making your site more livable and lowering your energy expenses might be difficult. Consider competence, the goods they use and those they don’t, if they are familiar with the various insulating materials, whether they are licensed, as well as whether they give a warranty when selecting an insulation service. Do you need help contacting insulation companies in your area? You may always contact home insulation contractors for the best team of professionals and services for insulation in your area.
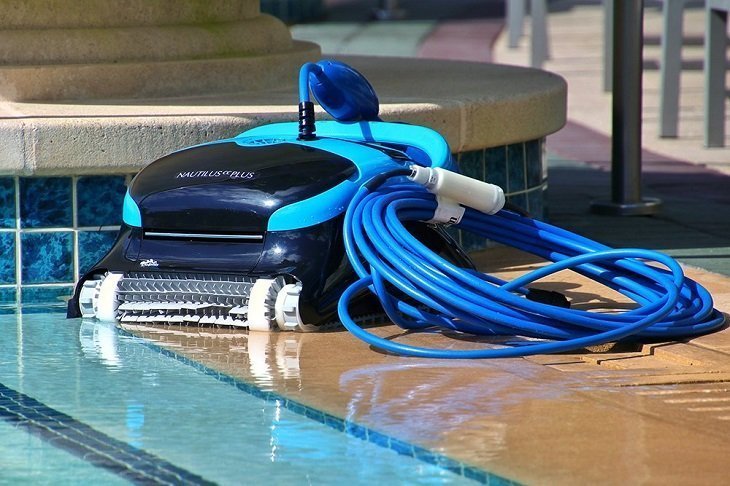
Among the choice of pool cleaners, a robotic pool cleaner or a pool vacuum robot is your best bet to clear away pollution and debris even in a small pool.
Swimming pools are like dogs; whether you have a chihuahua, a bulldog, or a husky, they all need regular maintenance. The only difference is the level of upkeep necessary for each breed. Chihuahuas are relatively low-maintenance breeds, while huskies are considered high-maintenance.
In the world of swimming pools, the same rule holds true. If you have a big pool, it’s like having huskies or Labradors– you have to follow regular, high-effort maintenance to keep them in the best condition. On the other hand, having a small pool does not require much upkeep. It still needs effort, but the hassle and work involved are minimal.
So, how do you clean a small pool? As they say, there are many ways to skin a cat, and this article endeavors to include the best and most common ways to clean a small pool. No one wants their children to have explosive diarrhea or develop embarrassing skin rashes, so parents may want to take special note of these suggestions.
Why Clean Even A Small Swimming Pool?
Most of us are ignorant of the lurking dangers even in a small swimming pool. After all, only family members and kids use it, right? Wrong! Whenever there’s water, there is always something swimming, or worse, breeding in there that could cause various skin, ear, and gastrointestinal diseases.
You can even make a case about small swimming pools needing more cleaning than the larger ones. Why? Because most small swimming pools operate without pumps and filters, they are basically just ponds of water in the backyard that invite foreign material that may cause diseases.
Of course, your kids and family members are more susceptible to bacteria if you let other kids and families use the pool. On the contrary, it’s much safer if you use the pool exclusively, but that doesn’t mean contracting water-borne diseases won’t happen. No, we’re not suggesting to keep all the fun to yourselves and never share the pool with others. It’s just that it’s always a good idea, no matter how tiresome it may be, to clean even small swimming pools.
Using a Robotic Pool Cleaner to Clean Small Pools
Robotic pool cleaners can handle pools of any size, but some models are specifically designed for small pools. The shared features of robot cleaners for small pools are their portability, shorter cords, and, like music to everyone’s ears, affordability (compared to robot cleaners for larger pools, that is).
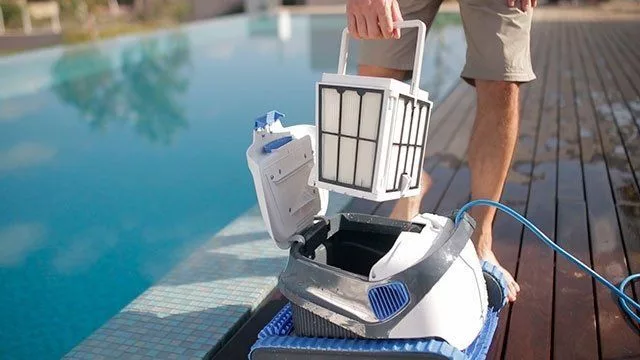
The best thing about robot pool cleaners is that you barely have to do anything. It’s as simple as lifting it out of the box, connecting it to a power source, turning it on, and submerging it into the water. Among these robotic cleaners, the maytronics dolphin stands out for its reliability and superior cleaning power. After a little over an hour, expect these machines to have already done their job!
Best Robot Cleaners for Small Pools
Dolphin S50
The Dolphin S50 is exclusively a pool floor cleaner. But as anyone with a swimming pool knows, pool floors are the hardest part to clean. It is lightweight, compact, safe to use, and ideal for above-ground and small pools with a maximum of eight meters in length.
Dolphin E10
The Dolphin E10 has a version that could clean pools of up to 30 meters in length, but there’s also one meant for smaller above-ground pools. Like the S50, it is primarily a floor scrubber, but has a quick water release system and requires simple maintenance.
Dolphin E20
Unlike the S50 and E10 models, the E20 does not only clean floors, it takes care of the pool walls, too! It could do quick work of any above-ground pool or in-ground pools of up to 10 meters in length. Think of it as an advanced version of the E10, one that packs a technological punch, but is a better cleaner overall.
Aiper Cordless
Now, if you do not like the idea of entangled cords around your swimming pool, the answer is to go cordless. The Aiper Cordless Robotic Cleaner is probably the most lightweight option out there, tipping the scales at 6 pounds. When it’s time to see the Aiper Cordless in action, you don’t need to do much. Simply drop into the pool and wait for it to finish. It has a self-parking technology that makes it stop whenever it finishes a cleaning cycle or if it’s running out of battery. When you’re finished, use the included retrieval hook to pull it out of the water without getting wet. Neat, right?
Dolphin S200
The other Dolphin models are ideal for small pools of up to 8 or 10 meters in length. The S200, however, can handle 12-meter pools without any difficulty. It is both an active floor cleaner and a wall scrubber, cleaning walls, floors, and waterline inside its two-hour cycle. It’s no doubt a great choice if you have a slightly larger pool.
For more questions about robotic pool vacuums and cleaners, check out this great FAQ section for some excellent information.
What About Kiddie Pools?
Using a robotic pool cleaner on a kiddie is such overkill, but cleaning them is a must like any other pool. The thing about kiddie pools is that there is no one way to ensure it’s safe. It’s always a combination of different things and may also depend on the circumstances. So, what are some of the ways to clean a kiddie pool?
Drain and Refill
Unless your place is experiencing a drought of Biblical proportions, a small kiddie will simply need to be drained and refilled. After every use, drain the used water, scrub down the pool, and refill it with water when used again. Or, if you don’t want to waste all that water, use it for the plants or to power wash the driveway.
Skim the pool every day
If the kiddie pool is slightly larger and wasting all that water after every use is not an option, skimming the pool surface must be done religiously. It won’t take as long as working on large pools, but it’ll keep the water clean and tidy. You may skim the pool before and after the kids use it for better results. Make sure to collect all debris in a bag since placing it somewhere in the yard may end up back in your pool. Yikes! When you’re at it, be sure to clean the skimmer net on a regular basis as well.
Cover the pool when not in use
This is pretty self-explanatory. Cover it if you don’t want leaves and other debris to camp in the kiddie pool. Whenever possible, choose a cover that shields the pool against rain because, as we all know, rain can quickly turn the pool into an algae factory. Make sure that the corners are shut tight and secure them with something heavy like a brick to prevent the cover from being blown off.
Properly sanitize
Pool chemicals are still necessary when using large inflatable pools. The rule of thumb here is to balance the chemicals in proportion to the amount of water your kiddie pool holds up. Some inflatable pools have a capacity of 200 up to 4,000 gallons of water. In such cases, you will need to disinfect the water with a mixture of chlorine, algaecide, and bleach in the proper amounts. These are necessary to maintain clean water at all times.
Use a manual pool vacuum
Skimming is just the beginning of pool upkeep. There is still little gunk and whatnot that makes their way to the bottom of the pool. That’s when you need to use a vacuum to suck them out. Again, it wouldn’t take long, but it’s still necessary to ensure a safe swimming environment for the kids.
Conclusion
Maintaining a small pool isn’t nearly as tormenting as caring for a large one, but don’t be overconfident. Small pools still need regular cleaning and upkeep, not only for aesthetic purposes, but, more importantly, for the safety of our family members.
The good news is that it really doesn’t have to be a hassle. There are robotic pool cleaners designed especially for small pools. These machines are self-contained and practically move independently as they clean your small pool within 90 minutes.
What about kiddie pools? Then it’s much easier to maintain them! Depending on the size of these pools, you may either drain and refill them every use or use sanitizing pool chemicals. Either way, never take any chances when it comes to the health of your kids and family.
Are you planning to renovate your kitchen? If so, you’re probably wondering how long the renovation will take. In this article, we’ll give you an overview of what to expect and provide some tips to help speed up the process.
One of the most important factors in determining the timeline for your kitchen renovation is the scope of the project. A simple refresh may only take a few weeks, while a full gut job could take several months. Other factors that will affect the timeline include the size of your kitchen, the number of contractors involved, and the availability of materials. To reduce the overall duration of your kitchen renovation, there are a few things you can do.
Reducing the Kitchen Renovation Time Frame
First, start by decluttering your kitchen and removing everything you don’t absolutely need. Then, decide on a budget and stick to it; having a concrete number in mind will help keep everyone focused. Finally, be sure to hire qualified contractors who have experience working on similar projects. You can have them walk through your kitchen renovation step by step to get an idea of how long each process will take. By decluttering, setting a budget, and hiring experienced contractors, you can reduce the overall timeline and get back to enjoying your newly renovated kitchen in no time.
What is the Process for Kitchen Renovation?
The first step in any kitchen renovation is to plan the project. This includes measuring the space, creating a budget, and selecting materials and finishes. Once the plan is in place, the renovation can begin.
The process of renovating a kitchen typically takes between two and four weeks, depending on the size of the space and the scope of the project. During that time, the cabinets, countertops, appliances, and flooring will be installed or replaced. In some cases, the walls may also be painted or tiled.
The process of installing countertops
The process of installing countertops typically takes one to two days, depending on the size of the space. During that time, the countertops will be cut to size and installed. In some cases, the sink and faucet may also be installed.
The process of installing flooring
The process of installing flooring typically takes one to two days, depending on the size of the space. During that time, the flooring will be installed. In some cases, the threshold may also be installed.
The process of painting walls
The process of painting walls typically takes one to two days, depending on the size of the space. During that time, the walls will be primed and painted. In some cases, the trim may also be painted.
The process of installing cabinets
The process of installing cabinets typically takes two to three days, depending on the size of the space. During that time, the cabinets will be assembled and installed. In some cases, the doors and drawer fronts may also be installed.
The process of installing appliances
The process of installing appliances typically takes one to two days, depending on the number of appliances being installed. During that time, the appliances will be connected to water and power sources. In some cases, the appropriate venting or piping may also be installed during kitchen renovation.
Once the renovation is complete, it’s important to take some time to organize and configure the new space to your liking. Don’t be afraid to experiment until you find what works best for you. You’ll be enjoying your new kitchen in no time!
.How long does it take to renovate a small kitchen?
On average, a small kitchen renovation will take between four and six weeks. However, this can vary depending on the scope of the project and the level of complexity involved. If you’re looking to do a complete overhaul, it’s best to allow for a little more time in order to get everything done properly. Conversely, if you’re just making a few minor changes, four weeks should be more than enough.
How long does it take to put a new large kitchen in?
It typically takes about four to six weeks to install a new large kitchen. Large kitchens generally require more time for installation because there are more cabinets and appliances to install. Additionally, the layout of a large kitchen is often more complex, which can add to the installation time. However, some large kitchens can be installed in as little as two weeks.
If you are planning a kitchen renovation, it is important to factor in the time required for installation when considering your overall timeline. You will want to work with your contractor to ensure that your kitchen will be ready when you need it. In some cases, you may be able to temporarily use another room in your home while your kitchen is being renovated. However, this is not always possible, so it is important to plan ahead.
Ready to Start with Your Kitchen Renovation?
Planning a kitchen renovation? Wondering how long it will take? The answer, of course, depends on the scope and scale of the project. But in general, you can expect a full kitchen renovation to take anywhere from two to four weeks. If you’re just replacing cabinets or countertops, that timeline shrinks to one or two days. Keep in mind that these are just estimates – your specific project may vary. We hope this article provides a helpful overview of what to expect when renovating your kitchen.
You hear strange noises, and you’re curious if a furnace repair in Spring, TX, is on the horizon. With the warm weather in the region, it’s not too often that we hear our furnaces running. So, when they kick on in the winter months, you may be a little anxious about what the different sounds mean or other unusual events taking place when it’s in operation. To know for sure when it’s time to call in the professionals, take a look at the top seven signs a furnace repair in Spring, TX is required.
Strange furnace smells often point to furnace repair
Utility bills are higher than the standard rate
Your unit won’t heat evenly
The carbon monoxide detector is alerting
Noises that are loud or unfamiliar
There is little or no airflow through the vents
The heating system runs continuously
As you can see, there are plenty of indicators that point to a furnace repair service being needed. However, you don’t want to call in a professional if you’re unsure. The dishonest ones will cheat you out of money. It’s best to arm yourself with as much knowledge as possible before reaching out. So, here is more detailed information on furnace problems and when you should contact an HVAC technician for furnace repair in Spring TX.
1. Furnace Repair in Spring, TX for Strange Smells
What causes odd odors to come from your furnace? When your furnace installation is first done, it is normal for smells to come out of the unit. However, after some time, those odors should dissipate. If they don’t, or if you notice smells that suddenly appear, it could mean that there is a problem with the system’s combustion.
2. Do High Utility Bills Indicate You Need a Furnace Repair in Spring, TX?
Your heating bills should be relatively predictable. You likely know what to expect every month when opening the mailbox. However, if you see that number owed growing every month, it could signify that there’s something wrong with the furnace and you need service. How can you check if your furnace is working properly? First, pay attention to the outside temperature and set the thermostat consistently. If there are increases in your energy bill that don’t make sense, then it’s time to call in a professional.
3. Uneven Heating Throughout Your Home
Do you walk into one room and get a chill? Then, you move on to the next and need to start peeling off layers of clothes because it’s so warm? If so, then your furnace is heating inconsistently throughout the house, and the only reason that typically happens is that there is a need for a furnace repair.
Tip: Your basement will be colder than the upstairs. Nevertheless, check the evenness of temperatures in rooms with similar environments to determine the consistency throughout the home.
4. Your Cabon Monoxide Detector is Alarming You – That’s an Emergency Furnace Repair for Spring, TX Homeowners! Call Right Away!
How can you tell if your furnace is working properly? Your carbon monoxide detector going off is one of the most significant indicators of a severe problem that requires immediate attention. Not only is your furnace going out, but you could be risking your health and safety and your family’s.
A cracked heat exchanger leads to gas leaks, and the colorless, odorless gasses that escape are deadly. So never wait to call a heating and cooling company and get out of the house right away!
5. Loud and Unfamiliar Noises
When your furnace is working as intended, you will likely hear a quiet whirring sound, or you might not hear anything at all. However, if you start noticing groans, rattles, irregular humming, banging, rattling, or other strange noises, your furnace could be on the verge of going out.
Take a bit and listen to see if the noises come back when the furnace turns on or while it’s in operation. If they do, you should schedule a furnace repair appointment. The longer you wait, the higher the risk for a serious malfunction.
6. There’s Little to No Airflow Through the Vents
Will a dirty filter keep your furnace from working? It can. If it becomes clogged, the filter will stop the airflow coming through your vents. You might hear your heating device kick on, but you don’t feel anything coming out when you walk over the vents. That means your furnace is running, costing you money, and you’re not getting anything out of it.
An HVAC company can change your filter and ensure it’s appropriately installed. In addition, if you have clogged air ducts, most contractors will do an air duct cleaning service. That’s why it’s so important to call a professional from the start. Then, you won’t be left scratching your head about what’s wrong after you change the filter yourself.
7. Your Furnace Won’t Shut Off
The one thing that many homeowners dread is a furnace that won’t shut off. It’s essentially like starting your money on fire and watching it burn. If your furnace continuously runs, there’s something wrong with the unit that keeps it from performing what it is meant to do.
Diagnosing why a furnace won’t shut off is something that a qualified HVAC technician is capable of doing rather quickly. So instead of sitting around wondering what’s wrong with your furnace, reach out to your preferred provider and stop the problem in its tracks.
Call in the Experts for Professional Furnace Repair in Spring, TX
It may be tempting to try and fix your furnace on your own. However, be aware that it’s a lot more complex when you open the system than what it looks like from the outside. In addition, if there’s a warranty on your heating unit and you work on it yourself, you could void that, making it impossible to get a replacement in the event it can’t be repaired.
Take the time to evaluate the indicators listed here about signs a furnace repair in Spring, TX, or anywhere really, is needed. If one, two, or all of them sound familiar, you need to call a qualified HVAC contractor right away. The quicker you get to your furnace repair, the more affordable the service is guaranteed to be.
There is no questioning that the state of Florida gets more than its fair share of rain. Making sure your roof is doing its main job of keeping the rainwater out of your home is all that more important. Unfortunately, things sometimes go wrong and older roofs are prone to leaks.
While a leaky roof can cause a major headache for you as a homeowner you may have some options. A small leak or two does not necessarily mean that you need to replace the roof or go through some major roof repair project. If your roof is otherwise in fairly decent shape you might be able to hire a roofing contractor to simply patch the damaged part of the roof. However, if the condition of your roof is on the rough side, you may not have a lot of options and roof replacement might be your best bet.
Why does my roof leak when it rains?
The answer to this question is not as straightforward as you might think. There are several reasons your roof might leak when it rains and not all of them require an expensive repair. For example, the leak might not be coming from your roof at all, your plumbing could be to blame. If there is an issue with your ventilation fan duct, this could lead to some leaking when it rains. Your home’s chimney can be another reason you are seeing leaking issues. Chimneys can pose several issues that lead to leaking and in fact, homes with chimneys are more likely to experience leaks.
Like chimneys, homes with skylights are also more likely to have issues with leaks. But of course, a leak can be caused by problems with your roof. When the underlayment or roofing felt deteriorates, your roof will become susceptible to leaking. A leaky rooftop could also mean your shingles are coming to the end of their usefulness, nothing lasts forever. Or you may just have a small hole or other roofing damage that can be patched. It can be hard to tell, your roofer will be able to get to the bottom of this mystery for you.
How long can I let a leak in my roof go before it needs to be fixed?
While there is never a convenient time for your roof to leak, it will likely happen at the most inconvenient time for you. So, how long can you let a leak go before it causes some serious damage to your home? The answer is that it is hard to tell. There are a good deal of factors that determine the extent to which a leak will harm your home. If it does not rain often where you live, you can probably go a little bit before it is showing an issue.
But this is Florida and a little water can go a long way. Plus, rainfall is not often lacking here. It is better to have your roof repaired as soon as possible. Water damage and biological growth can occur rather quickly in Orlando.
How do I stop my roof from leaking during a heavy rainstorm?
If you notice your roof is leaking during a storm and there is not a roofer available, you may need a temporary fix to stop the incoming water. Now, this is extremely important, it is not safe to climb the outside of your roof while it is raining. Patch the hole from inside. Do not risk climbing a ladder or walking around on a wet roof.
If you notice a small to medium-ish leak during a storm, grab some caulk or temporary tape and use that to fill the leak. This is not a long-term solution, you will still need a roofer to come to your home and repair your ceiling. For larger leaks, you may try stapling a waterproof tarp over the leak to help you get through the storm and give your roofer a chance to get to your home.
How much does roof repair cost in Florida?
Unfortunately, there is not a simple answer to the cost of roof repair in Florida. Again, there are way too many factors to give you a precise number. From the scope of work, to total the amount of damage that must be fixed, and the type and quality of the materials the roofer needs, there is a lot they will go into the estimate.
But to give you an idea, a wide idea, that is, the average cost of a roof repair in Florida can range from anywhere from $377 all the way to $1,662. So, as you can see, the cost of roof repair in Florida really does vary by the size and scope of the project.
Why would I want to patch my roof over replacing it?
The main reason you may consider patching your roof versus just going ahead and replacing it is the concerns over costs. While $377 to $1,662 for a roof repair is still a good deal of money, it is a drop in the bucket compared to the costs of replacing the whole roof. That is why many people will opt to patch a leak and try to prolong the life of their roof.
This is an okay strategy if your roof is in otherwise decent shape. Choosing to patch a leak might give you a little more time before having to replace it. However, there are no guarantees and you might find yourself in the situation where you pay to patch your roof and the patch fails after a couple of months. Then you are out the cost of the patching and still have to replace your roof. Your roofing contractor will advise you on your best options.
Final thoughts on dealing with roof repair in Florida
A leaky roof is no fun and can cause you as a homeowner a lot of stress. If you notice a leak in your roof when it rains the best thing you can do is try not to panic because you will not know what the true cause of the leak is or how bad the damage is. Call your roofer to come and inspect your roof and provide you with options on how to move forward with roof repair.
The foundation of your home may seem like one of the least important parts of your house, but it’s actually the most important piece of the puzzle. A great foundation can support a house and keep it sturdy; a bad foundation can lead to cracks in your walls, expensive repairs, and even danger to your family if the foundation gives way and causes structural damage inside or out. So, how do you know whether you need concrete foundation repair in Champaign?
Foundation Basics
Before diving into how to repair your foundation, it’s important to understand what a foundation is and how it affects your home. Foundations carry both structural and aesthetic weight for your house—they not only give you a base for building, but they also protect your interior structure from extreme temperature changes and moisture. Foundations consist of footers (the concrete slab that supports walls), piers (the vertical beams that hold up wall segments), columns (support structures between floors), and walls.
As your home ages, it can begin to sink or lean on one side. This is a common cause of foundation cracks and damage. Another potential issue with your foundation is water penetration, which causes peeling paint, mold growth, and rusting steel reinforcements. You may also notice that doors and windows are harder to open and close than they used to be. These are all signs that you may need concrete foundation repair services from a professional contractor.
The most common method for concrete foundation repair is underpinning, also known as deep underpinning or strip footings. Underpinning involves digging down to your home’s footing and installing a new layer of reinforced concrete that extends below ground level. This process can be done on either a horizontal or vertical plane, depending on what’s causing your foundation issues. Underpinning is a more expensive option than other methods because it requires digging out your existing foundation and rebuilding it from scratch; however, it’s also one of the most effective solutions for serious damage to your home’s structure.
The Most Common Solutions
Your home’s foundation is essentially its skeleton, providing structural support to walls and floors. When it starts to fail, a home can crack and develop other structural issues. This makes foundation repair an important project—and one that you may need help with if you don’t have much experience with concrete work. Fortunately, there are many common solutions available today that make concrete foundation repair easy to manage.
Today, concrete is used to create everything from sidewalks and driveways to foundations. It’s an extremely versatile material, but it doesn’t last forever—which means that your foundation may need repair over time. Fortunately, there are many solutions available to repair concrete problems and ensure that your home stays safe and sturdy.
You have a few main solutions to repair your foundation. Depending on what’s causing your foundation to crack, you may be able to deal with minor cracks yourself or hire someone to do it for you. The most common solution is to fill cracks with concrete. This is one of the most common options, and it’s a good solution if you only have a small number of cracks that aren’t too big.
There are a few other solutions that are also good options. For example, you can use fiberglass rods to reinforce cracks and repairs, or mesh to create sturdy patches around cracks. If your foundation is more seriously damaged and there’s no solid foundation left, you may need to replace it entirely. In most cases, replacing your entire foundation will require removing all of your belongings from your home before work begins—but it’s often worth it to ensure that you have a strong home with minimal damage.
Pros & Cons of Each Method
There are a few different methods used to repair concrete foundations, and some may be better than others depending on your circumstances. The main thing to consider is cost—some methods can be much more expensive than others, even though you might not always see a difference between them.
In many cases, homeowners can use concrete to patch holes or cracks. It’s an affordable option and can help homeowners stop water from leaking into their basements. However, because concrete takes time to cure, it may not be ideal if you have high water pressure or a leak that’s actively occurring.
The cost of foam injection can be a little more expensive than concrete, but it might be worth it if you need to stop a leak immediately. Foam is injected into cracks and holes, and expands to fill them as it cures. This creates an instant barrier against leaks. And because foam takes very little time to cure, you can seal your foundation almost instantly after applying it.
If you have a serious leak and water is actively pouring into your basement, a hole-plugging method may be best. It involves drilling holes directly into your foundation walls to patch leaks and prevent water from pouring into your home. This is a more expensive option, but it may also be worth it if you have a serious leak that needs to be fixed right away.
Costs, Process and Expectations
The process of repairing concrete foundations depends on the type of concrete foundation repair that’s required. Most homeowners will pay around $4,700 to repair foundation issues. It could be as low as $500 and could exceed $10,000. However, it is important to note that there are a few different types of foundation repairs you can get done.
All of these different foundation repairs are dependent on what type of issues you have. In some cases, your foundation may be cracked or crumbling because of poor concrete workmanship. In other cases, you might have a serious drainage problem that is causing erosion. If that’s true, then your repair costs will be higher than if it was just cracking due to general deterioration over time.
There are a few common methods that people use to repair concrete foundations, but they vary depending on what’s going on underneath your house. The most popular foundation repair method is called underpinning. Underpinning involves digging up and replacing sections of your foundation with new concrete piers or pilings. This process can be fairly expensive and time-consuming because it requires an excavation crew and some heavy machinery, but it is considered by many to be one of the best ways to fix problems with your foundation.
Getting a good night’s sleep is just one of the many benefits of a healthy lifestyle. Everyone knows that feeling groggy and cranky when they don’t get enough quality rest, but did you know that lack of sleep can negatively affect your health? Not getting enough shut-eye increases your chances of developing long-term health problems like diabetes and heart disease. Here are the tips on how to sleep better so you can wake up feeling refreshed and ready to take on your day!
Don’t go to bed on a full stomach
Eating too much right before bedtime will cause indigestion and heartburn which can wake you up during the night with pain in your chest and throat area. Plus if you eat too close to bedtime, then your metabolism will slow down.
Get some exercise
Exercise is one of the best ways to help you fall asleep faster, stay asleep longer and wake up feeling more refreshed. It can also help reduce stress levels and improve mood, which can be beneficial for those with insomnia. Experts recommend 30 minutes of aerobic activity three times a week for general health and at least 150 minutes of moderate intensity activity per week for weight loss. If you haven’t been exercising much lately, start slowly and work up to these goals over time.
Skip the nightcap
Alcohol may make you feel sleepy, but it also interferes with your natural sleep cycle and disrupts your individual sleep needs. Avoid drinking alcohol before bedtime, especially if you have trouble falling asleep or staying asleep.
Avoid caffeine before bedtime
Caffeine can be found in coffee, tea and soft drinks, as well as chocolate and some medications. It takes about 30 minutes for caffeine to reach its peak level in the blood stream; therefore, avoid consuming any caffeinated products for four hours before going to bed.
Power down before bedtime
Most of us spend our days in a state of alertness, but when it comes time to sleep, we turn into lazy sloths.
The reason for this is that we have two different brain states: active and passive. When we’re active and alert, our bodies release adrenaline and other stimulants that keep us awake and responsive. But when we enter a passive state — like when we’re asleep or meditating — our bodies release endorphins, which make us feel good and relaxed.
But here’s the thing: if you don’t power down properly before bedtime, then your brain won’t be able to enter its passive mode. And as anyone who has ever been kept awake by stress knows all too well, not being able to fall asleep can make you feel tired even though your body needs rest.
Follow a consistent sleep schedule
Set a bedtime and wake time, and stick to it every day, even on weekends and holidays. Try to go to bed at the same time each night, even on weekends and holidays. Your body needs a regular schedule to know when it’s time to sleep, so try to keep your bedtime and wake-up time within an hour or so of each other every day of the week.
Get up at the same time each morning, including weekends. If you’re going to be away from home during the day, set an alarm clock or use an app on your phone that will remind you when it’s time to go back to sleep.
Sleep better with a custom mattress
If you want to sleep better, the first step is to buy a good custom mattress. A custom mattress needs to be comfortable and supportive at the same time. The support comes from the structure of the mattress, which should be firm enough to provide body support but soft enough for your body to sink into slightly. This will give you better posture while you sleep, as well as increased circulation and muscle relaxation.
Pick the right bed sheets
The first step in getting a good night’s sleep is picking the right sheet set for your bed. There are so many different kinds on the market, with varying degrees of luxury and comfort. You’ll want to find one that’s soft enough without being too warm, doesn’t wrinkle easily, and is long-lasting enough to last through many nights’ worth of sleep. Smooth your sheets with sheet straps and sleep better all night.
Go dark (but not blue)
Your eyes need time to adjust to darkness before you fall asleep so that they don’t scan the room when it’s time for bed. Dimming the lights or using an eye mask can help prevent this from happening. However, avoid blue light at night because it makes it harder for your body to produce melatonin, which helps regulate your sleep cycle.
Keep it cool
The ideal temperature for falling and staying asleep is between 60 and 67 degrees Fahrenheit, according to the National Sleep Foundation. If you have trouble falling asleep because you’re too hot, try opening a window or turning on a fan to circulate air in your bedroom.
Don’t lie in bed tossing and turning
Experts say that if you don’t fall asleep within 15 minutes of lying down, it’s time to get out of bed. Go read a book or watch TV until you feel tired again — then go back to bed for another try at sleep. If you have trouble falling asleep, try reading in dim light instead of bright light or using an eye mask to block out light from electronics.
Conclusion
The idea of sleeping better may not be as easy as it sounds, but it is possible. The tips outlined in this article are designed to help you begin sleeping better today, and the best part is that they will work for everyone. Many of these tips may seem small when you read them here, but if you take the time to apply all of them, you will likely see a significant improvement in your sleep quality. Give these tips a try, and watch as you are able to fall asleep each night easier than before.
Construction safety is an important concern for every home renovation, especially if you are working on your own. Using the right equipment and following the proper procedures when working on your home renovation project is important, but you also have to be aware of the different construction safety tips for home renovations. Safety should always come before anything else.
To reduce hazards and accidents, Follow these tips to help you stay safe during your home renovation project.
Get a Permit
Before you begin any work on your home, check with your city’s building department or planning department to make sure you’re following all the rules and regulations. In some cities, you may need a permit even if you only plan to paint or install a new light fixture. Not only will this help ensure that your project complies with local codes, but it can save money in the long run by keeping you from running into trouble down the road.
Wear Appropriate Gear
The most important thing to remember when you’re working on a construction project is to wear the appropriate gear. In most cases, this means hard hats, eye protection and steel-toed shoes. It’s also important to make sure that you have appropriate insurance coverage in case something goes wrong and someone gets hurt on your property.
Wear Prescription Safety Glasses
You should always wear prescription safety glasses when working on any part of your home renovation. Even if you are just moving furniture around or doing some painting, you risk hurting yourself if you do not wear these glasses. They will protect your eyes from flying debris and other objects that could cause damage to your eyesight.
Keep The Area Clean
You’ll want to make sure that you’re keeping the work area clean at all times. If debris is left around, it can cause accidents and injuries. This is especially important if you have kids or pets around the house, as they may get hurt if they accidentally step on something sharp or dangerous.
Use Power Tools Safely
Construction safety is a top priority for anyone who works with their hands in the construction industry. It’s important to use power tools safely, wear proper PPE (personal protective equipment), and follow other safety procedures to avoid accidents and injuries.
Know Your Limitations
It’s important to know your limitations when it comes to remodeling your home. Some projects are better left in the hands of a professional, while other tasks can be done by homeowners with basic carpentry skills. Before getting started on any major renovation project, make sure you understand your skill level and what is involved in completing the task at hand. If you’re unsure about your ability or if there are any potential hazards involved with certain projects, consider hiring a professional contractor who can help you get the job done safely and correctly.
Secure and Dispose of Materials Properly
Since you’re working with building materials, make sure that you secure them properly so that they don’t fall on someone walking by. If you’re disposing of old materials, make sure there are no sharp edges or other dangers.
Secure Objects That Could Potentially Fall
Make sure that all objects that could potentially fall during a renovation job are securely fastened down using appropriate methods. This includes items such as light fixtures, ceiling tiles and wall hangings. You should also secure any furniture that could move about during the project.
Plan Ahead for Unexpected Hazards
When you’re doing a major home renovation, you may have to make some changes to your home’s electrical system, which could include installing new outlets or switches. These changes may require that you hire an electrician or other specialist. In addition, if you’re planning on digging up your yard to create a new patio or deck, be sure to get the appropriate permits from your local government before beginning work.
Hire A Professional Contractor
It’s always best to hire a professional contractor when doing home renovations. Not only do they have more experience with this type of work, but there are certain regulations that must be followed during construction projects such as these ones that require special knowledge and expertise. This will ensure that everything goes smoothly without any major issues popping up along the way
Conclusion
We hope that the tips and advice above will help to prevent an accident on your next home renovation project and allow you to embrace a safer home-improvement lifestyle. Be sure to take the necessary precautions every time you begin a new project, and keep safety in mind at all times.
In the past few years, property crimes like home burglaries have become more common. In fact, over 2 million homes in the United States are burglarized every year. Having your home burglarized can be a traumatic experience. Losing items that you love due to a lack of foresight is something you need to try and avoid.
This is why now is the time to figure out how to enhance the security your home has. While this will require some research and money, it is well worth it. Here are some things you can do to make your home more secure.
1. Upgrade Your Window Security Solutions
There are a few main points of entry a burglar will use. Usually, the first place a burglar will look when trying to gain entrance to a home is the windows. If the windows on a home are old, unlocked or damaged, a burglar might try to open them and hop into your residence. Instead of allowing window-related security vulnerabilities to remain, it is time to take action.
If securing your windows is a top priority, then investing in quality contact alarms is a great idea. These alarms will be mounted on the bottom side of your window frame. If the window is opened when these contacts are alarmed, they will make an awful racket when a burglar attempts to break in. Incorporating these window security devices into your existing alarm system is a good idea.
2. Modern Security Alarms Are Beneficial
If you want an effective way to protect all of your home’s entry points, then a modern alarm system is a wise investment. Many of the alarms currently on the market can be installed wirelessly. This means you won’t have to experience the aggravation of running lots of wires to power your security devices.
Figuring out which security system is the right fit for your home will require some professional assistance. With the help of a security company, you can get a new alarm selected and installed in no time.
3. Replace Old Door Locks
Inspecting the exterior doors on your home is beneficial. During this inspection, pay close attention to the condition of the locks on these doors. If the locks on your exterior doors appear damaged or old, then replacing them is vital. Confirm that your replacement locks are sturdy and durable. The lock’s ANSI rating, which gauges its level of security, can be used as a basis for your decision. The higher the rating, the more secure it is, which usually costs more, so you may need to balance your budget with the level of security you desire. Make sure you have the essential locksmith tools available so that you can replace the faulty locks yourself.
Luckily, there are tons of modern lock replacement options to choose from. If you want to eliminate the use of metal keys altogether, then investing in smart locks is crucial. These locks are operated with e-keys that are stored on your smartphone.
4. Don’t Forget About Security Cameras
Another important thing you need to do to secure your home is to invest in a quality security camera system. With the addition of these cameras, you can keep an eye on things while you’re away. The money spent on these cameras is worth it due to the peace of mind they’ll provide.
Now that you know more about making your home more secure, it is time to implement the tips found here.
Everyone buys a house, but to turn it into a home is no easy task! The house having your personal touch, something you can connect to and relate to, is considered your home.
Most people buy a house and fall into a dilemma about how they should go about the decoration process. And if you are the same and are wondering how you must go through the process, look no further than the segment below!
We’ll talk about some working ways that will surely turn your house beautiful! Anyone who enters your home is indeed going to appreciate your house! So, let’s take a look at what we have in store for you!
1.Focus on the Colors!
Coloring the walls and ceiling is considered one of the vital factors determining a house’s look. It begins here, and you cannot go wrong with this! When thinking about decorating your home, choose the right colors and try out proper color coordination. And I’m sure you’ll end up making yourself a pretty stunning home.
2.Right Lighting
Some houses have natural lighting, which eliminates the factor of concentrating on expensive fixtures. However, we have to think of the night, and there you would require a decent amount of lighting.
Remember choosing the right fixtures not only give your house the perfect lighting but also concentrate majorly on the look of the other pieces of furniture you have. Everything you put up is interlinked, and it would be best if you take care of that.
Lighting is used not only to enhance interiors but exteriors as well, And for that sconce lighting can be a good choice to elevate your house exteriors. I’d suggest you look out for great wall sconces Australia or any other place you live in to decorate your house. Apart from that, you can keep using other fixtures to complement the look of your home!
3.Greens!
It’s essential that you have the perfect number of houseplants in your house. It’s good for your health and improves the aesthetic of your home! In addition, greens can complement any furniture you have and bring in a drop of soothing and refreshment in your house. So, if you are looking at ways to beautify your home, you cannot miss out on greens.
4.Rugs To Define Spaces
One doesn’t have to place a rug only on one side of the house. A perfect combination of small and big things in your house can make your home look beautiful! It also helps in defining different areas of the house.
So, go for patterns or solids, whatever you think suits your home décor, and see your home stand out from the others. Of course, it’s not always easy to be perfect in choosing the right rug, but you are good to go with a little bit of trial and error!
5.Usage of Mirrors!
Some people who have little or no idea about interior decoration think mirrors are only used to dress up and see a face. But have you ever imagined why the lobby of a big hotel has plenty of mirrors? It is because mirrors are a great way to increase space in your house and give your room elevation! In fact, a small space can be magnified and made in a way where it looks bigger.
6.Drapes!
Draping a piece of a curtain is something everyone thinks of, but have you thought that a drape in your house could define how big your room is! You haven’t thought of it, right? Well, start now! Why don’t you drape long curtains right at the top of the ceiling and see how the entire room looks big and give your house a story! Curtains are a dramatic element in one’s house, and you can bring in that essence with the right choices.
Final Thoughts
As we slowly approach the end of our blog today, I’m sure you’ve learned something new and exciting that you wish to implement into your house. So go ahead and make out a sketch, choose the right items, and then start purchasing.
Most people think of the decoration process in just the flip way of what we’ve spoken of! But when you are doing it, do it right and see your house turn into a beautiful home that people will complement each time they pay a visit!