Home Blog Page 255

Which Is The Best Way And The Best Time To Cut My Hedge?

Hedge Trimming, which is commonly used to delineate property boundaries or merely to fence off specific areas of the garden, takes little maintenance: at most, once or twice a year.

If you follow our instructions, you’ll have lovely hedges all year.

When Is The Best Time To Cut A Hedge?

Hedges are typically made from bushes that have two distinct vegetative periods throughout the year, one in the spring and the other at the end of the summer.

It’s best to wait for these growth periods to settle down so that the shape you give them will last for longer.

As a result, your hedge will be trimmed in April-May and September-October.

However, because hedges can be trimmed more frequently, this is not a duty that must be strictly adhered to; it only means that more work is required.

Wait until the flowers have faded before cutting flowering hedges.

Hedges Can Be Trimmed In A Variety Of Ways.

Trimming a hedge properly helps to keep it in good shape over time, guaranteeing appropriate density to keep it opaque and maximizing hedge growth.

  • The tip of the base must be trimmed wider than the tip of the tip.
  • This helps to provide light to all of the hedge’s bushes.
  • For hedges longer than 16 feet (5 meters), use an electric or gas-powered hedge trimmer for improved precision and a less workload.
  • For the larger branches, use pruners.
  • Shears are more precise, which is beneficial for lower hedges.

Good-For-Hedge-Planting Shrubs

There are many different types of hedge shrubs, but some are especially well-suited to hedges due to their ability to withstand pruning.

Hedge plants including strawberry tree, wild privet, weigela, cypress, camellia, photinia, and flowering currant are ideal.

  • Start an evergreen hedge and go for green all year.
  • Make a flowering hedge that blooms as the seasons pass.
  • Berry shrubs are great for attracting birds.
  • Learn how to make mixed hedges, which act as excellent disease and parasite barriers.

Pruning And Trimming Hedges Is A Great Idea.

Obtain a long roll of burlap or a tarpaulin and place it near the hedge on the ground.

Trimmings will fall onto it, making cleanup a breeze. You’ll save a lot of time and get a wonderfully clean result!

For The First Time, You Are Cutting Hedges!

Hedge pruning should begin as soon as the hedge is planted, especially with flowering shrubs and robust non-flowering shrubs like hawthorn and privet. Reduce the plant’s height by about one-third. For new plants, this may sound severe, but if you don’t, your hedge will always be thin and weedy at the base. The next autumn, cut back new growth by half and begin cutting hedge side shoots to the desired width. After planting, evergreens and slow-growing deciduous plants (beech and hornbeam) should not be pruned. Side shoots should be trimmed by a third, while leading shoots should be allowed to flourish. The hedge will appear frail, but keep your cool.

5 Ways to Look After A Dragon Plant Indoors

Dragon plants may be planted as desk plants, but these are particularly striking as large trees with several sticks, and with dozens of thin, long greenish leaves covered in a dark crimson colour. The sticks are usually large, stiff and curled, making these a costly and attractive ‘specimen’ shrub.

Dracaena marginatas are simple to maintain, lasting, house plants, suitable for workplaces and houses. As an effective plant to remove dangerous pollutants from the atmosphere, NASA mentions the Dracaena marginata. Dragon plants are generally mildly toxic, particularly to cats and dogs.

The budding plants are like a large wild grass pile. When they mature, they can be shaped like a tree, generally with beautiful twisted wood, which is covered with a leaf shock, like a little palm tree.

5 Care Methods for Dragon Plants

As they are so different in length, they are a preferred option to provide dimension to your house décor. Many people use these as a table adornment in a pot, while others like the larger ones for their lounge spaces. Their leaves are also quite thick, making them perfect to pop out in front of a glass so that your neighbors do not observe your business. So we must take care of these kinds of trees. Here are some tips for you.

  • If you do spray, spray it generously, that it gets a nice drink for its thick root structure. Then allow for the topmost layer or more of the ground to dry before watering again. A Small amount of water is best for a Dragon tree. Watery soil will cause extra harm than everything else.
  • Dracaena members are usually quite easy to maintain indoor plants and dragon trees are also like that. Whenever they are positioned beside a sunny window, the colours of the dragon plant are at its richest and they may sustain in a gloomy lair. However, even during a sunny winter, the dragon plant is quite durable to minimal light circumstances.
  • Dragon Plant is not very demanding, but it likes to expand. Your dragon plant can grow up to 6 meters tall without checking. If you desire this, that is all up to you. If you do not want this, then you have to check the height of these plants several times in a year.

  • Because of his aggressive growing tendencies, re potting will perhaps be the hardest job for any dragon plant. The root structure is sturdy and joyfully crawls over the year via the draining openings inside your pots. In the springtime, put the dragon plant into a bigger pot which can manage the root sphere size.
  • Last but not least, these dragon plants appear dapper. Provide it a good bath in the bathroom to purify the dust from its foliage a couple times each year. At least offer the foliage a wipe with a moist towel if it’s too large for the bathroom.  This may also ensure that dust does not hinder the capacity to synthesize. After the bath it looks fresh.
  • Usually dragon plants throw off insects, but dry weather may invite spider mites. Decayed leaves as well as yellowing among foliage signify an infestation. Frequent water spraying will increase the moisture and keep harmful bugs away.

Some common problems with dragon plants

The dragon plant takes much negligence, as indicated above, but it is of course never suggested. Here are some possible difficulties:

Brownish Leaves Tips:

Dry wind, chilly temperatures or insufficient watering may be the possible factors. Assess the moisture in the space as well as the water amounts. Check further for another kind of problem. When it is discovered, offer just the appropriate treatment.

Brownish Soft Leaves:

The room is excessively chilly and the ground might be soaked with water. Give warmer temperatures and monitoring the soil.

Conclusion

Also, a small spray on the foliage a few times per week will help dragon plants. Throughout low moisture seasons, which including winter time, it is of considerably important. Without enough humidity, farmers might note that the leaf tips start to become yellowish or brown.

5 Rules to Keep in Mind When Decorating A Living Room

For many individuals, the living room is where they socialize, spend time with their families after a long day of work, or simply sit and relax. Being the most essential room in any home, it is necessary to decorate it accordingly. If you want your visitors to stay longer in your home, make sure your living room is designed to be comfortable, functional, and aesthetically appealing. Decorating your living room can seem like a daunting task. One can become overwhelmed by the number of choices, colors, furniture layouts, and accessories that are available when decorating their living room but following the 5 rules below will help to ensure that your living room is decorated beautifully and on budget.

1. Make a budget

Decorating your living room can get expensive very quickly. Set a price range that you are comfortable spending for each decision on the decorative elements in your home. Whether it is furniture, rugs, wall decor, or accessories, having a set budget will help keep you from overspending which could leave you with money left over for other things. A budget is also helpful when choosing the overall design elements of your living room. If you have a budget in mind, you will be less tempted to add a higher-priced item simply because it is something that would look good in your living room.

2. Start with the Layout

Before purchasing new furniture or accessories, it is important to determine how you want your living room to be arranged. Take measurements of your space and determine how much furniture you have available before shopping for new items. Draw an accurate map of where you want your furniture to go before purchasing. The layout is critical in order to maximize the room’s functionality and comfort. You will need to determine whether or not you want a formal living room with one central focal point (such as a fireplace) or an informal living space with multiple conversation areas.

3. Choose Your Colors Carefully

Color is the most influential element when decorating and can help to either make or break a living room’s design. Not only will color play a role in your furniture, flooring, and wall colors, but certain colors will attract people of different genders, ages, and personalities. Colors evoke different emotions from people and can help to determine the feel and tone of your living room. For example, red is a powerful color that evokes strong emotions, which could be too overwhelming for a small living room.

4. Lightening

Lighting is especially important when decorating a living room since it can help to create different moods and aesthetics. Before shopping for light fixtures and lamps, decide how much lighting you need and what types of lights will work best with your living room’s color scheme and design.  While a living room has many purposes, it is important to focus on the overall mood that you want your living room to have. For instance, a dimly lit fireplace can create a romantic and intimate feeling while a brightly lit chandelier will give your home an energetic feel.

5. Add an Area Rug

A rug can define an area in your living room and act as the focal point. It is good to match the size of your rug with the size of your furniture arrangement to avoid overcrowding your space. If you decide on a large rug, it may not be necessary to place all of your living room furniture directly on top of it. Keep in mind that your furniture’s legs should never cross the rug and take up more than one-third of the rug to avoid damaging it. A clean rug will help to give your living room a more cohesive look. Fortunately, area rug cleaning Boise Idaho does the job for you.

A living room is a perfect place for friends and family to gather together, share stories, and spend time with each other. It is the first space that will be seen when guests or potential buyers enter your home. Decorating a living room can be challenging, but following these 5 rules will allow you to create an aesthetically pleasing design that is comfortable and functional for your family and friends to enjoy. Always make a budget before you begin shopping and focus on the layout first. Be careful when choosing colors that work best with the space, then choose your lighting carefully. Add a stylish area rug to define an area in your living room and you will be ready to entertain guests or just relax with family. If you are planning on redecorating your living room, follow these 5 rules for decorating a living room!

How Long Does It Take to Paint A House?

Ever wondered how long it takes to paint a house?

If you’re planning on painting your home, then the answer will depend on several factors.

To get started, you’ll need to determine whether or not you plan on doing any prep work before getting started with painting.

It includes things like removing nails from trim and filling holes in plasterboard.

Depending on the size of your house, this could take anywhere from an hour to a full day.

When you paint a house, it’s important to prime it first.

It takes half a day for one coat.

Then you can paint the walls with another coat.

In the end, your painting job must look nice.

One important thing to remember is that it’s interior or exterior painting. So it’s always best to try and do the prep work yourself if possible.

It means filling holes in plasterboard, sanding down surfaces to be much more easily painted, and cleaning surfaces.

As a professional, this is done by the house painter too, but as a DIYer, you will save yourself from paying for it.

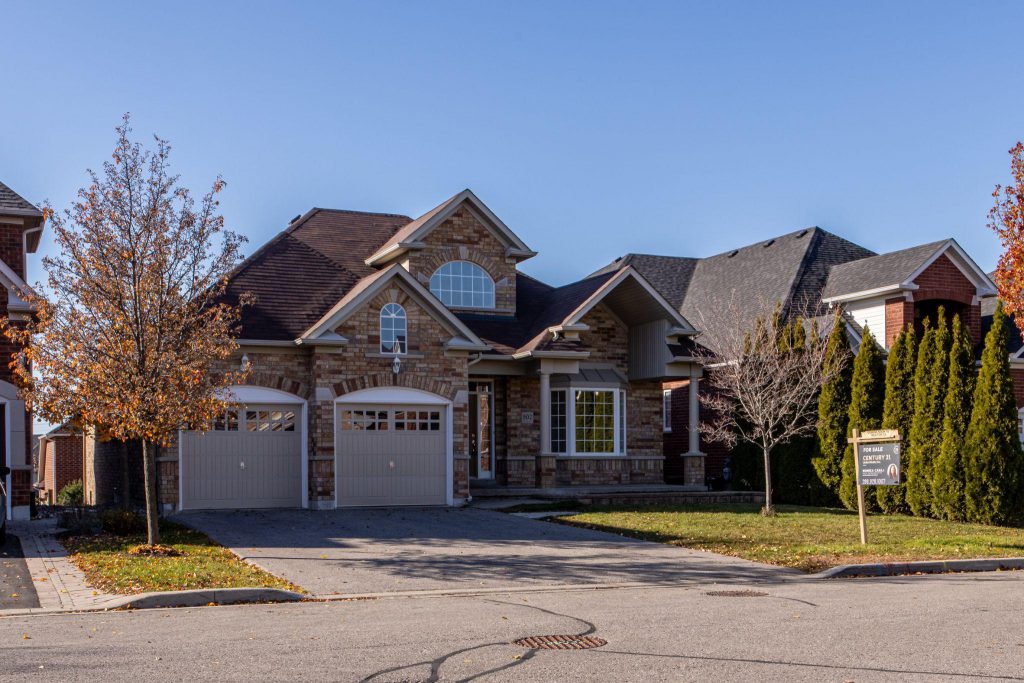
How long does it take to paint a house exterior?

Painting a house exterior is one of the most popular methods that people have for improving or even changing the aesthetics of their home.

The time it takes to paint a house exterior depends on several factors, including the size of the house and how many stories it has.

For example, painting an average European detached house with two stories would take approximately three weeks to complete.

This estimation assumes you are doing :

  • All preparation work yourself
  • Preparing surfaces by removing loose material
  • Repairing cracks in plasterboard and making sure all wooden parts are primed with an oil-based primer before applying topcoats in color.

You can also choose not to do this preparation work yourself, bringing up the time to paint your house.

This time can be reduced by half if you have the contractor do all the work for you, including preparation.

However, asking someone else to perform this laborious task will naturally cost more money, so consider this when planning.

The material used is also essential, as different paints and accessories can extend the time it takes to paint a house.

Duration

Oil-based primer: 1 – 2 days

Topcoats in color: 3 – 4 days

For 4 bedroom or a bigger house

interior takes 6~8days / exterior takes around 8~10days

3bedroom house

interior 4~6days/ Exterior 5~8days

2bedroom house

interior 3~5days / exterior 4~6days

It may seem like a lot, but this information is just guidance. 

The actual time it will take could be more or less than this, depending on whether you plan to do any additional work, such as:

  • Filling cracks and holes
  • Staining wood surfaces
  • or preparing the wall’s surface for painting by sanding

How long does it take to paint a house interior?

It is a question that many people ask, particularly if they are considering painting the interior themselves.

It is impossible to say how long you should allow painting your house interior because there are so many variables involved.

Painting an average apartment should only take a day or two at most, while painting a large home with multiple rooms and high ceilings could take up to a week.

Other factors influence this timescale, such as whether there have been any leaks in the roof or other building work that needs doing.

How long does it take to paint a ceiling

The painting of a ceiling can be pretty time-consuming.

It usually takes about 15 to 20 minutes per coat.

On average, it will take between 3-4 coats before the surface is completely covered.

If you use paint, it takes around 4 hours or more to give your walls two coats. 

And if people go in the room while the paint is still drying, they could ruin it and may take even longer for the whole thing to dry.

It could also take 1-3 days for the paint to dry overnight thoroughly.

If, instead, you are using wallpaper for your ceilings, then this process can go much faster since there is no wetting down or drying time needed in between coats.

Depending on how involved your installation process was, four rolls should cover an average-sized ceiling.

How long does it take to paint a room?

Professional painters advise that the average room should take around two weeks to paint.

This time will vary depending on size and whether or not you’re painting multiple rooms at once or just one room.

The critical thing to remember is not to rush it and allow yourself enough time between coats for an even finish.

The best painters in northern beaches say that the key to avoiding streaks or paint build-up is to make sure you prepare the room properly before painting.

If scraping off old paint, use a scraper and not just a putty knife to damage the walls.

After washing the walls, it’s worth using an oil-based primer before carrying out your final coats of either latex or emulsion paint.

It acts as a sealer preventing any new damp from affecting your work when it has dried.

Painting two rooms consecutive can save time, but if you don’t have enough time, it might be better to allow one room at least 24 hours between coats. Hence, you get an even finish without leaving brush marks.

Painting a home can be one of the most challenging tasks you will undertake.

It is vital to get it done right, but that’s not always easy.

You want your house to look beautiful and fresh for years to come, which means finding high-quality materials and hiring quality professionals with experience in painting homes

That’s where PaintBuddy & CO comes in!

Our team of experts is ready at any time, day or night, to help make sure your paint job goes smoothly from start to finish—no matter what size project you may have planned

We offer competitive rates on all our work.

So call us today if you need professional painters who know how long it takes to paint a small room versus a larger one!

5 Reasons To Get Your Roof Fixed Before Winter

There are many reasons why you should get your roof fixed before the winter season. If you enjoy saving money, time and aggravation then you’ll want to take heed of the winter warnings that every roofer will tell you when it comes to repair and installation.

If your roof happens to be located in the frosty North then you better git ‘er done by the end of October. There are plenty of Canadian roofing companies that will attest to this when it comes to Durham Region roofing. Chris Delaney, the owner of C.D. Roofing & Construction Ltd. says, “The fall season is by far the busiest time of the year because no one wants roofing problems during the winter.”

Image Source from C.D. Roofing & Construction Ltd.

Obviously, the further south you go, the more time in the year you have for warm weather. The reason we’re making the weather such a big deal is that it’s the root cause for the cold hard truths about roofing before winter.

Asphalt shingles get brittle in the cold weather

To this point, most people (especially in temperate climates) will use asphalt shingles. They are the most cost-effective and will keep your home warm during the winter months. However, whenever you’re roofing in cold temperatures, you run the risk of these shingles becoming brittle and breaking during installation.

Broken shingles can leave cracks in your roof, which allows water to get underneath it. Once this happens it’s bad news. Unattended, the water can cause mildew to grow. What’s worse is that if the water freezes, it’s going to create cracks in your roof and cause water to leak into your home.

Heard enough yet? Wait. There’s more.

Sealant becomes less effective in cold temperatures

Not only do you need to consider the fact that shingles may break but you’re also running the risk of losing shingles in high winds due to poor sealant. A number of manufacturers specifically state a range of ideal temperatures that shingles should be installed in. On the IKO website, it states that shingles should be installed between 40 and 85 degrees F (4-26 degrees C).

If you’re in need of roof repair or installation, it’s going to pay off to get it done before the cold kicks in. Do it to avoid the pitfalls but also to get the best possible roof your money can buy.

Get the highest quality roof installation in the fall season

There’s a reason the fall season is considered the busiest season of the year for roofers. The temperature is ideal for roofing. It’s not too hot and not too cold so you get the highest quality installation because the sealant hardens in optimal conditions. This gives you a waterproof roof that stands the test of time.

Your roof is much more impervious to water penetration and high winds when it’s been installed in ideal conditions. Of course, quality roofers play a big role as well but that brings us to the next point.

Save more money in the long run

Getting your roof done before the winter can save you money on potential future repairs as well as utility bills. The winter months can be hard on your home and if your roof isn’t up to scratch you could find yourself shelling out more money than you have to.

A draft that lets heat escape is going to make your furnace work overtime. With the furnace going constantly, you’re going to see a big difference in utility bills. And that’s just the tip of the iceberg.

If you have a draft, it’s because there’s a hole or crack that is letting the exterior elements enter your home. This means that this problem is only going to get worse. If water slips in and freezes it tends to blow cracks wide open. If this type of damage happens to the structure of your home every day you let go by could mean paying more in damages.

Be prepared for the rainy spring season

If you’re in a place where snow, wind and ice are prevalent during the winter months then you’re also in for a rainy spring season. The snow will melt and the rains will come and if your roof isn’t in tip-top shape-guess who’s getting an unintentional indoor spring shower?

Leaks are no joke and when the rain comes you want to make sure your home is protected.

Plan your roofing investment wisely

Get the most out of your investment by making sure your timing is on point. It doesn’t make sense to wait until spring if you know you need roof maintenance or a brand new installation.

Give your roof the attention it needs before the winter weather has its way with it. You can save money, time and aggravation by being proactive and biting the bullet when the situation demands it.

The Secrets to Getting More Roofing Leads

Every roofing contractor knows that leads are the lifeblood of their business. Leads generate sales, which generate profits. The more roofing leads you generate, the better your business will do! With that in mind, it is important to have a proven system for generating high quality leads on a consistent basis. This article provides some great tips on how to get more roofing leads and get your roofing company back up and running with plenty of customers again.

#1: Don’t Be Afraid To Advertise

When people think of advertising they may think about expensive radio or television commercials but there are many other ways to generate new customers without breaking the bank. Consider buying local print ads in publications like city newspapers or magazines that are targeted towards your target demographic.

When you generate roofing leads through traditional advertising it is important to track the results of that ad campaign so that you can tell if it was worth the money or not. Also, don’t forget about online marketing! There are many free tools available for small businesses like Google Adwords which makes creating high quality ads easy and cheap. Even more importantly though, make sure your website is optimized with all of the correct keywords for local search engines because this will generate more traffic flow on a consistent basis. This way when someone searches for “roof repair services near me” they see your brand name at the top of their list instead of just another generic company who might be out-competing you.

#2: Get Out In The Roofing Community

Simply put, the roofing community is your best source of leads. Make sure to get out and attend networking events or join a local trade association for roofers so you can generate more business from people who are already familiar with your brand name. This way you don’t have to do any initial marketing because they know about your company already!

Another great thing about getting involved in the roofing community is meeting potential partners who might be able to help generate even more leads on a consistent basis. For example, perhaps there’s another contractor in town who specializes in commercial roofs instead of residential ones like yours does but still has some customers looking for residential work as well? A partnership between both companies would not only generate additional revenue but it would generate roofing leads as well.

Roofers who attend these types of events also tend to be more serious about their business and are already looking for ways they can generate additional income so you know that when you get in front of them, they’re interested in what your company has to offer!

#3: Host A Local Event

Another great way to generate roofer leads is by hosting an event at your local community center or park. This way people who may not have been actively searching online come into contact with the idea that you might be able to help them out with whatever it is they need done on their house. For example, if there’s a big event coming up like Halloween people will naturally think “Hey I should probably get my roof fixed before all this heavy rain starts up again because then I won’t have any leaks for all the trick or treaters that come to my door!”

People who get in touch with you this way are typically more serious about wanting a proposal from your company and will be much easier to convert into a paying customer than someone just doing random searches online. This is especially true if they had no idea your company was even available before now!

This type of event can also generate additional revenue, which means it’s not just an effective form of lead generation but also acts as marketing since you’re essentially promoting yourself at another community event without having to lift a finger beyond organizing everything beforehand!

Final Thoughts

With these three tips combined, your business should never run out of roofer leads again so start applying them today and generate more roofing sales!

There are also many companies that offer lead generation services for roofers and online marketing platforms.  A local company that we recommend for your roofing contractor service is Rank Rise Marketing out of Windsor, Colorado.  They have vast experience with SEO and online marketing, specifically with roofers.

Carpet Steam Cleaning VS Carpet Dry Cleaning

A Carpet Cleaning business owner has to be familiar with both Carpet Steam Cleaning and Carpet Dry Cleaning. This is because he needs to guide his customers about the process involved in each of these Carpet Cleaning methods.

What are Carpet Steam Cleaning & Carpet Dry Cleaning?

Carpet Dry Cleaning is mainly done by applying chemicals onto the carpet surface using a sprayer or injection system. After applying chemicals, the carpet cleaning company’s employees will scrub on your carpets using special brushes, thus releasing soils embedded on your carpet surfaces. For this reason, you need to dispose of any mattresses, furniture covers, etc., which would prevent Carpet Dry cleaners from making direct contact with Carpet surfaces. On the other hand, Carpet steam cleaning uses water with detergents to clean carpets using a Carpet Steam Cleaning machine with rotating heads used to scrub Carpets & simultaneously inject high-quality cleaning solutions into Carpets.

The Carpet Steam Cleaning method uses Carpet steam cleaners which contain rotating heads attached to a long hose: these Carpet Steam Cleaners clean Carpets and the surfaces beneath Carpets, such as walls and windows, etc. However, it would help if you didn’t confuse Carpet Steam Cleaners with Carpet Shampooers. While professional carpet cleaners mainly use a Carpet shampooer for spot removal of soils from carpets, carpet steam cleaner can be used for effective & efficient carpet steam cleaning in homes and offices alike.

Benefits of Carpet Steam Cleaning over Carpet Dry Cleaning:

Your home will become safer.

The carpet dry cleaning process uses chemicals, solvents & other harsh substances to clean carpets. These chemical residues can cause long-term damage to your Carpets and family members who have been exposed to such harmful chemical particles daily for years together. Carpet Steam Cleaning instead uses pure water or water-based solutions with no traces of any chemicals or additives that may be harmful to Carpets. Carpet Steam Cleaners only use water, detergents, and Carpet specific cleaning solutions to clean carpets without having any Carpet Dry Cleaning residues left behind on Carpets.

Carpets will become more Carpet safe.

In the Carpet Dry Cleaning process, harmful chemical particles from dry chemicals get embedded inside fibers of your Carpets, resulting in a lower Carpef safety quotient for you & your family members living or working within homes where carpets have been cleaned through the Carpet Dry Cleaning method. However, since the Carpet Steam Cleaning machine uses high-pressure heated steam instead of chemical solvents to kill germs and dust mites that live deep inside your Carpets, Carpets become safer for everyone. Carpet Steam Cleaners also clean Carpets from deep within Carpets which is not possible with Carpet Drycleaners.

Carpets will last longer.

Since dry chemicals and chemical residues remain on your carpets even after Carpet Dry cleaning, you risk having stained and yellowing Carpets over some time due to prolonged use of such harmful chemical residues & solvents as part of the Carpet Dry cleaning method. However, as far as Carpet Steam Cleaners are concerned, there are no such risks involved since it has been proved beyond doubt that using water-based solutions instead of dry chemicals results in better colorfastness of Carpets. Carpet Steam Cleaning results in Carpets that stay cleaner, brighter, and new for more extended periods than Carpet Dry cleaned Carpets do.

Carpets will be more hygienic.

Carpet Dry cleaners use dry chemicals & solvents to clean carpets instead of water-based cleaning solutions that Carpet Steam cleaners use on Carpets. This means that there is no way you can verify or check if all dirt has been sucked out from Carpets while Carpet Dry cleaning is being carried out on your carpets. Since all solvents are left behind inside fiber cores after the carpet dry cleaning process, it becomes difficult to remove these residues over time, thereby hampering Carpet hygiene levels. On the other hand, Carpet Steam cleaners kill germs & dust mites that live deep inside Carpets, which are difficult to remove with Carpet Dry Cleaners during the Carper cleaning process. This means Carpets treated by Carpet Steam Cleaning will be cleaner & more hygienic than Carpets cleaned through Carpet Dry Cleaning methods.

Better results.

Carpet steam cleaners for homes and offices can easily clean most carpets with better results than Carpet dry cleaning. Since most wet carpet cleaning machines use hot boiling water to clean carpets, they clean Carpets faster and leave less moisture content in carpets after Carpet cleaning has been carried out. On the other hand, Carpet dry cleaners use filtered air to blow off all dirt and residues from Carpets after the Carpet Dry Cleaning process is complete. Carpet Steam cleaners can be used along with Carpet protectors and carpet stain removers if required, and this allows you and your family members to live in more hygienic surroundings at home or work.

Better Carpet Drying results.

Carpet dry cleaners do not allow Carpets enough time for drying after Carpet Dry cleaning, which often leads to low-quality damp carpets instead of high-quality dry carpets treated through Carpet steam cleaning methods. The Carpet steam cleaner uses hot steam combined with a Carpet cleaning solution to deep clean Carpets, and this means Carpets are dry within an hour of the Carpet steam cleaning process. This saves you the inconvenience of Carpeting wet carpets for several hours before they are scorched.

In a nutshell, Carpets treated through Carpet Steam Cleaning processes stay cleaner and newer for more extended periods than Carpet Dry cleaned carpets do because hot water-based solutions remove dirt better than dry chemicals ever can. So if you want healthy & clean Carpets that look good too, it is best to hire a carpet steam cleaner instead of going in for carpet dry cleaning methods to get rid of stains and germs from Carpets.

7 Home Renovation Mistakes You Must Avoid At All Costs

Home renovation is one of the best things you can do with your friend and family. The good thing about home renovation plans is that you can change your home and improve it without spending a lot of money and buying a new home.

However, how amazing a home renovation plan is, you cannot get the best results unless you know how to do it properly. Most people have no prior experience of renovating a home. They end up wasting their time, money, and effort – making them super stressed and anxious.

The good news is that you can ace your next home renovation projects if you know how to avoid the mistakes. Are you going to start a home renovation project and want to know which things to avoid? Keep reading this article to find out the seven home renovation mistakes to avoid at all costs!

1. Not buying the right items

Most people think that they know what they must have in their home. They think that they have been living in the home for years, and they probably know whatever is needed. But the real thing is that most of the time, people make the wrong choices when it comes to buying things for your home.

There are many necessary things that you must buy while working on a renovation project. For example, if you live in a city where the environment is super cold, you will have to buy the right equipment to stay safe in the cold winter.

But what most people do is that they buy all the renovation material and avoid the necessary items. You have to ensure that you don’t make the same mistakes. Make sure that you take a good look at your home and find out what items are missing. Make a list of all the important items like a camper hot water heater so your home is ready for an amazing experience after the renovation is complete.

2. Not having a proper plan

Planning is the key to the success of any project. If you wake up one morning thinking that you should renovate your home and hit the market to buy the right gear and products, you will never be able to achieve your renovation goal this way.

You have to ensure that you have the right plan before starting out on the renovation project. Ask everyone in your home to tell which things will be the most important and what expectations they have with the renovation plan.

Engaging everyone in the home will help you pinpoint which things are important and what you should avoid in the renovation phase. And when you are done asking for recommendations, the next thing will be listing down everything, so you don’t miss out on something necessary.

3. Lack of a proper budget

As with planning, starting your home renovation project without proper budgeting is also not the best idea. It’s a common observation that people have to spend around 15-20% more than their expectation of the renovation cost. If you don’t stay prepared for little details like these, you will be unable to reach your goals.

Make sure that you come up with a proper budget before starting out on a renovation plan. It will help you decide how much money you can allocate to each process and whether it’s the best decision for you or not – so you can get the most out of the renovation phase.

4. Ignoring the communication

Communication is the key to the success of any project. If you don’t have time to figure out what everyone in the home wants with the renovation phase, your renovation process will be a complete mess and won’t enable you to achieve your goals.

Remember that a home renovation plan will disturb the schedule of everyone in the family. You have to know how important the home renovation plan is for them and whether they are willing to get the renovation project started in the first place or not.

Take out time and discuss everything with your family in detail. Ask them for recommendations and check whether they can set a time for renovation and work with you.

5. Thinking that you know it all

It’s very easy to start thinking that you know everything about home renovation and can get all things done without taking the help of anyone else in the family. The bitter truth is that unless you have a certification in home renovation, you probably don’t know about several important home renovation details.

Therefore, it’s essential to find out which things are necessary for your upcoming home renovation plan. You have to ask your friends and family about recommendations to help you make the right decision – so you don’t waste your time, money, and effort on your renovation plan.

6. Hiring bad contractors

Most people think that they have to save their money by hiring the most affordable contractors. But the truth is that unless you hire talented people for the job, it will be impossible for you to achieve your renovation goals.

It’s super easy to find out the best contractors for your upcoming home renovation plan. All you have to do is to ask for recommendations from your friends and family about home renovation contractors. However, if no one in your circle has worked with a contractor in the past, the best option is to ask for help online from other people and follow the given advice.

7. Not having the right permits

You have to ensure that you don’t start on the renovation project before getting permission from the competent authorities. Most people think that they don’t have to contact anyone before getting started on the renovation phase.

But the thing is that you cannot start on the renovation without prior permission. You will have to check your local laws before hiring a contractor or buying the renovation material for the home improvement phase. Visit your Town Hall and ask for information, so everything goes as planned and you are not stopped by authorities.

Why Should You Sell Your House?

It’s that time of year again when you start taking stock of your life and find that your budget is under pressure. Whether you’re a die-hard who is already thinking about your closet and what goes to Goodwill, now is the time to start considering if it isn’t time to sell your house as well.

Why should you sell your house? Read on to find out!

It’s been an exciting few years in property investment. The housing market has been steadily growing since 2011, and even though some think it may have peaked, property buyers will probably always be a part of real estate transactions. Now might be a great time to put up that sign in the front yard – provided you have the right reasons why you should sell your house.

Here are some signs that selling might be the right choice for you:

  • You’ve been living in the same place for a while and feel it’s time to move on. It’s more often than not that we hold onto homes long after they have fulfilled their purpose, and maybe now is the best time to sell your house and move on with something new! Many people out there don’t want to settle down yet – why not join them?
  • Your children have grown up and moved away, leaving you more space than you need. Selling your house could provide you with an opportunity to start over in a smaller environment or even afford something better if you like to move up in the world!
  • You’ve always wanted to travel the world but never found the time. Selling your house could be an excellent way to finance your dream vacation – you’ll probably receive enough money from selling to live on for a couple of months but also have some leftover for spending.

These are just three of many reasons why you should sell your house. Of course, there are plenty more reasons why this is the right choice at the moment:

  • maybe you desperately need extra cash and can’t think of any other way than selling your house,
  • or perhaps you want a change of scenery and want to be closer to friends and family.

The point is that now might be as good a time as ever to sell your house and start fresh.

Before making the decision

It’s important to understand that selling is a huge step and not something to take lightly. Not everyone can buy back their house if, after they’ve sold it, they find out they don’t like the change, so carefully consider your options before making the decision. You never know where life will take you next, but at least now you’ll learn how to finance it. If you think now might be a good time for you, why not contact Mega House Buyers, who can help guide you through this?

If none of these reasons convince you, maybe we should also mention that there are some tax benefits with selling: capital gains exemptions or losses on sale may apply if circumstances warrant. So what are you waiting for – put up that sign and let’s get your house sold!

How The Storm Damages Your Building Roof?

Following a storm, the first responsibility of homeowners is to check the roof for damages. If you feel that there are no visible signs of wear, even then, you will have to inspect the roof for possible damages. Although it is tempting, experts recommend homeowners to take professional help for performing this task. These individuals will assess the roof damage and provide you with the necessary assistance. They use the relevant tools for a clear understanding of the roof and other related aspects.

Rain, hail, snow, and storm are the culprits that can immensely damage the structure and amount to severe damage. Hence, you have to take the help of professionals to assess the situation, understand the symptoms, and provide it with the necessary repairs.

Wind damage signs 

Winds that have a speed of 50 mph are considered damaging. When hurricanes or thunderstorms accompany it, it severely affects the building. Although it is hard to differentiate storms from tornadoes, wind damages are associated with either of these. When your house has to withstand severe weather conditions, it is your responsibility to check for these signs of storm damage.

Missing shingles 

Peeling or cracked shingles are the first signs of roof damage. Wind speed that exceeds 60 mph can cause severe damage to the structure. You will find multiple roofing manufacturers providing you with alternative roof structures. However, roofs that can endure high speed need well-maintenance. Hence, professional help is the only resort.

Granule loss 

A minimum amount of granule loss comes in. It indicates broken seals of the shingle. These granules will rub off the shingles and thereby compromise the overall strength of the roof. However, granule loss emanating from storm damage can result in horizontal lines. Hence, you will have to contact the roofing agents as fast as possible to rectify the surfaces.

Loose debris and water infiltration 

Whenever you notice loose debris is on the roof, it’s an indication of loss. You will have to clear the debris to minimize the risk and take care of the structure. Apart from this, water infiltration into the roof affects the entire network. Apart from wind damage, water damage is an evil that might compromise the whole structure. You will have to speak to professionals about the best ways to rectify the same.

Snow damage 

Strong thunderstorms often result in hail that affects the roof severely. Ice balls and hailstones damage the roof between one to 1.75 inches. These damages are hard to rectify, and thereby you require the help of professionals. Apart from this, if you see water damage like visible moisture, attic issues, and damage to accent or roof support, it indicates that you need to give immediate attention.

It demonstrates roof damage whenever you see hail damaged or missing shingles, ice dams, or clogged gutters. In all these cases, you will require the help of professionals to assess the situation. You thereby require roof agents who will provide you with superior service and necessary support. Roofers need expertise for ideal results.

Recent Posts

Posts You Might Like