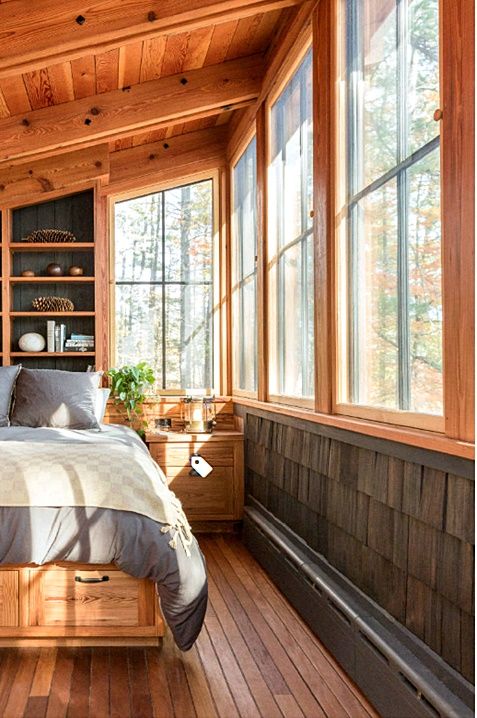
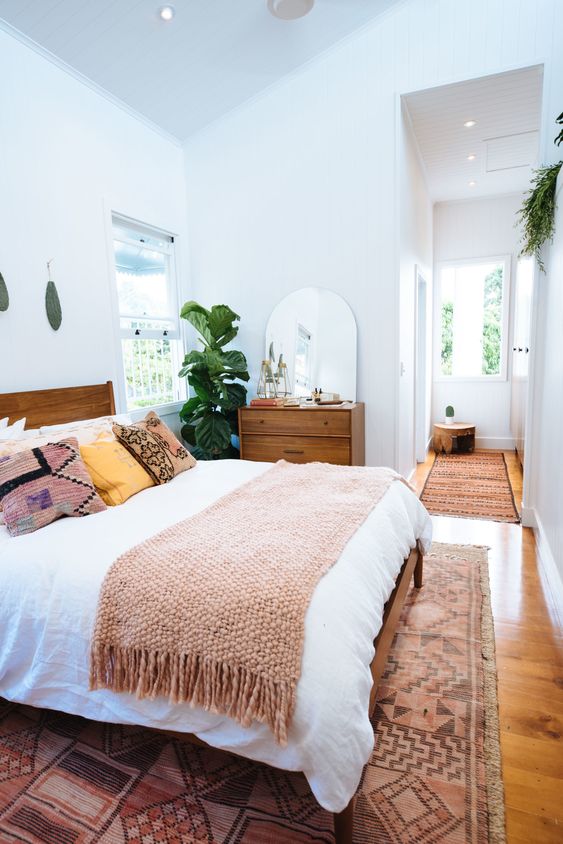
Some people are prone to the floordrobe phenomenon. No matter how often you declutter and rearrange your clothing, it always ends up in a pile on the floor. You need to find an organisational system that works for you and your lifestyle. You might need to simplify your system or store seasonal items, like ski gear, elsewhere.
You can design your dream wardrobe with your home and clothing in mind. Here are a few benefits of having a bespoke wardrobe.
Maximise the space
You can design your wardrobe to reach from the ceiling to the floor. You can build it into the awkward corners of your home and make use of all the space available. You can use the space up high for things you don’t often use, like Christmas decorations and sentimental treasures.
Add lighting
You can add lighting to your wardrobe with LED strip lights on the interior shelves. Your shelves will be illuminated when you open your wardrobe doors. You can see everything in the wardrobe – instead of shuffling around in deep drawers and shelves. Genius, right?
Think about your lifestyle
A complex organisation system with tiny drawers and dividers might seem like a good idea. It will make your wardrobe look Instagram ready and keep everything separated. However this sort of organisation is impractical and unrealistic. You need a system that works for your busy life to maintain it in the long run.
You could separate your wardrobe by event. For example, work clothes in one half and weekend wear in another. Keep it simple and think about the demands of your life. You could have a drawer for your outdoor gear, like women’s thermal tops. Leave some space for your shoes at the bottom or have a separate cupboard for them altogether.
You might need to split the wardrobe with your partner. You can add different organisational features to each side of the wardrobe. Your partner might need more hanging space, while you need a few shelves.
Add your style
Your built-in wardrobe can be practical and beautiful. Finish off your design with beautiful brass handles and sleek touches. You could add a pop of colour to your bedroom with a pastel wardrobe – or keep it classic with a wooden finish. Your wardrobe should complement your bedroom design and add a little style.
Make the most out of the space available in your home with a built-in wardrobe.
The real estate market is hot right now, making this the perfect time for investors to snatch up the perfect rental property. If you are thinking about diversifying your income by renting out a property, you will be taking on all the responsibilities of a landlord. To make your job easier, it’s important that you buy the right property in Manchester, UK.
As a property owner, you don’t want to end up with an empty unit. Being able to draw in the right tenants begins with your choice of property. Renters want to feel like they are in a home that has all the conveniences of a normal house. Choosing the right location could be critical to being able to keep your unit occupied.
Whether you are going to manage your rental yourself or rely on experts like quartermasterproperties.com to deal with the day-to-day operations, the most important factor in being a successful property investor is choosing the right rental. Let’s take a closer look at a few of the things to look for when buying a rental property.
Landlord Responsibilities
Once you acquire a rental property, your work will just begin. It’s important to understand the time and effort that it will take to successfully manage a rental property. You will need to establish a procedure for vetting potential tenants, learn everything that you need to know about the legal aspects of being a landlord, and dedicate time to paperwork. You will also need to be available at all hours to respond to the needs of your renters. Many rental property owners choose to hire the services of a property management company to take care of these types of responsibilities. Likewise if you are running a vacation pad, a vacation rental management group could be hired to handle these tasks.
Unexpected Costs
A rental property is no different than investing in your primary residence. Anything can happen at any time. Your rental property may sustain damage in a storm, have a pipe burst that causes flooding damage, or need a new fridge. It’s important to consider setting aside an emergency fund to cover unexpected expenses that come with owning a rental property.
Insurance
A commonly overlooked expense when investing in a rental property is the insurance. Your property will need to be adequately insured for damage and liability. It’s important that you discuss your needs with your broker to get the right coverage that will protect you, the property, and your tenants. You will need to decide how much coverage you will need, and what coverage is the best for your situation. Depending on the location of your property, you may need to consider special riders like hurricane or flooding protection.
Property Taxes
You are already paying for property taxes on your primary residence, but you will also need to consider the potential tax payments for your investment property. Conducting some proactive research about the area of your rental property and the average tax rates can save you from getting any surprises on your next tax bill. It’s important to discuss your tax options with your financial advisor and create a plan to set aside an amount that will cover your tax expenses.
Screening Tenants
A landlord’s worst nightmare is having tenants do damage to their property. The best way to avoid destructive tenants is to create an extensive screening process. Normal wear and tear on any residence will be the responsibility of the landlord, but larger areas of damage can be devastating if you haven’t taken the time to screen for the best tenants. Adding a security deposit that will cover any major repairs or damage is one way to ensure that your tenants take good care of your property.
Screening tenants can be a tedious process. One of the best opportunities to weed out many applicants is to post a highly detailed advertisement. You should include as many details as possible about your rental including the rent amount and any additional fees. With more detail, potential renters can weed themselves out of the process before they even make an inquiry.
As a landlord, it will be up to you to conduct your due diligence on each of your applicants. This means that you will need to call all of their references, check their work status, and do a background check to ensure that they have a clean history.
Neighborhood
When you are looking for a rental property, it’s important to do some investigation into the neighborhood. What is the crime rate? What is the overturn rate? Are there young families? Is it progressing? All of these factors will affect your choice of properties. You want to provide a safe environment and one that has a future. Neighborhoods that are growing are a great choice as you will have the advantage of expanding services and amenities.
Location
It is said that location is the most important factor to consider when buying real estate. While you want to make sure that you choose a developing neighborhood, you need to consider your location to amenities, schools, and other conveniences. A neighborhood that is too far outside of town may be tranquil, but you may have difficulty attracting tenants who would prefer to be closer to things like shopping, medical care, and entertainment.
Schools
Your potential tenants will likely have children that will need to register with a local school. When looking for rental properties to purchase, you should do a bit of research about the surrounding schools. You want to choose a district that is known for its higher quality of education. Buying a rental property close to a college or university will guarantee you to be able to fill your unit. Students are always looking for quality housing.
Renovations
While some investors don’t mind a fixer-upper when looking to purchase an investment property, it’s important to weigh the costs of renovations with your eventual profit. The goal of a rental property is to bring in income. If a property is going to require a large overhaul to get it ready to rent, it may not be worth the time and expense.
There are many factors to consider when looking to purchase a rental property. You will need to take a close look at the neighborhood, the potential neighbors, the proximity to conveniences, and how much it will take to renovate the unit for tenants. Consider these factors to help you make the right decision about buying a rental property.
Filling up a glass with clean drinking water from kitchen faucet
Choosing the right faucet for your kitchen may seem trivial, but it’s needed if you’re after practical home improvement. Beyond the good looks of stems and cartridges, you want to ensure certain personal touches are in place.
From what you intend to use the faucet to how you want to use it, being objective about choice makes for a good kitchen layout and cost-effective budget. Also, choice provides you with options and the proper assessment of a faucet before diving into the purchase.
It’s always a good idea to consult professionals when it comes to home improvement. There are a lot of plumbing companies that could advise you on choosing suitable faucets, like the faucet installation services in Chantilly, Virginia.
There are always questions to ask if you’re upgrading an old faucet or buying an entirely new one. Listed below are seven things to consider before choosing a faucet for your kitchen and your budget:
1. Purpose
Before you get that faucet, think about what you need it for and who would use it. Your needs should inform your purchase decisions. If you have a large family, you may want to put safety considerations first. Therefore, it would be advisable to go for a simple single-installation and single-handle faucet. While doing that, remember to consider the ergonomics of the faucet for safe use.
2. Location
The location of your faucet is another factor for consideration. Never buy a faucet until you have evaluated your kitchen carefully and seen where to place the faucet. Some pieces of kitchen equipment also influence the location of your faucet. For instance, if you have a dishwasher, it would help if you get a faucet with a dishwasher valve. And if you tend to wash large pots, the spout of a faucet should be your priority.
3. Second-hand Faucets
If you’re on a tight budget, you should go for second-hand faucets. One of the many benefits of second-hand items is cost-effectiveness. Rather than let the items go to waste, sellers are willing to lower the cost. You can get faucets with good working life ahead of them at meager prices.
4. Maintenance Costs
Prices of faucets can vary and usually depend on their quality. If you’re going for the inexpensive ones, say you’re on a budget, the attendant effects often are on maintenance cost. But if you’re looking at quality faucets that won’t trump your maintenance cost, you should be ready to pay.
5. Materials
A faucet can be made of metal or other materials like wood. It would help if you were familiar with the materials and their aesthetic appeal to prevent plumbing leaks. A wooden faucet pleads for a solid color. A metallic one is more flexible to colors and thus allows for varieties. The latter is more suited for a modern kitchen.
6. Haggling
Everyone has targets to meet, and you should, too. Do not just succumb to prices provided by a faucet retailer. So, it would help if you haggle your way in by persuading the retailer to give you a more reasonable rate. You can also read online reviews to know if there would be price incentives before engaging with any retailer. The most effective haggling leans on prior consumer information about the products.
7. Durability
You don’t want a faucet that can easily wear out within a year of purchase. So, if you’re looking for durability, you should be considering brand and price. A faucet may be large or small, but make sure it can provide you with the safety, design complement, and durability you need. It would help if you looked at getting the one that matches your use, whether long-term or short-term.
8. The Type Of Sink
If you’re upgrading your kitchen, a faucet can go entirely with a basin. If you’re not upgrading but starting, the basin should guide you on the type of faucet you’re going to get. You also want to think about where your sink is located before placing a faucet. If your sink is attached to a wall, you should get a faucet that balances the sink with the use of the faucet.
9. Water Sustainability
It’s also vital to consider a faucet’s impact on water use. After all, the water that goes to your bathroom fixtures can account for more than 60% of your overall household usage. Using faucets made with sustainability in mind can help you save hundreds of gallons of water annually.
Old-fashioned faucets can end up costing you money and wasted water. Avoid faucets that use more than 2.2 GPM (gallons per minute). Make sure your faucets have a flow rate of 1 GPM. Not only can you save money on your water bill, but you can also do your part for the environment.
Conclusion
Getting the perfect faucet that meets the appeal of your kitchen without breaking the bank is an objective decision. It would help if you were objective about factors such as the purpose of the faucet, maintenance costs, durability, type of sink, and materials, among others. Moreover, the right faucet can also help you save money and water.
Each year we see new trends coming about in home renovation Dubai. However, the year 2021 has been the most unique one. It presented us with many trends that we would overlook before, not knowing their real worth and value for our living spaces and their effects on our lifestyles as well.
In this regard, an established interior fit out company in Dubai defines below the five home renovation Dubai trends as the best designs ever. It says these trends have helped people cope well in their houses even during the epidemic. And they will continue to spruce up your home style always. For they are quite futuristic and practical home renovation designs.
The Futuristic Home Renovation Dubai Trends Of 2021
1. The Nature Inspired Bathroom Trend
It is the most liked trend in home renovation Dubai 2021. It focuses on turning your bathrooms into a sanctuary. The companies call this trend a retreat to relax and soothe yourself. It takes in some natural elements and some special features that give a very spa-like feel.
Upon asking an interior fit out contractors in Dubai. A nature inspired bathroom can be easily created using hardwood-like flooring material with metallic and some neutral hues. Add to it some fresh flowers and a few indoor plants along with an earthy feature wall made from stones and organic rocks to add more to the soothing overtone.
2. The 5 Zone Kitchen Trend In Home Renovation Dubai
The second prevailing home renovation Dubai trend is the multi-zone kitchen design. Earlier on, kitchens were built around the work triangle only. But in 2021 people prefer to have multiple separate zones for more space and better functionality.
Kitchens nowadays are much more spacious and given more attention than ever before. These five zones include a separate cleaning, cooking, prep, consumable, and storage zone. This kind of layout design allows more space for storage, work, and people movement. Several people can be cooking together, talking, and roaming around doing different work and tasks due to separate available zones.
3. The Garden Uplift
Since meeting up in indoor spaces was more of a disquiet this year. The home renovation Dubai brought a refreshing trend for creating a comfortable and enjoyable outdoor environment. That helps you meet up in the fresh air. A number of people called upon the fit out company in Dubai for landscaping services.
That mainly includes giving your garden the best shape with the help of full bed maintenance and installing different types of paving slabs. Other than the ornaments. The corners are also useful for creating a garden deck using wood and perfect outdoor lighting. That creates an amazing place to sit and relax together.
4. Creating Feature Walls In Home Renovation Dubai
Though walls are always treated very generously during every home renovation Dubai. But in 2021 the demand for creating feature walls increased a lot with time. Mainly because of homeworking and social media needs. People nowadays do not like the shabby backgrounds during zoom meetings or shooting for the videos.
Hence they need one fine wall to use as a background. That you would even want in your house as well. Just ask any interior fit out contractor in Dubai, to paint it with a contrasting color, to give the wall a grading effect, or to use some wooden wall panels for a more professional and classier look.
5. Use Ceiling As A Statement Piece
Statement pieces in home decor have gained a lot of prestige. While some of you would like to see a statement lighting in the house, others may like to make an artwork as the centerpiece. However, this year, ceilings are the focal point. People paid great attention to add visible charm into their conventional ceiling designs.
Hence, trends in home renovation Dubai is to use pretty moldings and different modern ceiling designs that go well with your room demands. It helps you turn your ceilings into a perfect statement piece that really grabs the attention.
Conclusion
All these five amazing ideas for home renovation Dubai are trending this year. As they provide the most value and comfort to the house. These trends not just bring a refreshing change to a house but also improve its efficiency and property’s worth. So, let’s try all these ideas out for an enhanced living experience.
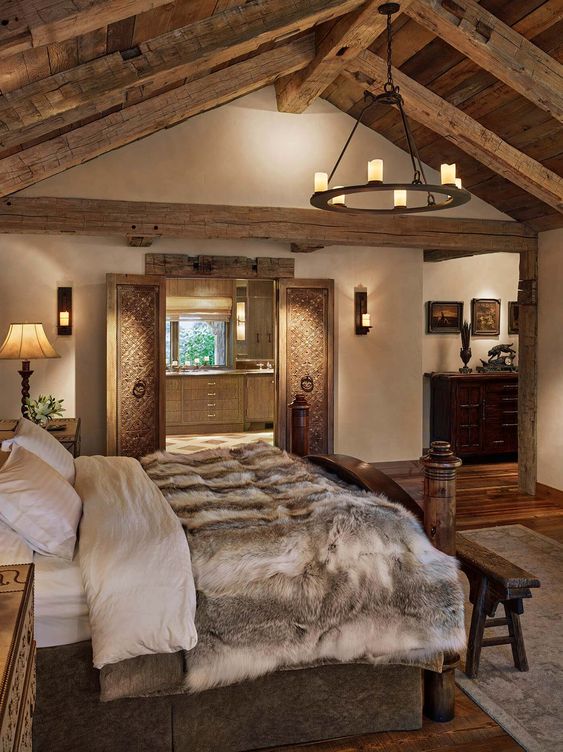
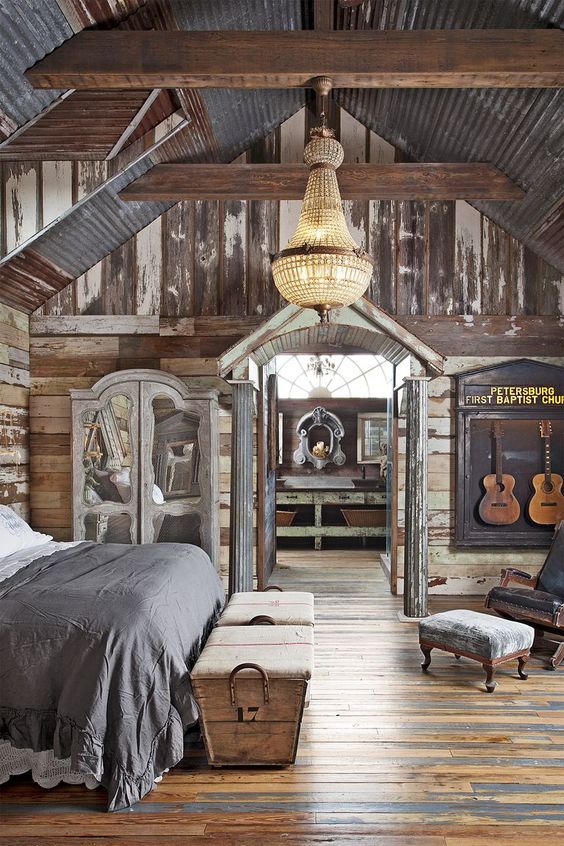
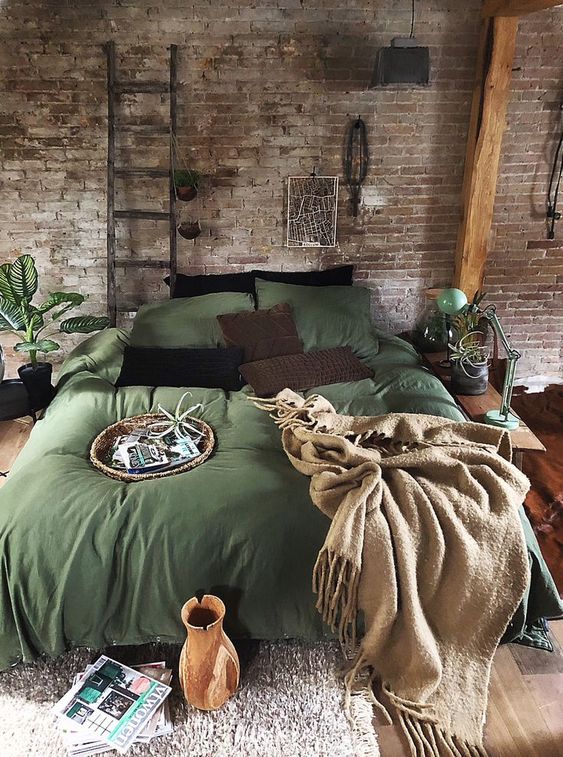
Roohome.com – Decorating a rustic bedroom is not about making it looks rustic. There are some elements that we have to apply in order to create a better combination. Today, we would like to create a really beautiful set of rustic concepts to lift up your stress. Applying this unordinary theme certainly will create coziness and eyes relaxation.
Textured Wooden Light Bedroom
Applying a wooden wall to our bedroom will certainly create a nice atmosphere. Everyone knows that it would be something nice to see. Then, we can also add some chandeliers above our bedroom cabinet.
1 of 32
Old Fashioned Wooden Chalet
Creating an old-fashioned wood theme for our bedroom is the best option especially for someone who loves a natural color and is also dark-themed. We can also add some pictures to decorate our wall.
2 of 32
White Cozy Themed with Wooden Ceiling
Barely using a wooden ceiling does not mean it would be terrible to increase our design. It would actually lift our rustic concept. Then, we can see adding a brown fluffy rug to the bedroom is also great since it is combined with the white bed sheet.
3 of 32
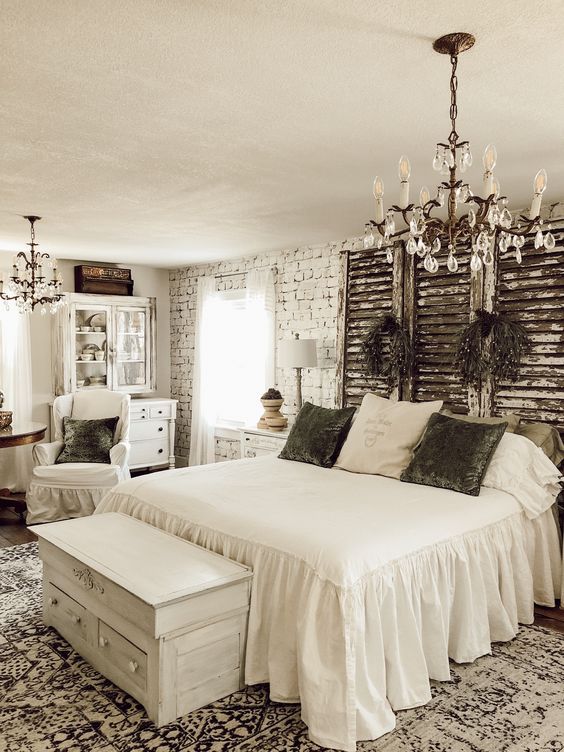
White Country Bricked Wall Concept with Crystal Chandelier
Adding a chandelier actually brings more atmosphere to make it look elegant. Then, we can also add a bohemian rug style where the concept will be astonishing. However, for better space. We suggest removing the cabinet since it will disturb the focal point of the room itself.
4 of 32
Cheerful White Bricked with Pendant Lamp
We love the usage of white brick on the above design. Then, the bed cover and bed sheet overall are okay to be used. The most important part of all is to add the pendant lamp where it makes this one unique including the usage of oak wooden flooring.
5 of 32
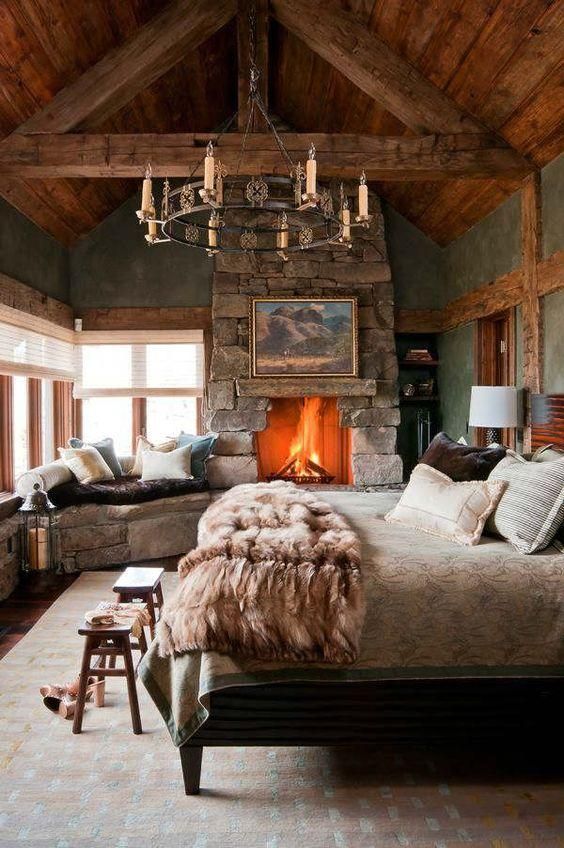
Victorian Concept with Traditional Accent
Victorian is certainly the best choice to be combined with a rustic theme. The bed selection is also perfectly combined with the fluffy rugs. Then, the main fixture of all elements comes from the fireplace. Usually, it is placed near the living room but it could be a nice idea to install it in the bedroom to create a cozy atmosphere and also it would well function.
6 of 32
Wooden Urban Selection
Urban style is getting popular nowadays. Take a look at the design above. It is really nice selection. The lighting concept is also great where it creates a beautiful brightness in the morning. Then, adding a small bedroom table with a white table lamp is also well arranged.
7 of 32
Trippen Live Edge Theme with Rustic Bed
Take a peek at the bed style is really adorable. We love the rustic selection as the main furniture here. Then, the implementation of walls bricked with wooden flooring really create this concept into a masterpiece. Then, we can also set up some indoor plants. What a wonderful theme!
8 of 32
Swiss Chalet Style with Bubble Chandelier
What do you think about the design above? Do you think it is kind of a simplified theme? Well, we do not think so. Every element is on the right track. The usage of bubble chandelier. Then, the canopy bed with grey curtains is also nice to see. The last part is the white fluffy rugs which are great to see.
9 of 32
Small Dreamy Bedroom
To those who have a small bedroom but looking to design it then we come with this style. This one is easy to follow the main thing of all is the white wooden walls which lead to the rustic theme here.
10 of 32
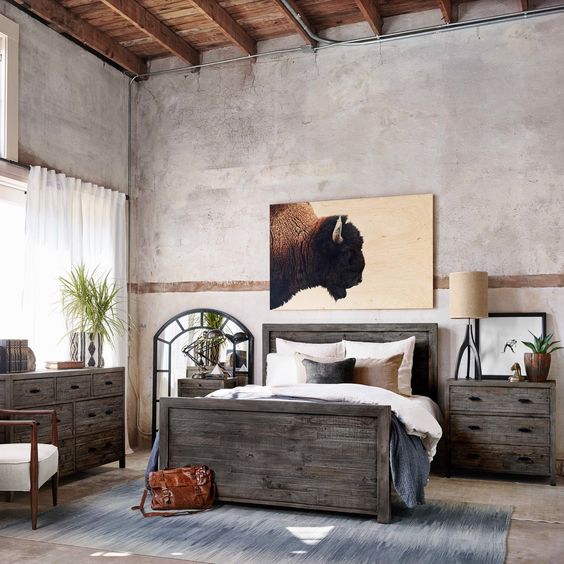
Simplified Men Bedroom with Bull Picture
We have no idea which one is the best of all, but the usage of the bull picture with rustic furniture as the main fixture of this bedroom ideas is really outstanding. Then, you can check out the table lamp which looks unique. Not only that but also the indoor plants. Oh gosh! we cannot imagine if we were there.
11 of 32
Rustic Ranch Bedroom in Traditional Way
The candle chandelier and fluffy rugs really make this one different. Then the usage of the bed frame is also unordinary. We do not know how the designer chooses each element can support each other. Really brilliant thought! Then the doubled-bathroom door is well-matched with the wall texture.
12 of 32
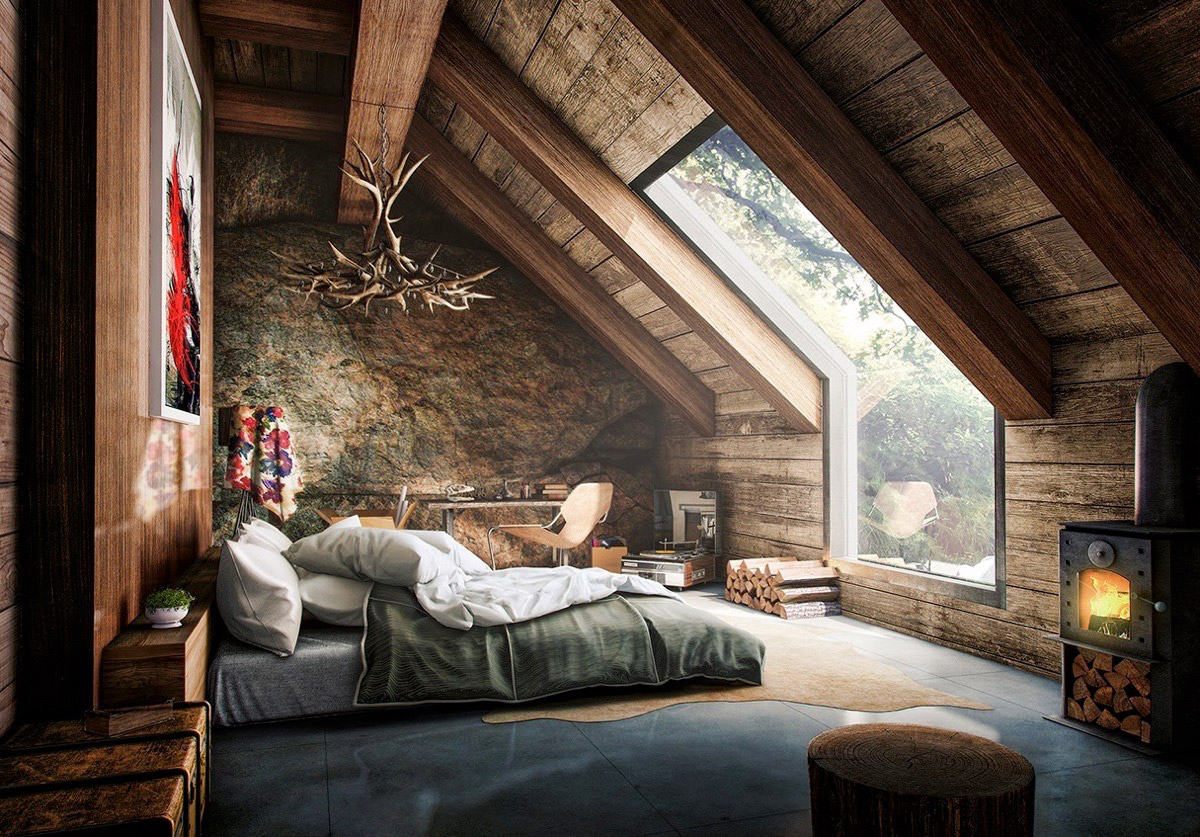
Bright Rustic Attic with Masculine Combination
The masculine combination with the rustic theme really astonishing. Then, the sunlight can go through the window which is really nice to give more brightness. Anyway, before going down. You have to check the fireplace on the right corner which leads to a different way.
13 of 32
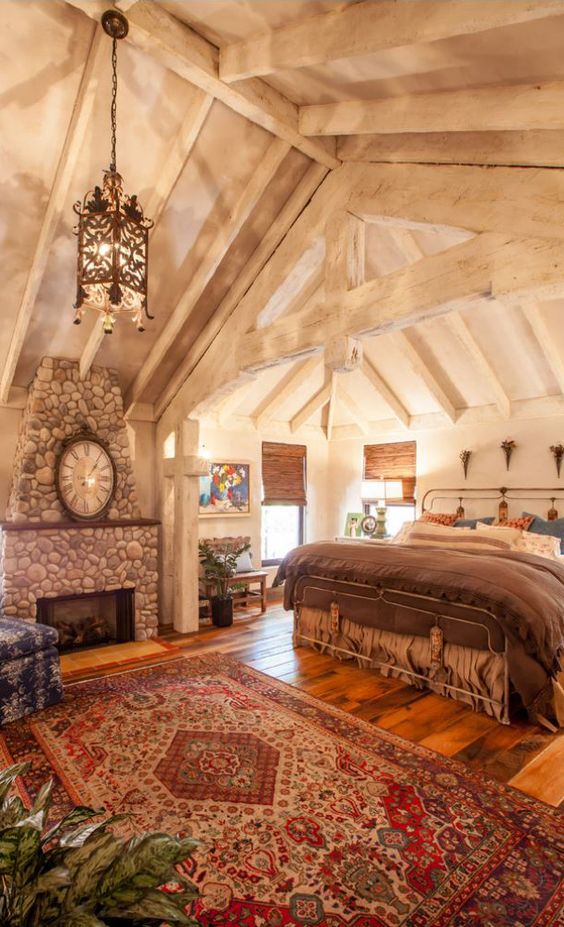
Rough White Boho in Victorian Theme
Well, the usage of bohemian rugs and bedroom is really nice. We also love the wooden flooring with the stone fireplace. However, it would be great if we can paint the loft color on the ceiling.
14 of 32
Passionate Modern with Double Windows
Brightening our room will be the best way to increase the aesthetic level. Then, we can see beside using double windows. This concept also implements a double bed table which is quite useful to save our stuff. Then, double wall-mounted lamps are also installed there.
15 of 32
Unordinary Pure in Rustic Theme
Some people may think that this one does not really have good looking. However, if we consider the art itself. This is the best among all since it really represents the rustic theme.
16 of 32
Dark Wooden Wall Bedroom with Full Lighting
Applying wooden walls is quite common but applying 4 mounted lamps on the ceiling really create it differently. Then, we also love the bedsheet style which blends to this concept. The cons of this one are lack of sunlight which is hard to pass thru.
17 of 32
Loveable Farmhouse in Contemporary Way
Sometimes, combining contemporary is really the best part to go since it can also lift a modern theme. This one is really suitable for small bedrooms who wish to get simplicity without removing its elegant atmosphere.
18 of 32
Loft Modern Dreamy Bedroom
Combining loft wall texture could be the best reference. We love the blue loft color combined with wooden flooring and a white rug. They are really matched each other and also the pendant lamp is quite unordinary. Well done selected!
19 of 32
Green Natural Concept with Bricked Wall
Do you love natural concepts which close to nature? Adding some indoor plants will make it stronger than before. However, it is already enough at this moment. We love the green bed concept which would relieve our stress. Cannot imagine if we were there and lying on the bed.
20 of 32
Unordinary Farmhouse Bedroom with 3 Memorable Pictures
Well.. well.. Do you ever mind having this kind of bedroom? This is the best farmhouse design combined with a rustic theme where it creates a really nice atmosphere. Then, we can also those three pictures with our memorable one.
21 of 32
Eden Hall in Rusty Atmosphere
It looks a little bit messed. However, that is the art of this design. The best thing you can apply for your bedroom is the bed table and also the bed set itself. Take a look at those two pillows on the floor. Isn’t they look cute? Maybe, they could decorate our bedroom.
22 of 32
Duvet Rustic Ideas in the Mediterranean
Do you love Mediterranean design? Then, you can combine it with your own bedroom. This design is also combined with contemporary, rustic, and brick ideas which lead to increased elegance.
23 of 32
Traditional Bedroom with Soft Accent
This one is really nice to see. It looks simple but the combination of each element such as bed frame, bed table, and door is really savage. Anyone can be easy to implement this one. Would you like to give it a try?
24 of 32
Charming Beautiful Bedroom with Two Farmhouse Ceiling Lamps
Nicely done! We love the bed frame, bed cover, and also the bedsheet itself. Then, focus your eyes on the rugs. What a wonderful selection! It could blend into the flooring style itself. How about the brightness? Do not ask that one since we are sure that this bedroom would have nice light coverage.
25 of 32
Fully Bright Wooden Bedroom Style
Do not ever visit this one since you would not be able to wake up in the late morning. That would be hard since there are no curtains and once the sunlight has on the right spot. It will totally disturb you. Talking about the design. This one is already perfect and anyone can follow it. There is no change we have to do. Outstanding!
26 of 32
Boho Traditional Rustic for Kid Bedroom
Alright, if you are looking for a bedroom style for your kid then you should consider this one. Well, you kids may not love this one since this one is kinda old. Maybe for 80s kids. However, what we will get applying this one is to bring more joy since there are lots of combination which can relieve whenever your kid feel tired.
27 of 32
Wooden Boho with Red Brick Wall
Using red brick as our wall texture is really nice especially if we combine it with the boho concept. Take a look at the rug. It looks really great and also the bed frame itself. Then wall shelf which is really nice to put some decorations on.
28 of 32
Open Space Balinese Bedroom
What is on your mind about this one? Do you love the Balinese concept? If you ever go to Bali then this concept should be really common for you since most of the housing is using this style. In the cutting of the edge, this one is also combined with contemporary style.
29 of 32
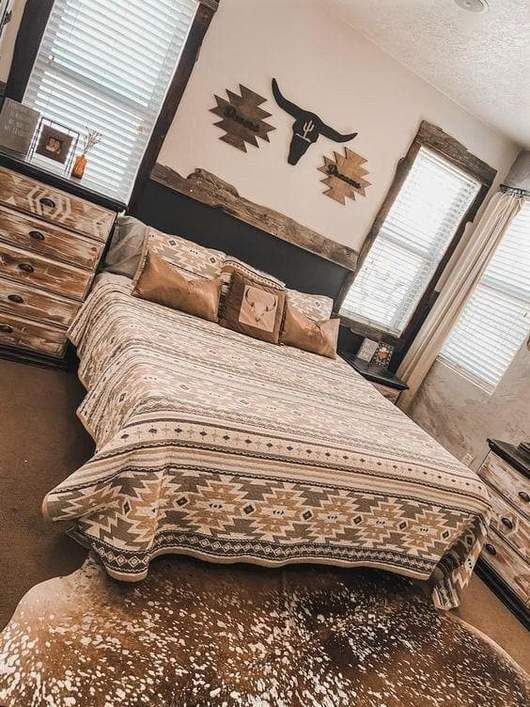
Aztec Stone Quilted
Aztec stone is the best modern concept with a rustic combination to create a rusty outlook. Then, if you see the sidewall, it uses soft textures as it increases the atmosphere of this room. We also love the wall decoration. It could be implemented in any design based on our thought.
30 of 32
Clear White Modern with Rusty Flooring Style
Do you love the rusty flooring concept? What kind of combination to fit it? The white modern style is the best one. Then, we also see a bohemian rug there including the pillow sets.
31 of 32
Bright Stunning with Modern Fireplace
A loveable fireplace with a loft bed cover including the pillow sets is unbelievable. Wait a sec, how about the flooring? We love the carpet usage. It looks like wallpaper though. Then a rusty bed table is also great.
This post will discuss who a roofing contractor is, the qualifications/licensing required to be one, and the benefits of employing one for a roofing project. If you require additional information about roofing contractors, check out our website https://lewisvilleroofingcompanytx.com/.
Who exactly is a roofer?
Roofers construct and maintain roofs. To ensure safety, they install materials such as cement and clay and fix damaged portions. They could specialize in residential or commercial roofing.
Who are roofing contractors?
Roofing Contractors are people who work in the roofing industry.
Who are roofing companies?
Roofing companies typically specialize in a range of disciplines, including roofing. These firms use a team of professional roofers with industry knowledge. In addition, your company may provide a warranty on completed roofs. When you engage with a corporation, you can anticipate your roofing crew members to be employees. This assures that all roofers are licensed and have passed a background check before performing any work on your property.
Although most roofing companies are certified and offer roofing warranties, this does not guarantee that all companies will meet or surpass your expectations. To ensure that you pick a reliable roofing business, you should ask for references and other information to ensure that the company conducts excellent work.
1. What exactly do roofers do?
Roofers use hand tools and other equipment to build and repair roofs (e.g., scaffolds). They make sure that roofs are stable and weatherproof. They also put up insulation and vapor barriers.
Roofer responsibilities include the following:
constructing and repairing roofs
Choosing roofing tiles, wood shingles, and other materials
Making sure that roofing jobs are completed on time
2. Qualifications of a roofer?
Roofers may have a roofing apprenticeship or a relevant license, or they may operate as an independent contractor, depending on the nature and location of the job. Some people learn on the job with the assistance of specialists. Roofing job responsibilities may involve knowledge of roofing materials and techniques.
Roofers must also have stamina and balance because they frequently work at heights using various machinery and equipment. Roofers are also detail-oriented and capable of multitasking.
When establishing your roofer job description, include these abilities as requirements and change them as needed.
3. License required for a roofing contractor
There isn’t a roofing license that allows you to work in any job in the business. This is because the construction business in the United States is one of the most severely regulated job sectors. Furthermore, each state has its criteria and laws for roofing contractors. Therefore, to lawfully undertake work in your state, you’ll need to get a license.
You must have a state-verified certification or a Residential Roofing License to operate on residential properties. Some states allow you to work on both residential and commercial properties with an Unlimited Roofing License. Most states require a state license, while some require a contractor license at all levels.
So, what does all of this mean to you? First, given that most jurisdictions require a Residential Roofing License, you can begin to discover more about your state’s licensing requirements.
Here’s a rundown of what you’ll need to get your driver’s license:
Evidence of unemployment insurance
Proof of worker’s compensation
You must provide proof that you have passed your residential or commercial exam.
Property and liability insurance documentation
4. Considerations before hiring a roofing contractor
Having a high-quality roof installed or replaced is a wise investment for your home. However, because no two residential roofing firms are alike, you should take your time to learn a few things about picking a roofing contractor. In addition, conducting thorough research on possible contractors will assist you in making a more informed hiring decision. But why should you employ a roofing professional instead of doing a roof repair on your own?
Cost-cutting
Some homeowners attempted self roofing repairs but ended up making pricey mistakes and having to hire someone to fix them. Hiring a professional roofer to install, repair, or replace your roof is always the most cost-effective option. Furthermore, an experienced roofing contractor has established long-term relationships with local suppliers, allowing them to obtain roofing materials at lower prices. In addition, they have the necessary tools and equipment to complete the operation more quickly and efficiently. When you consider the supplies and tools required to complete a DIY roofing project, you’ll realize how much money you may save by hiring a roofing professional.
Saves Time
A professional roofer can do the job more quickly, freeing you up to attend to other priorities. Roofers that operate on deadlines can complete the task as quickly as possible and move on to the next project. Experience is vital in the roofing industry. You can bet that if you hire a roofing contractor, they’ve been in the business for a while. They are well-versed in the many types of roofs and the best strategy to save time and money. Furthermore, their ingenuity is usually remarkable, ensuring that your roof will survive for many years before needing to be repaired.
Ensures safety
Professional roofing contractors have the tools needed to work safely on your roof, so you don’t have to risk your life. Even if you enjoy do-it-yourself jobs, you can’t dispute that roof installation, repairs, or replacement can be dangerous. Accidents can happen at any time, causing severe pain and expensive medical bills. Hiring a professional roofer allows you to avoid putting your life in danger while allowing the specialists to perform what they do best. Furthermore, they frequently insure their roofers to protect both them and the homeowners from responsibility.
Professionalism
So, what exactly does a roofing contractor accomplish that you can’t? A skilled roofing contractor specializes in this craft, allowing them to deliver high-quality work, identify concealed problems, and make essential repairs. An expert contractor is familiar with various roofing methods and can ensure outstanding outcomes while making few to no mistakes. They also make use of the proper processes, high-quality items, and modern tools and equipment.
5. Do roofers need to get entry to your home?
Most roofing jobs may not necessitate a roofer entering your home. However, if other elements of your home, such as windows, require repair, they may seek entry to the inside of your home. In addition, others may need to enter your home if they require a power outlet to complete a work.
6. When Should You Pay a Roofing Contractor?
When working with a qualified roofing contractor, you may need to pay a deposit upfront, but you should not be required to pay the full fee before work begins. It is allowed to pay an initial deposit of up to $1,000, as well as ‘progress payments throughout your project. Irrespective of the deposit amount, paying with a check or credit card creates a record of money paid for your roofing project. (You shouldn’t be too concerned if you work with a reputable local firm.) Another great option is to finance your roofing project!
7. What to look for in a roofing contractor
A new roof is not an inexpensive investment, and the process of shopping for one can be intimidating. But, on the other hand, the roof is the single most important component of your home for protecting you from the elements. Therefore, you should follow a few simple measures before committing the protection of your roof to a professional roofing company to ensure that you are making the proper choice.
1. Create a list, then narrow it down.
Don’t hire the first contractor you discover online who offers you a price that appears to be acceptable. Instead, make a list of up to ten contractors in your region who you want to look into further. Then, depending on evident factors, reduce down your list. Contractors to avoid are those who are not insured or licensed, have a poor Better Business Bureau (BBB) rating, have a slew of negative customer reviews online, and are eager to offer you a quotation over the phone without first evaluating your property.
2. Choose your top three contractors.
Once you’ve chosen your top three, you may use a few additional parameters to refine your search. First, inquire with your prospective contractor about the length of time they’ve been in business, whether they’re willing to provide you with a dedicated onsite point of contact for your job, and what references they can supply.
Schedule a quote call for your top three choices.
Request that your top three roofing candidates come out and estimate the needed roof work. Follow them around your house. Inspect the roof’s exterior and interior, including the gutters, if you have attic access. After they’re done, you’ll know which roofer you prefer.
3. Obtain a Written Estimate
Each of your prospective contractors should present you with a written quote as soon as possible. In the event that you have to wait longer than a week for a quote, that contractor isn’t prepared to handle your business appropriately. On the other hand, those who provide you with a detailed, well-written quote as soon as possible are ready to manage your job.
According to HomeAdvisor, roofing Material Prices Installing a new roof costs between $5,000 and $10,000 on average.
Open door to a new home with key and home shaped keychain. Mortgage, investment, real estate, property and new home concept
Are you thinking of moving to a new place? Well, many people will consider moving to a new residence at some point in their lives. This can be for numerous reasons such as downsizing, upgrading, or even starting a new life in a different location.
It’s natural for some individuals to feel overwhelmed when the time comes to move, but it doesn’t have to be too stressful if you follow these steps:
1. Start Looking For The House Of Your Dream
Whether you want to go and rent a house or look for NYC real estate and others to reside in, you could consider contacting real estate sales agents or look up on the internet for places where you’d love to move in the most. You could also ask your friends and family if they have any recommendations from where you might be able to start.
If you’re a foreigner in a new city, you could search the internet for real estate agents that speak your native language and start the searching process straight away without any barrier.
2. Establish An Itinerary With A Move-In Date
It’s important to begin planning for your move ahead of time, especially if you’re looking to find a new residence in your desired location. This will give you enough time to research homes, locations, and even the local schools as it may affect where you choose to live.
If possible, try not to schedule any vacations within these three months because that could complicate things even more for you throughout the moving process. So, you could make the best out of this stipulated time and make sure that everything’s in order—from contacting the real estate agent, visiting your new potential residence for inspection, making a payment plan, and processing school transfer if you have kids.
3. Sort Through Unwanted Possessions
Sorting through your belongings can be daunting, so start small by deciding which items can be donated or thrown away first before the big sorting process. You could take photos of the items you want to keep so it becomes easier to determine which ones can be donated or thrown away first. This is an easy and necessary step to take because no matter what, you’ll need to have to take into your new residence only the things that are useful so you don’t make furnishing a hard task.
4. Begin Boxing Belongings
When packing your boxes, label each box with its contents and room designation (bedroom 1, bedroom 2, kitchen). This will help make unpacking less challenging as you can use these labels for quick reference when searching for an item in your new residence.
5. Schedule Utility Transfers
If possible, schedule your utilities to be transferred on the same day as your move-in date; this way, there are fewer disruptions since all services should be set up when you arrive in your new residence. At the same time, you don’t want to spend the remainder of your time at your old residence without accessing electricity, water, telephone, TV, and other services because you’ve called them off while you’re still in your old location. So, make sure you call them off about two days after you move out.
6. Find Movers
If you’re planning on hiring movers, it’s important to review their website and social media accounts before choosing them to see how professional they are in their services. You can also contact your friends or family members for recommendations of any moving companies they’ve used in the past. You may check out WhatRemovals for cheap removal companies in Bristol, and anywhere else in the UK.
7. Pack Last-Minute Belongings
Make sure to pack anything you need in this stage because if something is forgotten, it usually needs to be bought again. Try packing smaller items first so fewer boxes are cluttering up each room. You can also use bubble wrap or crumpled paper to reduce the chances of breakable items slipping out of box containers during transit.
8. Take A Final Walk Through Your Home
Take some time before leaving your old residence by taking one more stroll through your space and picturing yourself living there. This will help ease any feelings of sadness you feel as you leave your old home. If possible, have a neighbor or friend watch the house after you leave so nothing is stolen or damaged while moving out.
Conclusion
Moving doesn’t have to be stressful if it’s done correctly. Following the steps mentioned in this article will help make sure your move goes smoothly and successfully, so it can be fun rather than overwhelming.
A common question many people ask is how often should you change your mattress, however, the answer depends very much on what the mattress is made from. Generally speaking, most mattresses have an average longevity of around six to eight years, but some of the higher end mattresses could last even longer.
If your current mattress is looking worn, stained or lumpy, those are just some of the small signs it’s due for an upgrade. And if you keep waking up feeling achy and unrested then it’s clear that you need a mattress that offers more support.
In this article, we’ll go though the average lifespan of different types of mattresses. We’ll also look at some of the signs that it’s time to replace your mattress. With all the early Black Friday mattress deals, now is a great time to upgrade your mattress for a bargain price.
How often do you need to change your mattress?
To give you an idea of how often you should change your mattress, here is how long different common mattress types last on average:
Innerspring/pocket spring – 5 to 7 years
Memory foam – 10 years
Hybrid – 5 to 10 years
Synthetic latex – 5 to 10 years
Organic latex – 15 to 25 years
Different types of mattresses have varied lifespans, depending on the materials and the way the mattress is constructed. How often your mattress should be changed also depends on how well you take care of It from the beginning, including regular clean and either flipping or rotating the mattress according to the guidelines provided by the manufacturer.
When a mattress is made using premium materials, you can expect it to have a longer life. Another good indicator of quality and potentially longer lifespan is the manufacturer warranty or guarantee. If the manufacturer offers a 10-year guarantee for example then you can be sure that with some maintenance you shouldn’t have to worry about changing your mattress soon. Having a mattress topper could also extend your mattress’s life.
How often do you need to change an innerspring mattress?
Innerspring mattresses are oftentimes the most affordable option. You might be tempted to go for one yourself, however, this is false economy, because springs wear down faster than other materials. This means that your mattress will start to sag quicker, won’t offer the needed spinal support and will need replacement in no time.
Most pocket spring or innerspring mattresses only last around four to six years. There are some higher-quality models on the market that use better quality wire and construction design and are therefore guaranteed to last a bit longer than the average spring mattress.
Innerspring mattresses are more traditional. Their construction is a straightforward layer of metal springs. In pocket spring mattresses the spring are individually enclosed in a fabric pocket, which allows each coil to move independently from the rest. This offers less motion transfer than the innerspring as well as better support and more comfort.
How often do you need to replace a memory foam mattress?
A top quality memory foam mattress will last between eight to 10 years, because this type of foam is more durable than the regular foam. In addition, if the mattress is an all-foam one then there is less chance of other layers or components wearing out quicker and compromising the overall integrity of the mattress.
To maintain your memory foam mattress in good condition, you have to rotate it regularly as recommended by the maker and use a bed frame.
It’s common for memory foam to soften or start turning yellow over time, if you notice than happening to your mattress then tis is a sure sign you need to change your mattress. Another hint that it’s time to upgrade your mattress is if it no longer provides you with proper posture relief and you wake up with backache or neck pain.
How often should you replace a hybrid mattress?
Hybrid mattresses combine foam and spring and can last around eight years on average, depending on the quality of the materials and how the core is constructed.
Some top quality brands, use better materials and offer a guarantee of up to 10 years for their hybrid mattresses. So they won’t need replacing as often as budget foam models.
Hybrids are built with a spring foundation and a soft foam top, therefore you should never flip them or you risk damaging your mattress and voiding its warranty. They can still be rotated, unless the manufacturer advises otherwise.
How often should you replace a latex mattress?
Latex is durable, flexible and naturally antibacterial, so it makes for a high-quality and long lasting mattresses. Mattresses made with 100% organic latex can last you for more than 15 years if kept in good condition.
If you can afford the initial expanse of buying a natural latex mattress, it could save you money in the long run.
Synthetic latex mattresses are still very durable, but they might need replacing every 10 years or so. Synthetic latex softens quicker than natural one, so after the first five or more years of regular use it might not support your posture as well as a natural latex mattress would.
Signs that your mattress needs changing
There are certain scenarios where it would be beneficial to upgrade your mattress to a new one. Those include:
Weight change – If you have gained weight since you bought your current mattress and it now feels too soft, pick a firmer one that can offer you better support. And if you’ve lost weight and your mattress is now too firm, pick a softer model that can cushion the main pressure points of your body.
Sore back – A sagging mattress can cause your back or neck to feel sore as well as joint pain. When choosing a new mattress look for one with zoned support from head to toe, but if your pain is serious ask a physiotherapist for recommendation.
Feeling hot – Not only can sweat cause your mattress to stain, but it also creates a breeding ground for dust mites and other bacteria that love hot and humid environments. Luckily for you many new mattresses have cooling technologies and use antibacterial materials such as copper to combat overhearing and pesky mites.
Allergies – If you keep waking up in the middle of the night unable to sleep because of coughing, sneezing or itching, your old mattress could be to blame. Dust mates love to feast on dead skin residue, then leaving manure that can trigger your allergies. And the years of build-up on your mattress provide dust mites with plenty of snacks.
Stains and wearing – A well-worn mattress with rips, springs poking out and staining can’t offer adequate support and will also be haven for all sorts of mites and bacteria. While it’s natural for your mattress to start yellowing over the years, it could also be a result of built up sweat and spills, which is a huge sign that your mattress is way past its prime.
How to increase your mattress’s lifespan?
Once you have your new mattress, there are a number of things you can do to help it remain in good condition for longer, including:
Flipping – Many new mattress models are one-sided with a foundation layer where all the springs are and a softer top layer, so make sue you check before flipping your mattress. When flipping and rotating you want to ensure each side gets the same time at the top of the bed.
Rotating – This is done to ensure any dips that might form over time are levelled out and your mattress remains even. It’s recommended to rotate your mattress every few month. Keep in mind that some mattresses are zoned to support specific areas of the body and can therefore be used only in one direction.
Cleaning – Remember to change your bedsheets regularly and keep your bed fresh by vacuuming the mattress. To eliminate moisture and odours, you can also sprinkle bicarbonate of soda on your bed and leave it for a couple hours then vacuum it up.
Protection – One of the easiest ways to make sure your mattress remains in excellent condition is using a mattress protector. They can be easily washed in a washing machine and also add a layer of protection against spills and sweat.
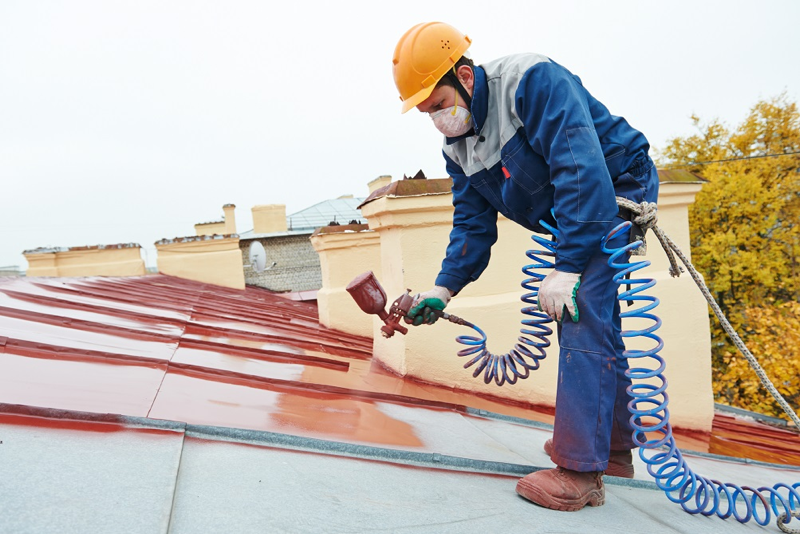
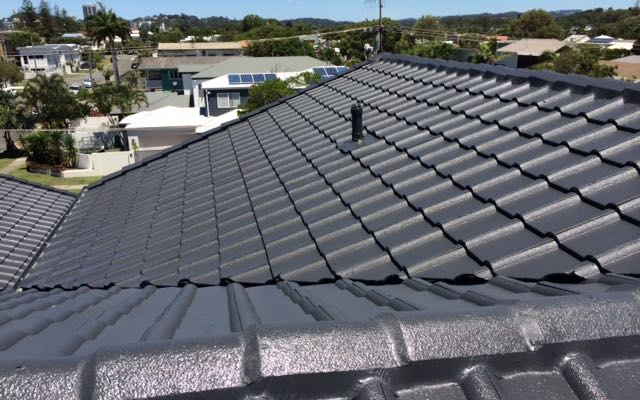
Painting has a lot of benefits to a building. It makes it look appealing and also serves to protect various parts from destructive environmental factors.
The roof is one such area that benefits a lot from painting. If done correctly, your roof will not only look great but it will also stay in good condition for a long time.
When it comes to saving energy, painting your roof with a bright color will help reflect away radiant heat hence lowering the amount of energy used for cooling and consequently the cost.
To get the best out of it, you definitely need to get the best roof painters to do the job. Well, with that said, here are some of the things that you need to consider.
Skillset
You have to make sure that you hire professionals who have the right skill set that fits your type of roof. Otherwise, they will struggle with the job and end up delivering results that are of poor quality.
They ought to be able to do the work without damaging the structure or interfering with other parts of the building. This is, particularly, true for delicate roofing materials such as corrugated iron sheets.
If someone steps on them the part will cave in and with time result in problems such as leaks and loosely fixed parts. Experience also plays a major role towards the successful undertaking of the task.
Equipment
The job must be done using the right equipment to ensure good results. The paint, for instance, should be of good quality to be able to adhere properly and withstand the various elements of nature.
If it is of poor quality it is bound to start fading and chipping off sooner rather than later. This will leave the roof exposed to corrosive agents and also make it look unappealing. Thus it is proper to ask the type of paint that they use then do some research on it to determine if it is appropriate.
Other equipment used such as brushes also ought to be of relevance to the task. Using the wrong type of brush can result into wastage of paint and will also negatively impact the final outcome.
Certifications
It is always advisable to ensure that the technician is a certified one before you hire them. This is, especially, helpful when dealing with an independent contractor who is not part of any company.
The certifications will serve as proof to assure you that they have been indeed tried, tested, and found to be up to the task. Being certified by different entities shows you just how competent they are.
While at it you should also check their license to verify their legitimacy. Note that these documents can be forged, so it is important that you take your time to look at them carefully.
Insurance
At times, the materials get painted before they are used for roofing while other times the painting is done after the roof has been installed. The latter involves the professional climbing to the level of the roof using a ladder or any other appropriate equipment.
This makes it risky. A simple slip can result in a serious injury or a fatal accident. For this reason, it is wise to ensure that all the technicians that you have hired to do the job have a valid insurance cover. This takes away your liability to compensate them for the damages done in case of an accident.
For their own personal safety, they ought to wear the right Personal Protective Equipment (PPE) to minimize the level of damages that might occur.
Eco-friendliness
Paints are manufactured using various chemicals. Some of these are toxic and can be harmful to the ecosystem.
There are various bodies that are in charge of setting regulations that govern the practice to ensure that such products are not used or that their use is properly controlled. Therefore, when hiring a technician it is good to make sure that they are aware of such regulations and are in compliance with them.
The current advanced level of technology has also made it possible to manufacture paints that are completely eco-friendly and so you should opt for these whenever possible. Make sure that the waste products are properly disposed of.
Cost
You should come up with a budget that is comprehensive. This is inclusive of the cost of equipment and the technician’s fee.
For good results, have a professional come and take a look at the work to be done then give you their quotation. Keep in mind that the cost is affected by several different factors hence it varies.
For example, where the price of materials or the technician’s fee is low the total cost will be lower than where it is high. Take advantage of discounted prices that come with bulk-purchasing of equipment. Make decisions that will be cost-effective even in the future. Click here to read more.
Conclusion
Painting your roof gives it aesthetic appeal and also protects it from being degraded by elements of nature. The coating ensures durability and will help you avoid frequent repairs that are known to be costly in the long-term. There are lots of painters available and this widens your range of options. Take time to compare the options available and pick the one that fits your needs. Make sure that you consider aspects such as skillset, quality of equipment, certifications, insurance cover, eco-friendliness, and the total cost. To avoid overspending, make a good budget and stick to it.
Epoxy is a chemical compound you can apply over the old and worn countertop to give it a new and glossy look. Epoxy countertops are becoming popular because of their durability and high-end look.
Another reason for the popularity of epoxy is its low cost. Applying epoxy on the countertop is much cheaper than buying a new countertop. Epoxy over tile countertops is the perfect choice for homeowners who want to give their countertops a marble or granite look at a low cost. Applying epoxy over a tile countertop creates a fabulous high-end look for a fraction of the cost and can be done in the kitchen or bathroom”, said Shaun Martin, a Denver cash home buyer who you can get a fair cash offer from to sell your house fast at https://webuyhousesindenver.org/. He continued, “I have applied epoxy over existing countertops on many fix and flip properties in Denver. Buyers love the look, and I love the ease and durability of the product. I have even used epoxy countertops in my rental houses.
You need to buy an epoxy countertop kit, which usually contains two bottles. One has resin and the other a hardener. In this guide, you will learn the exact method of applying epoxy over the tile countertop. Below are some common mistakes that can cause various problems when working with epoxy.
Common mistakes to avoid
Below are common mistakes people make during epoxy coating over the tile countertop. You can avoid these mistakes to give your countertop a captivating look.
Room temperature below 70 degrees: To get it right, make sure that the temperature of the room and epoxy must be between 70 to 75 degrees. You will not get desired results in case of inconsistent temperature. After pouring the epoxy on the surface, you need to maintain the room temperature mentioned above for another 24 hours to cure the epoxy countertop properly.
Not mixing epoxy: Mixing epoxy resin is necessary. Mix it for 3 minutes in a container to avoid eternal sticky spots and bubbles on the countertop surface.
Improper Measurement: The Epoxy countertop has a 1:1 ratio. For a durable finished surface, ensure you get the correct ratio. You can find the details of the mixing ratio for epoxy resin on the container or packaging.
Below are some other mistakes one ought to avoid when applying epoxy over the tile countertop.
Miscalculated Epoxy Amounts
Not preparing the surface properly
Not storing epoxy at the appropriate temperature
Below is the exact method of pouring an epoxy coating over tile countertops.
Purchase epoxy product
You need to buy and clear epoxy over the tile countertop kit, which usually contains two bottles. One has resin, and the other has a hardener. Make sure to purchase a high-quality epoxy product to get the best results. Caesarstone has a detailed article on epoxy countertops. Read the article before buying epoxy. You can also read the review of the best epoxy products for countertops here.
Tools and material required for epoxy coating over tile countertops
The tools needed for Epoxy coating over tile countertops include a 6-in paint roller, orbital sander brushes, drill, trim router, and oscillating tool are essential tools required for epoxy coating over tile countertops. Materials needed for epoxy countertop are 80- and 220-grit sanding sponge, four 1-qt. cups, tape, plastic sheet, spray bottle, two 2-gallon buckets, two 6-in. 3/8-in.-nap roller sleeves, two paddle mixers, wiping cloths, etc.
Remove the tile backsplash (optional): If you want the elegant look of your marble on the countertop, then you may want to remove the backsplash of your countertop. An oscillating tool and a carbide blade are perfect for this work. Also, don’t forget to fill gaps between the countertop and the wall with wood glue or sawdust.
Remove your sink: If you have a sink on your countertop, make sure to remove it. In this way, your sink will be safe from epoxy, and it will be easy for you to tape.
Route the corners of the countertop: Your epoxy countertop may look ugly with the sharp corners. Therefore, It’s advisable to round the corners because rounded corners are perfect for epoxy countertops.
Fill out seams: Make sure to fill out all the corners and gaps.
Sand the surface: After filling the gaps and seams with a paint scraper, you may notice high spots in the body filler. Use 60-grit sandpaper to sand the rounded corners, top, and front edge.
Masking: Endeavour to mask everything you don’t want to spoil. Tape the plastic sheet on the floor beneath the countertop. Also, cover walls with the sheet.
Prepare the material: Before applying and coating epoxy over the tile countertop, check whether all the required material is available and ready to be used or not.
Apply primer: Mix two-part primer in the bucket, then roll it over the countertop and the edge as well. Again apply the primer on the counter if you still see old color somewhere on the countertop.
Pre mIx the highlights: After that, wait for an hour before it gets fully sticky. Meanwhile, you can mix the metal powder in an epoxy resin, but don’t mistake mixing the hardener until you are ready to apply epoxy.
Apply the base coat of epoxy: Before applying the base coat, make sure the surface is tacky. It’s best to mix epoxy in two different buckets with a clean and stocky stick. After that, pour enough epoxy on the countertop and then spread it around with the help of a roller.
Make sure to roll the edges: Don’t forget to apply the epoxy on the edge of the countertop. Make sure epoxy covers every part of your countertop.
Add highlights: Mix highlights for 2 to 3 minutes to give your countertop an elegant look. After mixing, pour the highlights on the surface of the countertop. Before applying more highlights, make sure whether your countertop needs more highlights or not because you can’t remove it if you pour highlights too much.
Dragging highlights: Drag the highlights slightly with a brush to create a unique design on the countertop surface. Epoxy can blend with highlights. So, it’s best to cure the base coat of epoxy before applying the highlights on the surface.
Sweep off drips: Sweep off drips hanging down from the leading edge of the countertop. In case of any bugs or dust on the surface, use a toothpick to remove them.
Protective topcoat: The last step is to apply the topcoat on the surface of the countertop. But you need to wait for 20 hours before performing the topcoat. The next day, make sure the surface is clean of dust and drips. Next, mix the topcoat in a container and pour it on the surface. Spread the coat around quickly with a roller. It will take a week for the countertop to set up.
Safety tips for applying epoxy over tile countertops
To protect your eyes against splashes, use chemical goggles with side shields.
Wear gloves before starting the work. Wash your hands before and after each use of gloves to prevent any side effects of chemicals.
To protect your skin from harmful chemicals, cover your body with a coverall, also known as a boilersuit.
Wear boots to protect your skin in case of chemicals falling on your foot.
Conclusion
That’s it! Now you have sufficient knowledge to apply epoxy over the tile countertop. Overall, epoxy countertops are good, but they are not as durable as marble or granite. If you decide to pour epoxy over your countertop, we encourage you to consult with professionals of epoxy countertops such as Caesarstone to avoid severe problems.