One of the most common reasons a garage door doesn’t work is because the remote control batteries need replacing. It can be done easily by following a user guide or YouTube video tutorial. If the opener’s photo-eye sensor is covered in debris, it may need to be wiped clean. It will help ensure that it can see its path.
The Door Is Off Track
Often simply a sign of age, your garage door track can become misaligned over time. The routes are bolted to the wall on each side of the door and form a sort of “s” shape for the door to travel up and down. If the tracks get out of alignment, they can cause the door to catch or even break the lift cables that wind around them. The best way to check the track is with a carpenter’s level. Loosen the screws or bolts holding each bracket, then use the level to see if the ways are perpendicular to the ground. If not, it’s time to call a service from coastalgaragedoors.com to realign the tracks.
The Photo-Eye Is Dirty
Over time, the photo-eye sensors can become dirty, blocking the invisible beam and misinterpreting it as an obstruction. If your garage door cannot close when the transmitter button is pressed, it may be a problem with the photo-eyes. To check for this, loosen the screws on each sensor and gently wipe them down with a soft cloth. Please ensure that there are no objects in the way of either of them (especially boxes or items stored nearby) and that they are level with each other. Each sensor should have a small LED light that will glow when it works properly. If the light is off or flickering, that sensor must be realigned. If this is the case, call in a professional. The safety sensors are an important part of your garage door and must be functioning to ensure the garage door isn’t closing on someone or something. If they aren’t, the heavy weight of your garage door could cause serious injury.
The Remote Control Is Faulty
When a garage door remote or keypad is pressed, it sends an infrared signal to the opener that’s then read and interpreted. If the movement dies, your garage door won’t open or close. Check the batteries in your remote and keypad to ensure they’re working properly. If they are, it may be time to re-program the opener. Most newer models have a ‘Home’ or ‘Learn’ button inside the opener unit near its antenna. To start an LED light (whose color will depend on your model), press and hold the learn button briefly. It is done to link the remote with the opener. This process can be complicated, so consult your owner’s manual for specific steps on how to do this. If you still need help getting the door to operate, a professional can help. The problem may be as simple as a disconnected cord that needs to be reconnected or even a blown Ground Fault Interrupter (GFI). The latter is similar to a tripped circuit breaker and should only be handled by a qualified professional.
The Power Source Is Disrupted
The operator may have lost power if your garage door isn’t moving. It’s not uncommon to forget to unplug the operator when carrying out a task that requires working near it. Alternatively, a manual lock has also been activated. These locks typically look like handles with horizontal bars and prevent the opener from operating your garage door until disengaged. If you have a newer operator, it may be equipped with a disconnect switch in case of an outage. To turn this off, locate a button that says ‘Home’ or ‘Learn’ inside the unit next to a LED light (colors vary between brands). Press and hold this button for six seconds. If this fails to resolve the problem, a more serious issue is present and should be handled by a professional. Your remote or keypad may need a new battery if nothing else works. A garage service can help with this if necessary.
Air mattresses are incredibly convenient for guests, camping trips, and impromptu sleepovers. However, discovering a leak in your air mattress can quickly deflate your comfort.
In this guide, we’ll walk you through the step-by-step process of patching a hole in an air mattress. Following these instructions, you’ll be back to enjoying a sound sleep in no time.
Understanding the Problem:
Before diving into the patching process, it’s essential to understand why air mattresses develop holes.
Common causes include sharp objects, friction, and general wear and tear. finding the location of the hole in the air mattress is crucial for successful patching.
Materials You’ll Need:
Patch Kit: Most air mattresses come with a repair kit containing adhesive patches.
Rubbing Alcohol: Used to clean the area around the hole for optimal adhesion.
Fine Sandpaper: Helps prepare the surface for the patch.
Marker or Chalk: Used to mark the hole’s location.
Clean Cloth: For wiping away debris.
Scissors: To trim the patch to the required size.
Step-by-Step Guide: How to Patch a Hole in an Air Mattress:
Follow these steps to effectively repair the hole in your air mattress and restore its functionality:
Step 1: Locate the Hole
In this section, you need to Inflate the air mattress to identify the area where the hole is located.
You can put the air mattress under the water to inspect the bubble. You can mark the hole’s location using a marker or chalk.
Step 2: Clean the Area
You can dampen a clean cloth with rubbing alcohol and gently clean the area around the hole. Allow the alcohol to evaporate fully before proceeding.
Step 3: Prepare the Surface
Use fine sandpaper to gently roughen the area around the hole. This promotes better adhesion. Meanwhile, you can wipe away any sanding debris with a clean cloth.
Step 4: Apply the Patch
Depending on your repair kit’s instructions, apply the adhesive to the patch or directly onto the hole area.
You need to carefully press the patch over the hole and smooth out any wrinkles or air bubbles. Apply even pressure for a few minutes to ensure a secure bond.
Step 5: Allow Time for Curing
Check the manufacturer’s guidelines for the recommended curing time. Typically, it’s around 24 hours.
During this time, keep the mattress in a dry, flat, and well-ventilated area.
Step 6: Test the Patch
Inflate the mattress and listen for any escaping air. Gently press and apply pressure around the patched area to ensure there are no leaks.
Tips and Precautions you should know
If you can’t locate the hole by inflating the mattress, you can try the soapy water test. Mix water with a small amount of dish soap, apply it to the mattress, and watch for bubbles forming where the air escapes.
Always follow the instructions provided in your repair kit for the best results.
Keep sharp objects away from your air mattress to prevent future punctures.
Conclusion:
Patching a hole in an air mattress might seem like a daunting task, but armed with the right tools and a bit of patience, it’s a straightforward process. You can easily repair your air mattress and extend its lifespan.
The next time you’re faced with a deflated mattress, remember these simple instructions to restore your sleeping haven to its former comfort.
Embarking on a home remodeling project is an exciting endeavor, promising a fresh and rejuvenated living space. Yet, the road to that dream home often comes with its fair share of challenges and obstacles.
From unexpected delays to budget constraints to design changes, navigating these hurdles requires careful planning, foresight and adaptability. Regardless of whether you are considering a kitchen remodel in Crystal Lake, a bathroom renovation in Woodstock or a complete home redesign in Huntley, You may also need the help of professionals.
In this article, we’ll delve into the essential strategies to help you transform your vision into reality without losing your sanity along the way. From setting realistic goals and managing expectations to effectively communicating with contractors and handling supply chain disruptions, we’ll equip you with insights to proactively address common renovation roadblocks.
By understanding these challenges and arming yourself with practical solutions, you’ll be better prepared to achieve not only a beautifully renovated home but also a smoother and more gratifying remodeling experience.
1. Planning and Preparation
There’s no denying that the cornerstone of a successful home renovation lies in meticulous planning and thorough preparation. Start by defining your project’s objectives and prioritizing them to guide your decision-making.
Craft a comprehensive budget that factors in potential contingencies, and if you need to stretch your budget a little, payday loans for bad credit could be a solution. Additionally, make sure to research and select reputable contractors, scrutinizing their portfolios and seeking recommendations. A detailed project timeline also helps manage expectations and reduce unexpected delays.
Adequate planning minimizes the likelihood of design changes and ensures a smoother execution. With a well-laid groundwork, you’re poised to tackle remodeling challenges head-on, setting the stage for a hassle-free renovation experience.
2. Managing Timeline and Expectations
A realistic project timeline is crucial to maintaining your sanity during a home renovation. You have to understand that unexpected issues might arise, impacting the schedule. With that in mind, always anticipate potential delays and communicate openly with the contractors to manage your expectations.
Flexibility is key; make sure to build in buffer time to accommodate unforeseen setbacks. Regular check-ins and transparent communication can also help ensure that everyone is on the same page. By acknowledging that renovations rarely follow a straight path, you can navigate twists and turns with grace, ensuring a smoother journey from start to finish.
3. Temporary Living Arrangements
Deciding whether to stay or temporarily relocate during a renovation requires careful consideration. First, analyze the scope of work and potential disruptions to your daily life. If you plan on staying, create designated living spaces away from the construction zone.
Alternatively, if you’d prefer living elsewhere until the renovation is completed, plan for temporary accommodations to minimize your inconvenience. Additionally, make sure to pack essentials and create a comfortable setup in your temporary space, even if that involves hosting a house blessing.
Don’t forget to maintain open communication with your contractors to stay informed about the progress. By balancing your comfort with the practicalities of the renovation process, you can ensure a smoother transition between your current living situation and the future dream space you’re working towards.
4. Minimizing Disruptions
As hammers start swinging and dust fills the air, you may want to find more effective ways to manage disruptions during your home remodeling. For this, you could designate a clear renovation zone to confine the chaos. Consider setting up alternative living areas to maintain a semblance of routine.
You can also employ strategies to control noise, dust and inconvenience, such as sealing off construction areas and using noise-canceling solutions. Effective communication with contractors about your daily routines and preferences is the key to handling these issues.
By proactively addressing disruptions, you can create a more comfortable environment and reduce stress for both you and your family, ensuring a seamless renovation experience overall.
5. Dealing with Design Changes
Adapting to design changes is an integral part of any renovation journey. Try to remain flexible as you encounter unexpected alterations that might enhance the project.
Communicate openly with the contractors and designers to ensure seamless integration of all necessary changes. Assess the impact on the budget, timeline and overall project vision before making any major decisions. Additionally, try to embrace the creative possibilities that arise from design adjustments, and view them as opportunities to refine and enhance your original vision.
By accepting change and approaching it with an open mind, you can turn potential challenges into exciting avenues for innovation and improvement in your home remodeling project.
6. Materials and Supply Chain Challenges
Navigating materials and supply chain issues is a common aspect of home remodeling. You can be prepared for potential shortages by identifying alternative suppliers and materials.
Maintain clear communication with your contractor to stay informed about any delays and adjust your project timeline accordingly. Moreover, consider flexible design options that allow for substitutions without sacrificing quality. You could also research local availability and consider ordering materials well in advance to mitigate potential setbacks.
By anticipating and addressing these challenges, you can ensure a smoother renovation process and prevent unnecessary delays that could otherwise disrupt your project’s timeline and budget.
7. Permits and Regulations
Navigating the realm of permits and regulations is crucial for a successful home renovation. You will have to familiarize yourself with local building codes and zoning laws to ensure compliance.
Make sure to secure all the necessary permits before commencing any work to avoid legal complications and potential fines. You can also engage with your contractor to ensure that they have a clear understanding of regulatory requirements. Additionally, don’t forget to plan for potential inspection delays and factor them into your timeline.
By proactively addressing permit and regulation matters, you can sidestep unnecessary hurdles and ensure an efficient renovation process that adheres to all legal requirements and guidelines.
8. Finishing Strong
As your home renovation project nears completion, meticulous attention to detail becomes paramount. This is where you have to prioritize quality assurance by conducting thorough inspections of the work done.
Make sure to address any lingering issues promptly to achieve the desired finish. Engage in final walkthroughs with your contractor to ensure all aspects meet your expectations. Additionally, start preparing for the transition back to your newly renovated space by cleaning, organizing and adding personal touches.
By focusing on the final touches, you can confidently conclude your renovation with a sense of accomplishment, a renewed space, and a seamless transition back to comfortable living.
To Sum It Up
Overall, a well-thought-out home renovation project can be a rewarding journey that can elevate your living space to new heights. While challenges are inevitable, armed with the insights provided in this article, you’re better equipped to navigate them with confidence.
From meticulous planning and managing expectations to adapting to changes and regulations, a strategic approach ensures a smoother renovation process. By embracing flexibility, maintaining clear communication and prioritizing quality, you’ll not only transform your home but also your remodeling experience.
Remember, each challenge presents an opportunity for growth and creativity, ultimately leading to the realization of your dream space. So, begin your renovation and let your dream designs come to life within your home. Good luck!
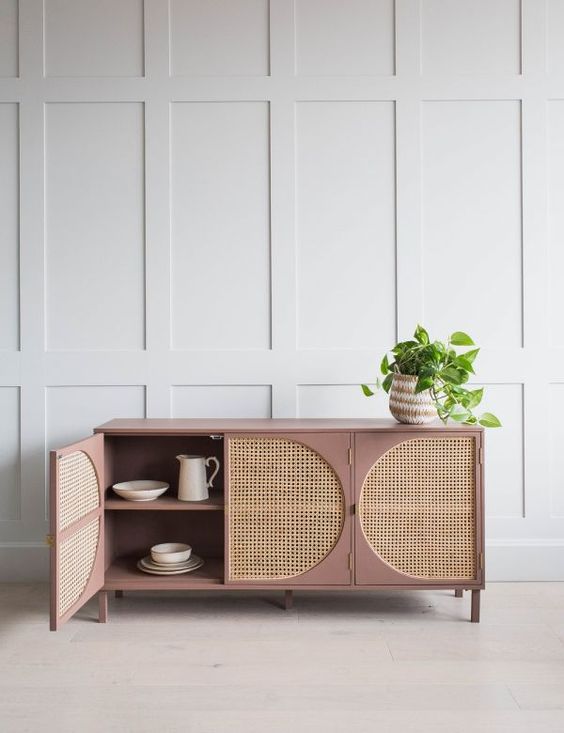
roohome.com– A cabinet table is a piece of additional furniture that you can use as an interesting spot or to add to the aesthetic value of your room. You can use this piece of furniture in the entryway, living room, or dining room. Some cabinet tables have drawers that you can use as storage to create a cleaner and more minimalist room. For the upper area, you can put some decorations that can make the cabinet table look stand out in the room. And, in this article, we have provided 20 Cabinet Table Decors you can follow. So, let’s check it out!
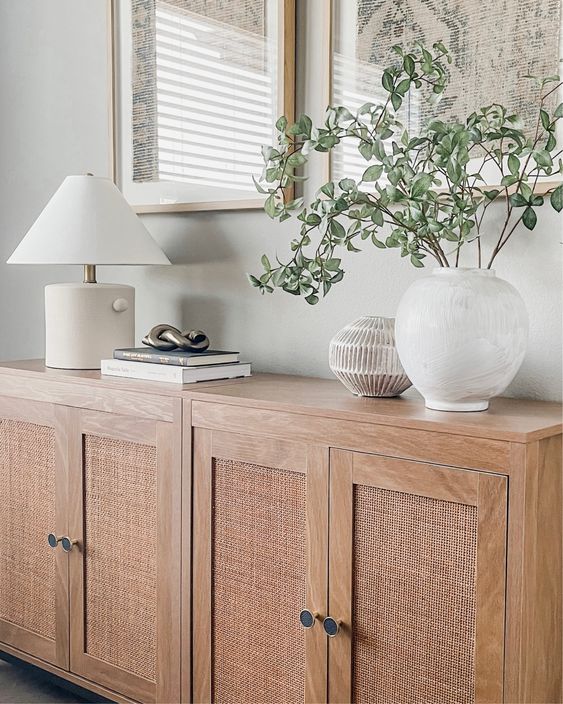
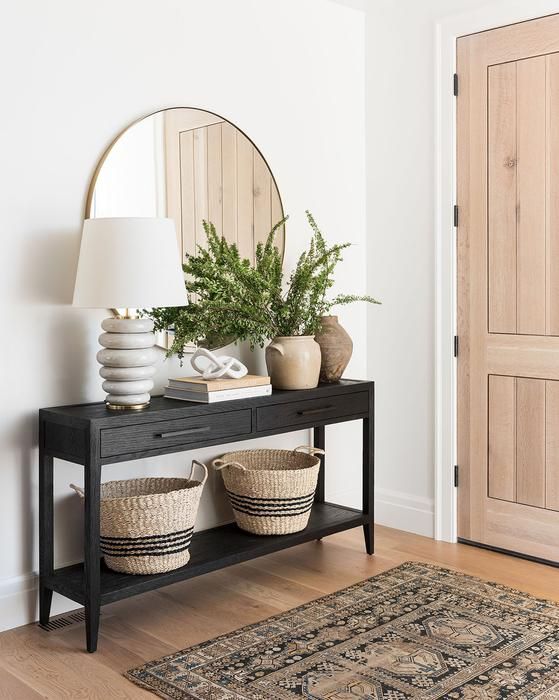
1. White Nuanced Decoration
Cc: Pinterest
The wooden cabinet table brings a natural impression to the room. So, it will be good to maintain this natural impression. Use white nuanced decorations, starting from table lamps, vases, books, and so on. Adding a green plant there can add a natural impression as well as provide freshness to the cabinet table area.
This one decoration would be better to be applied to a white room. Or, you can also place a cabinet table on the side of a whitewashed wall. So, with this, the white nuanced decoration will look more alive in the room. It is also good for maintaining the harmony of the appearance of the room itself.
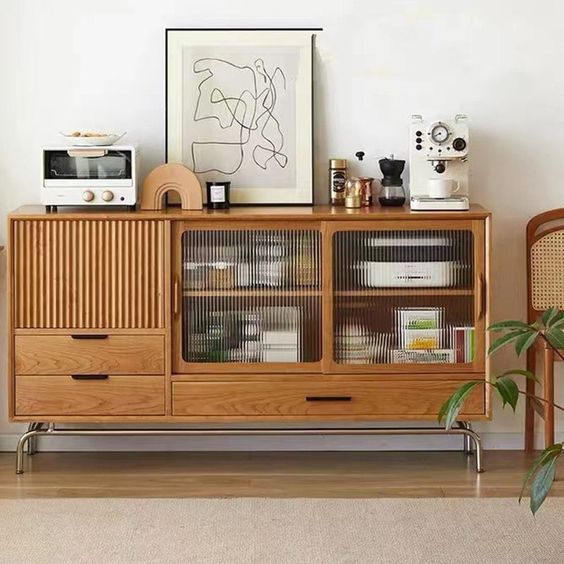
2. Kitchen Appliances
Cc: Pinterest
You could not just place kitchen appliances in the kitchen area. You can also put it and use it as decoration for the cabinet table. And, this becomes the next of 20 Cabinet Table Decors you can follow.
Use kitchen appliances that are not too big, such as instant coffee machines and microwaves. You can make it look busier by adding some interesting decorations such as a picture, several bottles of coffee and sugar, and so on.
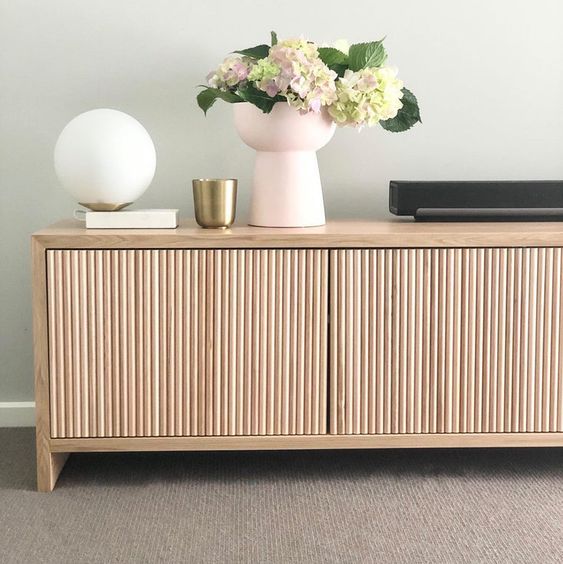
3. Small Decorations
Cc: Pinterest
This cabinet table looks so sweet with its simplicity. Small decorations look so beautiful on the table. There are white books showing the neutral side of this spot. The books are also stacked to make a small candle appear taller. This is also a great way to make the cabinet table look aesthetic.
Although very simple, a small plant manages to make it look dazzling. The green color of the plants seems to blend with the other decorations and also the wooden material of the cabinet table itself. Even though the plants used are small, they succeed in bringing freshness which makes this area feel more comfortable to look at.
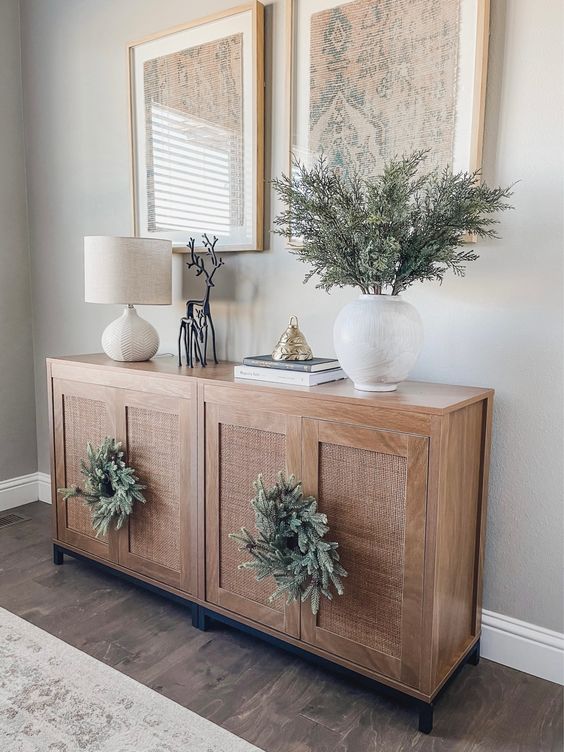
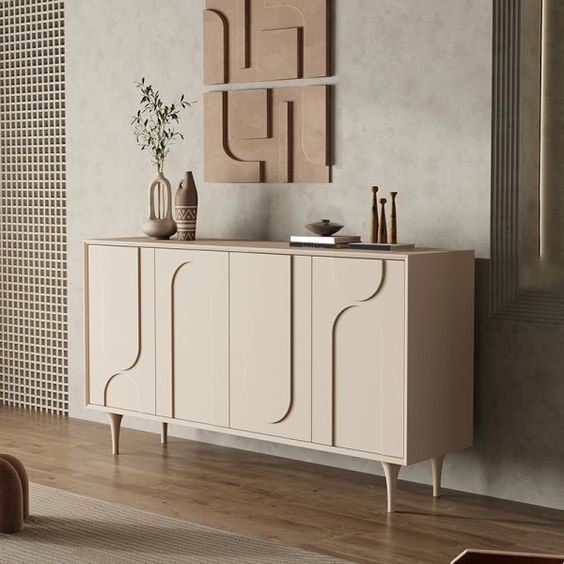
4. Something That Can Give Freshness
Cc: Pinterest
Bring freshness to the cabinet table is the next of 20 Cabinet Table Decors you can follow. Here, you can use several plants. Decorate the top area of the cabinet table with a green plant with a simple appearance. Use a white vase which can make it look more natural.
There are two drawers in the cabinet table which are used to add aesthetic value and freshness to the cabinet table. The drawers are decorated with green wreaths. The minimalist design fits perfectly with the wooden cabinet table.
5. Contemporary Touch Look So Simple and Attractive
Cc: Pinterest
This contemporary gives a simpler, sweeter, warmer, and calmer look. Shades of brown and gray are perfect for the calm room. Cabinet with a dove surface looks so pretty when exposed to sunlight coming through the window. Above it, a very pretty little decoration adorns the table.
There is a small plant that is used to add freshness and a natural impression to this spot. The plant succeeds in bringing other colors in a natural way so that it is easily accepted by contemporary design. Also, small plants go a long way in making the wood decor on the walls appear more natural.
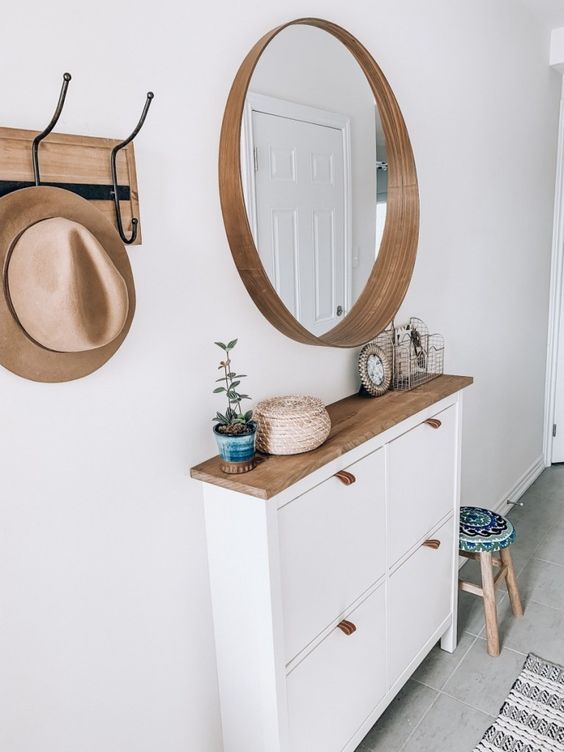
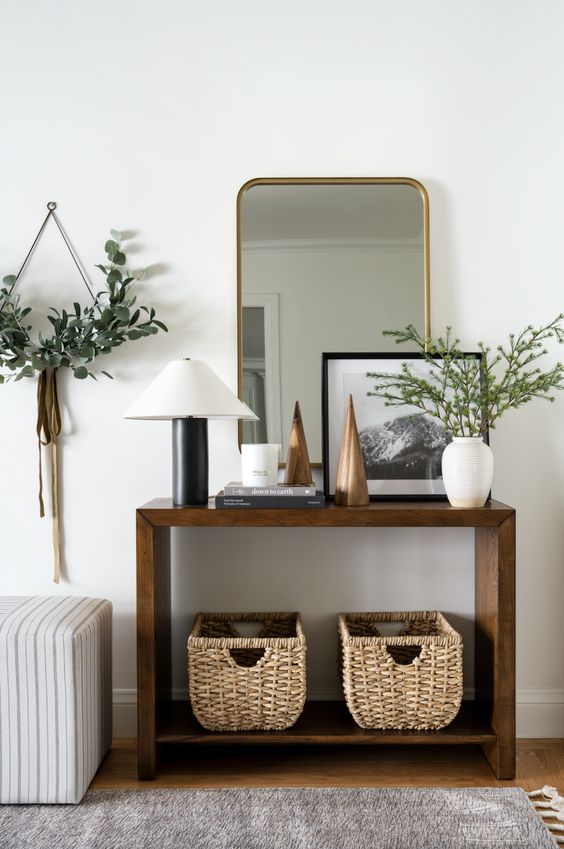
6. Mirror on The Table
Cc: Pinterest
For a simple cabin table, also use simple decorations. That way, it will look parallel and nothing will weigh against it.
The round mirror is the most suitable decoration for a simple cabinet table. The wooden frame has a color that matches the top cabinet table so that the appearance of this spot is harmonious.
The round mirror presents curved lines which really help soften the appearance of the cabinet table area. That way, even though the cabinet table looks very simple, it will not look stiff.
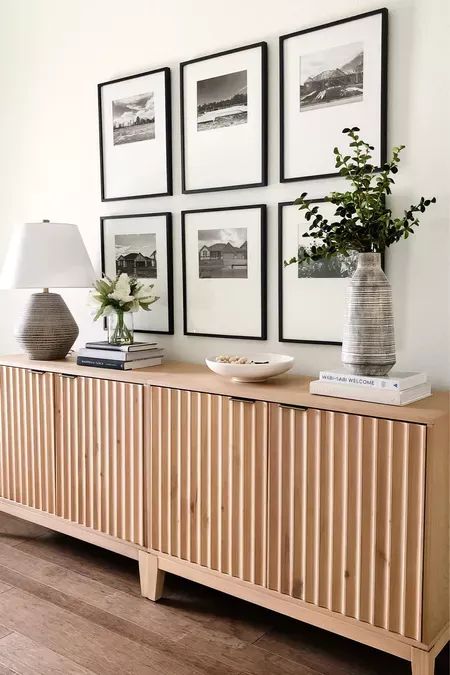
7. Black and White Pictures
Cc: Pinterest
Make the cabinet table an interesting spot and the main focus of the room. Take advantage of the empty wall in the cabinet table area. Here, you can make the wall a medium to show off your portraits. Make your work look old and natural with a black-and-white filter.
In order to make your pictures look stand out and pretty when hanging on the wall, use a frame. For white walls, black frames are the most appropriate. The black color also gives a bit of a firm impression to the cabinet table but still looks natural.
8. Vintage Arch Mirror Design
Cc: Pinterest
This small table is decorated with some big decorations which makes it look very tiny. However, this method actually makes it look more attractive and stand out in the room. Moreover, there is a vintage touch there.
The vintage arch mirror is a very fitting decoration for this cabin table. The gold frame brings another color to this area and makes it look even more charming. With a touch of vintage style, the cabinet table has an old look that takes you back to the 90s.
9. Table Lamp and Plant
Cc: Pinterest
The black cabinet table with a minimalist design looks perfect to beautify the entryway. The black color gives a firm impression which makes it immediately visible to the eye when entering the house. There is also a turkey carpet which is a friend of the cabinet table in filling in the entryway.
What makes the cabinet table look aesthetic is the table lamp with its unique design. The stalk is spiral shaped which makes it look so attractive. So, when the lights are turned on, the light will make it look more dramatic. Yellow lighting is the most appropriate for this table lamp. It can make the black color look calmer and warmer.
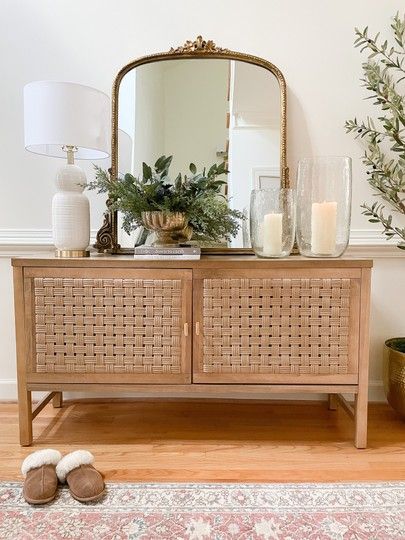
10. Put The Mirror on The Table
Cc: Pinterest
If you want to decorate the cabinet table in an easier way, try relying on mirrors. The large round mirror is the most appropriate for you to choose.
Usually, you will hang the mirror on the wall. However, in this one idea, make a mirror look attractive in a different way. So, instead of hanging it on the wall, you can put it on the table and lean it on the wall.
Add other decorations to help the mirror beautify the cabinet table area. You can make this area more natural and fresh with green plants. And also, decorate it with a table lamp to make it look beautiful at night.
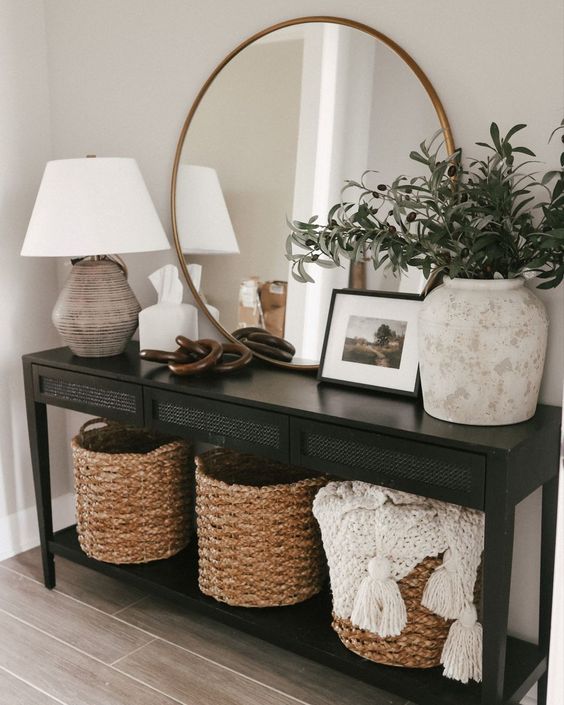
11. Rattan Baskets as Storages
Cc: Pinterest
Not all cabinet tables have drawers. So, if your cabinet table is like that (it does not have drawers), then you can add storage there. Choose natural storage places such as rattan baskets. For size, adjust it to the size of your cabinet table.
Here, two rattan baskets are not only a storage place for the cabinet table, but also a decoration that adds aesthetic value, a natural impression, and also the beauty of the cabinet table area.
12. Present Cloudless with A Colorful Painting
Cc: Pinterest
Create a cloudless ambiance through a cabinet table. Choose a blue cabinet table with a natural touch like the picture above. And, on the table, you can use two plants with different colors to add another color to this area as well as provide freshness to make the room feel comfortable.
For the wall area, hang a colorful painting with a fairly thick frame. The ivory-white frame looks beautiful when hung on the white wall panels. The combination of vibrant colors from the painting manages to create a bit of a cloudless ambiance in the room.
13. Do It Minimally with A Small Plant
Cc: Pinterest
It is okay if you want to make your cabinet table look very simple. Some cabinet tables have indeed been designed as attractive as possible by utilizing drawers and other parts. However, if you want to bring a decoration that can add to the beauty of the cabinet table, then do it minimally. And, plants are the most appropriate decoration for you to choose.
You can place the plant in a wicker basket or other vase that has a natural look. So that when placed on the table, it can look unified and harmonious. Besides that, plants are also decorations that not only add to the beauty of the cabinet table but can also bring freshness which can make the room feel more comfortable.
14. Look Pretty with Beautiful Flowers
Cc: Pinterest
For those of you who prefer a minimalist, elegant, beautiful, and feminine look, flowers are the decoration you can choose to fill your cabinet table. You can choose your favorite flowers. Several colors in the flowers will beautify and also make the cabinet area look more lively.
Make flowers look more beautiful by choosing the right vase. You can choose a vase with a minimalist design with colors that match the flowers. Or, you can also use a clay vase. This will really help in maintaining the natural impression of your wooden cabinet table.
15. A 3D Painting
Cc: Pinterest
Another decoration that you can choose to fill your cabinet table is a 3D painting. This decoration shows a texture that makes the appearance of the cabinet table look very attractive and aesthetic. And, to show off the texture of 3D painting, eliminate your desire to use frames. Here, you can immediately put a 3D painting on the table and lean it against the wall.
Because the texture of a 3D painting is enough to decorate and fill the cabinet table area, then you can do the next decoration minimally. You can choose a minimalist table lamp with a matching color which can make the cabinet table area beautiful at night. Also, lighting from a table lamp can make the texture of the 3D painting appear more clearly.
16. Put Your Magazine There
Cc: Pinterest
For you women who like collecting magazines, this is the time for you to use your magazines as decoration. You can use it to add aesthetic value to your cabinet table.
Choose 3-5 magazines to place on the cabinet table. So that the magazines look neat there, use an additional holder made of rattan. It is really good for a wooden cabinet table or your navy wooden table. And, on top of the magazines, you can put an interesting item that will become additional decoration.
17. Large Square Mirror with Black-Framed
Cc: Pinterest
The plain wall of the cabinet table is filled with a large square mirror. With a thin black frame, the mirror looks standing out on the whitewashed wall. A touch of black is perfect for your white light wooden cabinet table. White and black are indeed the most perfect color combinations.
Because of its large size, the reflection from the room can be seen very clearly in the mirror. It is a great way to make your small room feel more spacious. And also, mirrors have the property of reflecting light. So, the bigger the mirror, the more light it reflects into the room. That way, the room will look brighter.
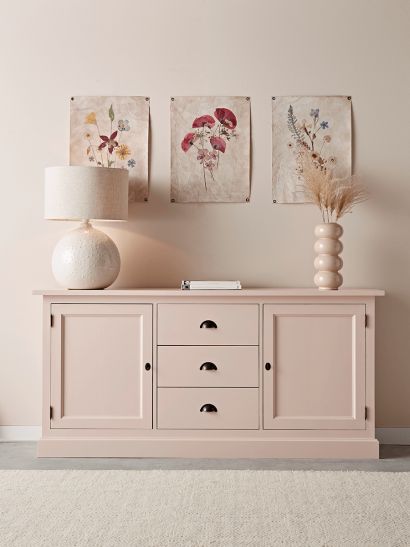
18. Look Soft and Pretty with Flowers Painting
Cc: Pinterest
The cabinet table has a color that matches the walls, making it look very harmonious. With a soft pink color, the appearance of the room becomes soft too. And also, you can feel the calm of this area. So, to maintain the calm atmosphere of this spot, decorate the cabinet table minimally. You just need to use a table lamp and a chocolate plant with a vase that matches the cabinet table.
For the wall area, you can fill it with three flower paintings. Different flower images have different colors, bringing more color to this area and making it look enchanting without disturbing the impression of the minimalist in this area.
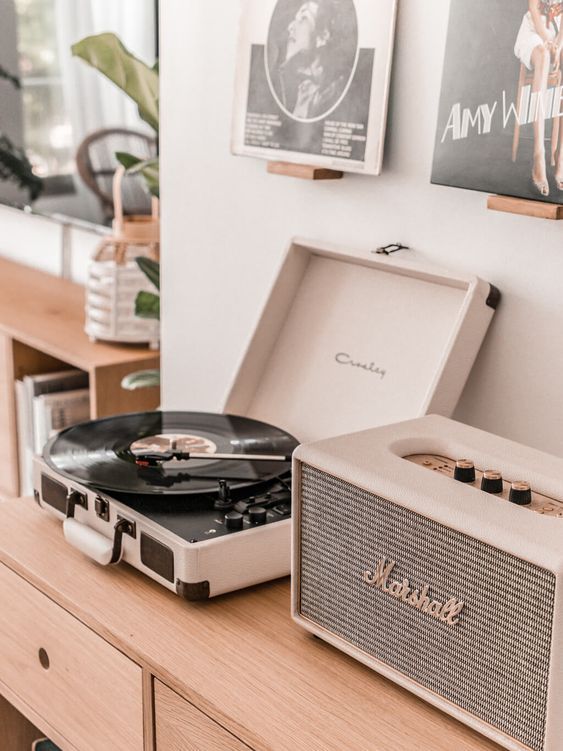
19. Vinyl Record Player
Cc: Pinterest
Decorate your cabinet table with something that suits your hobby or likes. For those of you who like to listen to music and make music a friend of your activities, then you can choose a vinyl record player as a decoration for your cabinet table. Right next to it, you can add a small speaker which can make the sound from the vinyl record player bigger. This is also a decoration that will add an aesthetic value to the room.
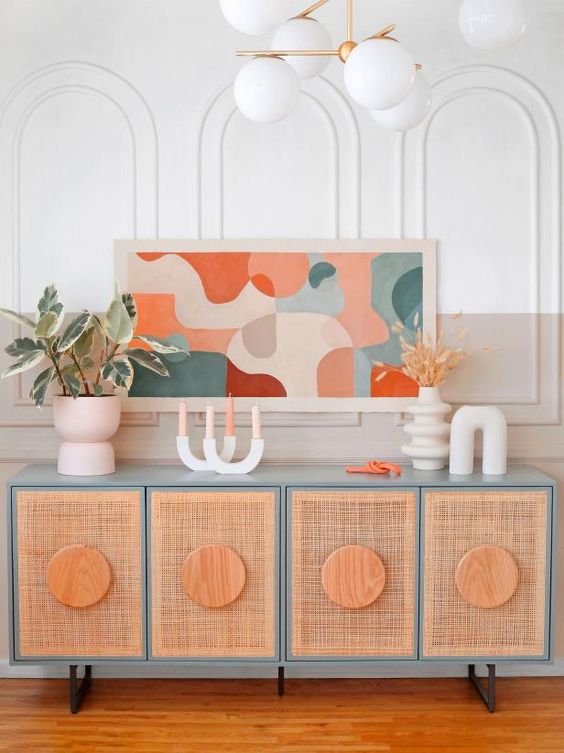
20. Simple Sculpture
Cc: Pinterest
Make your cabinet table look minimalist and contemporary. So, it will become up-to-date. Here, you can use a sculpture with a minimalist design. Choose a sculpture with a color that matches the cabinet table to maintain a minimalist appearance in this area. And, if you want to add other decorations for this room, a minimalist painting and simple plant is the most appropriate. And, this is the last of 20 Cabinet Table Decors you can choose from.
Final Words
The cabinet table is a piece of furniture that is often used to create an interesting spot in the room. And of course, this table is decorated with several items that can help it look more attractive. And, the points above are 20 Cabinet Table Decors that can make your cabinet table area charming and aesthetic. You can choose one or several of the decorations above for your cabinet table. However, also adjust the decoration to the theme, concept, and design of your room. So, good luck everyone!
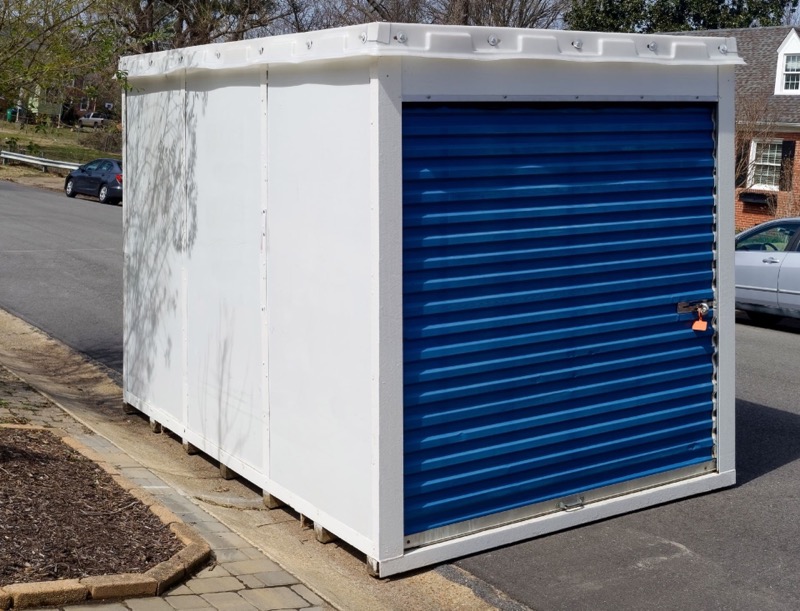
Renovations, whether big or small, can transform a living space into a haven that mirrors your personality and style. But amidst the excitement of giving a home or office a fresh look, comes the dilemma of managing belongings. Paint, debris, dust, and construction tools can pose risks to your cherished possessions. This is where innovative storage solutions come into play.
As renovations commence, safeguarding possessions becomes paramount. A cluttered space can be a risk of damage to items and hinder the renovation process. This makes portable storage a prime solution. These units can guarantee safety by allowing you to access your belongings whenever needed.
If you have a renovation project, here’s how you can keep your belongings safe and accessible with portable storage solutions.
Understanding Portable Storage Solutions
Before delving into how to ensure your possessions’ safety, it’s important to learn some essential things about portable storage solutions. Sometimes referred to as mobile storage, they’re essentially large containers that can be rented and delivered right to one’s doorstep. Once filled, they can be locked securely and either kept on-site or transported to a secure facility. Now, let’s delve into the many advantages of such solutions:
Flexibility: Unlike traditional storage units, these can be transported from one location to another. This means after a renovation, they can be easily moved to another site or returned to the facility.
Accessibility: Even if stored off-site, many providers offer round-the-clock access to your belongings, ensuring that essential possessions can be retrieved whenever necessary.
Security: These units are generally built with robust materials and come with lockable features. When combined with surveillance at facilities, it provides an added layer of protection.
Despite these benefits, the choice of portable storage largely depends on the volume of items to be stored and the nature of the renovation project. Therefore, it’s best to assess the situation before making a decision.
Tips For Storing Items Safely
Storing items in portable storage units during renovations requires meticulous planning to ensure safety, accessibility, and longevity of belongings. When using portable storage units, there are several strategies to ensure the utmost safety and organization of your belongings. Let’s explore these tips:
1. Categorize And Label
One of the important tips for keeping your belongings accessible and safe is proper organization. One effective way to achieve this is by categorizing your possessions, using some labeling techniques and performing a detailed inventory. For instance, it can be a good idea to prioritize items based on their usage frequency. Items that aren’t needed immediately, such as seasonal decorations, can be stored at the far end of the unit.
When it comes to labeling, use colored labels or stickers to differentiate between rooms or item types. For fragile belongings, utilize bold and clear markings like ‘FRAGILE’ or ‘HANDLE WITH CARE’ to alert anyone handling the box. Lastly, create a list of what’s inside each box. Attach a copy to the box and keep another separately. This can aid in locating items and act as a record in case of damage or loss.
2. Use Proper Packing Materials
Invest in quality packing materials to protect your belongings from external damage during the renovation project. Some common materials include:
Bubble Wrap: This is ideal for breakables like glassware, ceramics, and electronics. Wrap items individually to provide ample cushioning.
Packing Peanuts: These fill empty spaces in boxes, preventing items from moving around during transportation or shifting.
Furniture Covers: These are protective sheets or covers to shield furniture from dust, moisture, and scratches.
With these packing materials, you can keep your possessions safe and damage-free in a portable storage.
3. Perform Stacking
Another safety tip to consider is the art of stacking to keep your belongings stable and avoid getting them crushed. This means placing heavier items or boxes at the bottom and layering lighter ones on top.
To ensure proper stacking, begin with flat-surfaced and heavy items like books, appliances, or furniture pieces without legs, ensuring a solid foundation. Also, avoid overloading. While it’s tempting to fill boxes to the brim, it can weaken the box’s structure. Distribute weight evenly to avoid box deformities or breakages.
Moreover, monitor the height. Don’t stack boxes too high as taller stacks can become unstable, risking toppling and potential damage.
4. Leave Some Breathing Space
Another crucial aspect of storing items is ensuring adequate ventilation. Keeping your items safe in portable storage can be enhanced by leaving some breathing space. This can help prevent the growth of mold and mildew which can cause damage to your belongings. Hence, ensure that the unit has ventilation outlets. If not, consider leaving tiny gaps between stacks for airflow.
Additionally, place desiccants, like silica gel packets, in boxes, especially those containing electronics or fabrics. They help in absorbing excess moisture and prevent mold growth. Avoid plastic bags. While they seem like a good idea to prevent moisture, they can trap humidity and promote mildew growth. Use breathable fabric covers instead.
5. Ensure Maximum Security
Security is paramount when using portable storage. To maximize the protection of your belongings, it’s essential to invest in high-quality, weather-resistant locks. Padlocks with short arms are harder to cut, offering better security.
If the unit is on-site, perform daily checks to ensure that the lock hasn’t been tampered with. Lastly, insure valuable items in storage. While locks offer a line of defense, insuring valuable possessions provides a financial safety net in case of unexpected damages or theft.
Final Thoughts
Renovations are undoubtedly exciting, yet they come with their set of challenges. With portable storage solutions, safeguarding and accessing belongings doesn’t have to be one of them. By following storage best practices, possessions will remain safe, accessible, and ready to adorn the newly renovated space.
Your heat pump is essential to your home’s heating and cooling system. If it’s not functioning properly, it can cause great discomfort and potentially damage your living space. From common problems to troubleshooting tips and DIY solutions, this blog post covers everything you need to know about heat pump repair.
Common Heat Pump Problems and Warning Signs
Heat pumps are generally reliable, but they can experience problems from time to time. Some of the most common issues include refrigerant leaks, faulty thermostats, clogged air filters, and broken fan motors. If you notice any warning signs, such as poor temperature control, unusual noises, or an increase in energy bills, it’s time to call in a professional.
Troubleshooting Tips
Before calling a professional, there are a few things you can do to troubleshoot the problem with your heat pump. One of the first steps is to check the air filter to see if it’s clogged or dirty. A dirty air filter can restrict airflow, causing the heat pump to work harder than necessary. Another tip is to check the thermostat settings to ensure they’re set correctly. Additionally, you can inspect the outdoor unit for debris or dirt buildup that may block proper airflow.
DIY Repairs
It’s always best to call in a professional for serious problems, but there are some DIY repairs you can do. For instance, you can clean the outdoor unit by removing debris, dirt, and leaves that build up. Additionally, you can replace the air filter to improve airflow and save energy. If you’re handy with tools, you can fix minor issues such as a broken fan blade or a loose electrical connection.
Calling in Professionals
In many cases, it’s best to call in a professional for heat pump repairs. Experienced technicians have the knowledge, training, and tools necessary to diagnose and repair problems with your heat pump properly. If you’re uncomfortable with DIY repairs or the problem is more serious, it’s best to call in the pros. They can assess the problem, provide an estimate, and offer quick and reliable repairs to get your heat pump up and running again.
Maintenance and Prevention
One of the best ways to prevent heat pump problems is through regular maintenance. Maintenance can include simple tasks such as changing air filters, regular inspections, and cleaning outdoor units. Additionally, it’s wise to schedule routine maintenance with a professional. Regular tune-ups can help identify potential problems before they become major issues that require costly repairs or replacements.
Heat pump repair can be a daunting topic, but it doesn’t have to be. By following the tips and advice provided, homeowners can better understand and address heat pump issues and avoid major problems in the future. Remember to always be safe when performing DIY repairs, and don’t hesitate to call in the professionals when the problem is serious.
Indoor air quality is often overlooked, yet it plays a crucial role in maintaining your family’s overall health. With people spending approximately 90% of their time indoors, it is essential to create a healthy indoor environment. From respiratory problems to allergic reactions, poor indoor air quality can lead to a host of health issues. This blog post will discuss why indoor air quality is so important and what steps you can take to improve it.
The Dangers of Indoor Air Pollution
Indoor air can be contaminated by various sources, including chemical cleaners, cigarette smoke, pet dander, and even excess moisture. These contaminants can cause serious health problems, ranging from allergies and respiratory problems to cancer and heart disease.
For example, volatile organic compounds (VOCs) are chemicals found in paints, carpets, and other everyday items that can cause headaches and respiratory problems. Meanwhile, poor ventilation can lead to high levels of carbon monoxide, which can cause nausea, headaches, and even death.
How to Improve Indoor Air Quality
Fortunately, there are many steps you can take to improve your indoor air quality. One of the best ways to start is by investing in an air purifier. Air purifiers use filters to remove contaminants, leaving you with cleaner, fresher air.
Another simple yet effective solution is to keep your home well-ventilated. This means opening windows and doors to let fresh air in and running fans or air conditioning units to circulate air throughout your home.
It’s also vital to avoid using harsh chemical cleaners, which can release dangerous VOCs into the air. Instead, opt for natural cleaning solutions, like vinegar and baking soda.
Other steps include investing in houseplants, which can act as natural air purifiers, and limiting your use of scented candles or plug-in air fresheners, which can emit harmful chemicals.
The Benefits of Improving Your Indoor Air Quality
By taking steps to improve your indoor air quality, you’ll reap a variety of benefits. First and foremost, you’ll protect your health by reducing exposure to harmful pollutants. This means you’ll be less likely to develop allergies, asthma, or other respiratory problems.
Moreover, improving your indoor air quality can also boost your overall well-being. Studies have shown that clean air can lead to better sleep quality, increased productivity, and even lower stress levels. So not only will you feel better physically, but you’ll also feel better mentally and emotionally.
In conclusion, indoor air quality is a vital aspect of our health that’s often overlooked. Whether you’re dealing with allergies or respiratory problems or want to improve your overall well-being, indoor air quality can make a huge difference. Investing in an air purifier, ventilating your home, and using natural cleaning solutions can provide you and your family with cleaner, fresher air. So go ahead and take those first steps towards a healthier, happier life today! Consult your local HVAC professionals for more advice and tips on improving your home’s indoor air quality.
Picture this: a home that’s not just a haven of luxury but also a sanctuary for the environment. As the world embraces the importance of sustainable living, the concept of eco-friendly home designs has taken the spotlight.
Yes, you can have the best of both worlds – a home that pampers you with opulence while embracing a greener way of life. Join us as we explore the delightful realm of custom eco-friendly home designs, where luxury and sustainability hold hands and create magic.
The Green Revolution in Home Design
Gone are the days when eco-friendly designs were limited to minimalist aesthetics and basic functionalities. Today, architects and designers are turning the tide with custom home designs that redefine luxury while respecting the planet. These homes are more than just energy-efficient; they’re a statement of conscientious living.
Imagine walking into a home that’s bathed in natural light, thanks to strategically placed windows that maximize daylight. The same windows are designed to optimize cross-ventilation, bringing in fresh air and reducing the need for artificial cooling. It’s not just about energy savings; it’s about crafting a home that aligns with the rhythms of nature.
Luxury Meets Sustainability
Now, let’s talk about luxury. Contrary to popular belief, eco-friendly doesn’t mean compromising on opulence. In fact, it’s quite the opposite. Sustainable luxury homes boast features that elevate your living experience to new heights.
From sleek, solar-paneled rooftops that harness the power of the sun to provide electricity, to smart home systems that allow you to control lighting, temperature, and security with a simple touch – these homes are designed with your comfort in mind.
And let’s not forget about the stunning interiors crafted with responsibly sourced materials. Imagine the feel of reclaimed wood flooring underfoot, a reminder of nature’s beauty brought into your living space. These homes offer an immersive experience where luxury and sustainability intertwine harmoniously.
Details:
Novus Homes
32 Mumford Pl, Balcatta WA 6021
(08) 9240 8001
https://www.novushomes.com.au
Savings that Make Cents (and Dollars)
“But isn’t sustainable luxury expensive?” you might wonder. While the upfront costs of eco-friendly features can be a bit higher, they’re investments that pay off in the long run. Think about it: a home with efficient insulation, energy-saving appliances, and renewable energy systems can significantly slash your utility bills.
Solar power, for instance, not only reduces your carbon footprint but also provides you with energy independence and potential savings over the years. Plus, eco-friendly homes often come with certifications like LEED (Leadership in Energy and Environmental Design), adding value to your property and making it more attractive to potential buyers in the future.
Tailoring Sustainability to Your Style
One of the beauties of custom eco-friendly home designs is their adaptability. Sustainability doesn’t adhere to a one-size-fits-all approach; it can be tailored to suit your unique preferences. Whether you’re a fan of modern architecture with sleek lines and minimalist interiors or you lean toward a more rustic, cozy aesthetic, eco-friendly design principles can be woven seamlessly into your chosen style.
Imagine a modern home with rainwater harvesting systems that nourish your garden, or a rustic cabin with passive solar heating that keeps you snug during the colder months. The possibilities are as diverse as your tastes.
Creating a Legacy of Green Living
When you choose a custom eco-friendly home, you’re not just making a decision for the present; you’re creating a legacy for the future. These homes are designed to stand the test of time, both in terms of structural integrity and environmental impact.
They often incorporate durable materials, efficient insulation, and water-saving fixtures that reduce maintenance and resource consumption over the years. This commitment to sustainability extends beyond your own living experience – it’s a gift you’re leaving for generations to come.
Final Thoughts
As we journey into an era that values both luxury and sustainability, custom eco-friendly home designs are emerging as the epitome of conscious living. These homes seamlessly blend opulence with eco-conscious features, creating a haven that not only spoils you with comfort but also respects the environment.
From energy efficiency to responsible material choices, every aspect of these homes is a celebration of the planet we call home. So, if you’re envisioning a life of indulgence that’s also rooted in responsibility, consider the marvels of custom eco-friendly home designs.
Hot water is essential to any restaurant, hotel, or craft brewery’s operations. Selecting an appropriately sized commercial water heater installation can prevent costly mistakes from being made, such as choosing too small of size or oversizing too large of an option.
Want to hire a professional for commercial water heater services in Chicagolands? Consider J. Blanton Plumbing.
What does a commercial water heater do?
A commercial water heater is a larger and more powerful unit than the residential variety. It produces hot water at a high flow rate to meet the needs of businesses that require large volumes of hot water for their operations.
Commercial heaters are designed to handle many gallons of hot water per day, while residential models typically provide much less.
Tank to tank installation
A licensed plumber should only require 2 to 3 hours to replace an identical tank water heater with one of a similar type. This process includes shutting off the water supply, draining the old unit, connecting new water and gas supply lines, and testing before completion.
However, depending on other factors like existing plumbing projects or the way your business layout is designed, it may take longer.
Tank to tankless installation
A licensed plumber typically can have your tankless water heater up and running in 4 to 6 hours, though this depends on the unit type and your business.
Once your old unit has been disconnected, drained, and taken away, your plumber will install your tankless gas water heater according to the manufacturer’s instructions, mounting it to a wall while leaving enough clearance.
They’ll need additional time to install air vents, as well as new water and power lines.
Your plumbing professional may also need to add sediment traps, shut-off valves, and pressure reduction valves.
Tankless to tankless installation
Replacing a tankless heater and switching out a tankless model for another is perhaps the quickest and simplest, requiring a minimum of 1 hour. Depending on your existing system though, it may extend to 3 hours.
Conclusion
Installing a commercial water heater is generally not something that you can do yourself, as it requires specialized knowledge and tools. Hiring a professional who understands what they’re doing will ensure your installation goes smoothly and quickly.
When choosing the right plumber, make sure you select one with both experience and expertise in the particular type of water heater system you have or are planning to install.
The type of water heater you choose and the complexity of the installation will depend on your specific needs. However, when properly installed by a qualified professional, it should provide reliable hot water for years to come.
And since an efficient system can save energy costs, the savings from installing a quality system may offset any associated installation costs. Investing in quality services and parts can go a long way in extending the life of any commercial water heater.
When you’re in the market for a property, it’s crucial to do your homework and carefully select the right one based on factors like price, location, and essential features. If you’re considering buying a condo in Marco Island, there are several key points you need to be aware of before making a decision.
Marco Island boasts a vibrant real estate market due to its popularity and strong investment potential. People from around the globe are drawn to Marco Island for property purchases, with a diverse array of options available. From luxurious beachfront condos to properties in golf communities and lavish family homes, the choices are abundant.
Here are some key aspects to keep in mind when considering a condo purchase on Marco Island:
Familiarize Yourself with Marco Island: Before diving into property buying, take the time to learn about this world-class resort island and its offerings. The favorable weather and abundant Florida sunshine are standout features. Outdoor recreational activities abound, and the island experiences a significant population increase during peak seasons, offering premier dining and shopping experiences.
Establish Your Budget: Especially if you’re a first-time buyer, understanding your financial limits is crucial. Determine the type of property that aligns with your needs. When looking into Marco Island condos, there are numerous options to explore, including vacant plots that can be developed.
Benefits of Owning on Marco Island: Investing in property here is a smart move, as the island attracts travelers seeking luxury holidays or their very own vacation homes. Furthermore, you have the opportunity to generate additional income by renting out your property for a majority of the year.
Awe-Inspiring Scenery: Regardless of whether you plan to permanently reside on Marco Island or rent out your vacation home, breathtaking scenery envelops the island. This natural beauty serves as a major attraction for tourists and can translate into a solid real estate investment. Don’t underestimate the value of views—bay, ocean, and inland/garden—that come with waterfront condos on Marco Island.
Diverse Property Selection: Whether you desire a high-end condo or a spacious family residence, the experts from Marco Island Florida Real Estate will offer a variety of property types. The market is secure and dependable, delivering strong returns on investments. This diversity contributes to the island’s desirability.
Simplified Real Estate Transactions: Marco Island’s property market is conducive to both buyers and sellers, making transactions relatively easy. The presence of interested buyers ensures a smooth selling process. Many buyers view Marco Island property as an attractive investment due to its promising nature, popularity, and luxurious living opportunities. To navigate this market successfully, it’s wise to engage a reputable real estate company that’s based on the island.
Ideal for Retirement Planning: Purchasing a Marco Island condo for your retirement is a strategic move. Watch your property value appreciate over time, while potentially earning rental income to cover expenses. When the time comes, you’ll have a property ready for you and your family, positioned in one of the most sought-after locations.
Marco Island is not only a hotspot for real estate investors but also a favored vacation destination for discerning travelers. This unique combination makes it an attractive option for those seeking their own piece of real estate, whether for permanent residence or investment purposes. Experience stunning views, luxurious amenities, and stress-free living by acquiring a Marco Island condo, solidifying your place in this prime location.